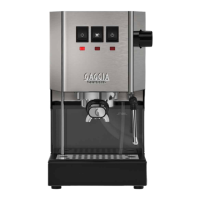
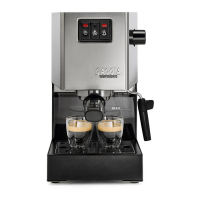
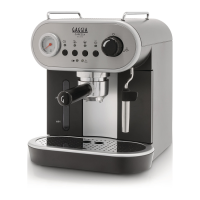
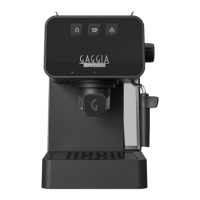
The Gaggia Espresso machine is designed for home use, offering a perfect espresso with distinctive crema. It is available in three models: Espresso Evolution, Espresso De Luxe, and Espresso Style, all identified by the product code EG2115 (SIN045) or EG2111 (SIN045).
Function Description
The Gaggia Espresso machine allows users to prepare espresso with pre-ground coffee or single-dose pods, and to froth milk for cappuccinos. It features a user-friendly interface with dedicated buttons for ON/OFF, Coffee, and Steam, along with a steam/hot water knob. The machine incorporates a pre-brewing function to enhance coffee aroma extraction and maintains a constant temperature for optimal brewing.
Important Technical Specifications
- Power Supply: See the data plate inside the water tank compartment.
- Machine Body Material: Thermoplastic.
- Dimensions: 255 x 199 x 303 mm.
- Weight: 3.7 kg.
- Power Cord Length: 900 mm.
- Control Panel: Frontal.
- Cup Size: Up to 76 mm with drip tray inserted, 102 mm without it.
- Water Tank: 1.2 liters, removable.
- Pump Pressure: 15 bar.
- Boiler: Stainless steel boiler.
- Safety Devices: Thermal fuse, maximum pressure valve.
Usage Features
First Installation and Circuit Priming:
Upon first use or after prolonged inactivity, the water tank (9) should be rinsed and filled to the MAX level. The power cord is then plugged in, and the ON/OFF button (1) is pressed. To prime the circuit, a container is placed under the Pannarello (8), and the steam/hot water knob (5) is turned counter-clockwise to dispense hot water until all three buttons (ON/OFF, Coffee, Steam) flash simultaneously, indicating the knob should be closed. The ON/OFF button will then become steady, and the coffee button (2) will flash until the machine reaches the factory-set temperature.
Filter Holder:
The machine comes with a 2-cup "Crema perfetta" filter (12) pre-fitted in the filter holder (19), and a 1-cup "Crema perfetta" filter/single-dose pod (13) with a "Pod System" (14). To insert the filter holder, align the triangle on its handle with the icon on the brew group (20) and turn it from left to right until it's aligned or slightly shifted rightwards. Removal is done by turning it from right to left.
Preparing Coffee (Pre-ground):
- Preheat the filter holder by inserting it into the brew group, placing a cup underneath, and dispensing about 150ml of hot water by pressing the coffee button (2).
- Remove the filter holder, discard water, and fill with 1 scoop for a single shot or 2 level scoops for a double shot, tapping lightly to even out the coffee powder.
- Tamp the coffee evenly and smoothly using the supplied tamper.
- Clean any excess coffee from the filter holder rim.
- Insert the filter holder correctly.
- Place cups under the filter holder.
- Wait for the coffee button to be steady, then press it to start brewing.
- Press the coffee button again to stop brewing once the desired volume is reached.
- After brewing, remove the filter holder, empty the puck, and clean any residue.
Preparing Coffee (Pods):
- Use the special pod filter (13).
- Place the pod into the filter, ensuring the paper does not stick out.
- Position the "Pod System" (14) onto the pod.
- Follow steps 7-9 for pre-ground coffee.
Note: Wait about 10 seconds before slowly removing the filter holder to avoid scalding from residual water.
Memo Function:
This function allows users to save their preferred brewing time.
- Prepare coffee as usual.
- Hold the coffee button when it's steady; the machine will enter MEMO mode and begin brewing.
- Release the coffee button when the desired volume is reached. All buttons will flash twice to confirm the setting is saved.
To disable the MEMO function, hold the ON/OFF button for a few seconds until the steam, coffee, and ON/OFF buttons flash twice.
Frothing Milk for Cappuccino:
- Use cold whole milk (approx. 5°C) with at least 3% protein and 3.5% fat for best results.
- Press the steam button (3); the coffee button will turn off, and the steam button will flash.
- Once the steam button is steady, the machine is ready.
- Purge the steam tube by turning the steam/hot water knob (5) counter-clockwise for a few seconds until only steam comes out, then close the knob.
- Fill a jug with milk (about 1/3 full) and insert the Pannarello (8).
- Turn the steam/hot water knob counter-clockwise to start frothing, swirling the jug gently up and down.
- Once desired froth is achieved, turn the knob clockwise to stop.
- Tap the jug lightly on a worktop and let it rest for 30 seconds for smoother milk.
- Press the steam button to exit the function.
- If both steam and coffee buttons flash, the temperature is too high for brewing coffee.
- Clean the circuit by turning the steam/hot water knob counter-clockwise for a few moments to remove milk residue.
Lowering Boiler Temperature:
- Place a container under the Pannarello.
- Turn the steam/hot water knob counter-clockwise to dispense hot water until all three buttons flash, then close the knob.
- The coffee button will become steady, indicating the machine is ready to brew coffee.
Hot Water Dispensing:
- Place a cup under the Pannarello.
- Turn the steam/hot water knob counter-clockwise to dispense hot water.
- Turn the knob clockwise to stop dispensing.
Energy Saving:
The machine has an auto power-off function. To restart, press the ON/OFF button; the coffee button will flash until the set temperature is reached.
Maintenance Features
Cleaning the Pannarello:
- Daily: Remove the lower part (15), rinse with running water, and reassemble. Open the steam/hot water knob briefly to clear milk residue.
- Weekly: Remove both lower (15) and upper (16) parts, rinse with running water. Clean the steam tube with a damp cloth. Reassemble.
Cleaning the Filter Holder, Filters, and "Pod System":
- Daily: Remove the filter from the filter holder and wash both with warm water. If the "Pod System" (14) was used, wash it too.
- If brewing malfunctions, steep filters in boiling water for 10 minutes, then rinse. Gaggia cleaning tablets are recommended for thorough cleaning.
Note: Only remove the filter when the filter holder has cooled completely to avoid scalds.
Cleaning the Screen:
- After each coffee brew: Remove the filter holder, brush away coffee residue from the gasket and screen. Clean with hot water by pressing the coffee button to dispense a cup of water.
Cleaning the Grid and Drip Tray:
Remove the drip tray (17) and grid (18) and wash with running water. Do not use abrasive products.
Cleaning the Water Tank:
Remove the water tank (9) and wash with running water. Ensure silicon hoses (6) are correctly positioned when reinserting.
Descaling:
When the ON/OFF button turns orange, descaling is needed. Use only Gaggia descaling solution.
- Disable MEMO function and remove the filter holder.
- Remove and empty the water tank.
- Pour HALF the descaling solution into the water tank and fill to MAX with water.
- Remove the Pannarello (8).
- Turn on the machine.
- Press the coffee button to dispense 1 cup (approx. 150ml) from the brew group.
- Turn the steam/hot water knob to dispense 1 cup (approx. 150ml) from the steam tube.
- Turn off the machine and let the descaler sit for 15-20 minutes.
- Turn on the machine.
- Dispense 1 cup (approx. 150ml) from the brew group and another cup (approx. 150ml) from the steam tube.
- Turn off the machine for 3 minutes.
- Repeat steps 10-11 until the water tank reaches MIN level.
- Rinse the tank with fresh water and fill to MAX.
- Place a large container under the brew group.
- Turn on the machine.
- Press the coffee button to dispense water until it stops automatically (about halfway down the tank).
- Place a large container under the steam tube.
- Turn the steam/hot water knob counter-clockwise to dispense remaining water until MIN level, then close the knob.
- Fill the tank to MAX and dispense all water from the brew group until MIN.
- Repeat dispensing a full tank from the steam tube.
- The descaling cycle is complete.
- Insert the filter holder (rinsed) and refit the Pannarello.
- Hold the coffee and steam buttons for about 5 seconds; the ON/OFF button will flash, and the orange LED will reset, indicating the machine is ready.
Note: If necessary, prime the circuit after descaling.