

J
Jenny DavisSep 12, 2025
What to do if Gardena Lawn Mower is upside down?
- JJulia MarksSep 12, 2025
If your Gardena Lawn Mower is upside down, it means it is leaning too much or has turned over. Turn the mower the right way up.
What to do if Gardena Lawn Mower is upside down?
If your Gardena Lawn Mower is upside down, it means it is leaning too much or has turned over. Turn the mower the right way up.
Why Gardena R45Li mows for shorter periods?
If your Gardena Lawn Mower is mowing for shorter periods than usual between charges, grass or another foreign object may be blocking the blade disc. Remove and clean the blade disc.
Why does my Gardena R45Li Lawn Mower say no loop signal?
A 'no loop signal' error on your Gardena Lawn Mower can occur for several reasons. It could be due to the transformer not being properly connected, so check the wall socket and the connection of the low voltage cable to the charging station. Also, the boundary wire might not be correctly connected to the charging station. In some cases, metal objects or buried cables nearby can cause disturbances; try moving the boundary wire. Finally, the connection between the mower and the charging station might be broken. To fix this, place the mower in the charging station and generate a new loop signal via Security -> New loop signal.
What to do if Gardena Lawn Mower cutting system blocked?
If the cutting system of your Gardena Lawn Mower is blocked, it's likely due to grass or another object wrapped around the blade disc. Check the blade disc and remove any obstructions. Alternatively, the blade disc might be sitting in a pool of water. If this is the case, move the mower and try to prevent water from collecting in that area.
Why Gardena Lawn Mower has no drive?
If your Gardena Lawn Mower has no drive, it could be because it has gotten caught on something. Free the mower and identify the reason for the lack of drive. If wet grass is the cause, wait until the lawn dries before using the mower. Also, if the working area includes a steep slope, this could be the reason. Maximum guaranteed slope is 25%. Steeper slopes should be isolated. Another reason could be that the guide wire is not laid at an angle on a slope. If the guide wire is laid on a slope, it must be laid at an angle across the slope.
How to fix Gardena R45Li Lawn Mower left wheel motor blocked?
If the left wheel motor of your Gardena Lawn Mower is blocked, it's likely because grass or another object has wrapped around the drive wheel. Inspect the drive wheel and remove any obstructions.
What to do if Gardena R45Li goes outside working area?
If your Gardena Lawn Mower is going outside the working area, it could be due to several reasons related to the boundary wire. The boundary wire connections to the charging station might be crossed, so ensure they are correctly connected. Also, the boundary wire may be too close to the edge of the working area, laid in the wrong direction around an island, or there might be disturbances from metal objects or buried cables nearby. In any of these cases, check that the boundary wire has been laid correctly or try moving it. Another reason may be that the robotic lawnmower finds it hard to distinguish the signal from another robotic lawnmower installation close by. In this case, place the robotic lawnmower in the charging station and generate a new loop signal via Security -> New loop signal....
What to do if Gardena R45Li displays right/left wheel overload?
If your Gardena Lawn Mower displays a 'right/left wheel overloaded' message, it means it has gotten caught on something. Free the mower and identify the reason for the lack of drive. If wet grass is the cause, wait until the lawn dries before using the mower.
Why Gardena Lawn Mower vibrates?
If your Gardena Lawn Mower is vibrating, it is likely due to damaged blades causing imbalance in the cutting system. Inspect the blades and screws, and replace them if necessary.
What to do if Gardena Lawn Mower charging station is blocked?
If the charging station of your Gardena Lawn Mower is blocked, it might be because the contact between the charging strips and contact strips is poor, causing the mower to make repeated charging attempts. Ensure the mower is properly placed in the charging station and that the charging strips and contact strips make good contact. Alternatively, an object might be obstructing the mower; remove any such object.
Details for recording serial number, PIN code, and product registration key for security.
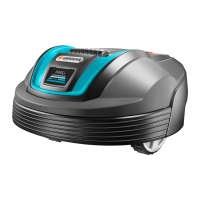
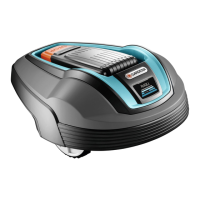
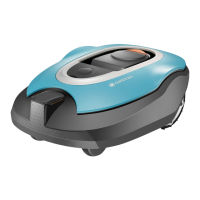
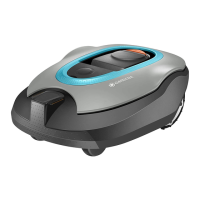
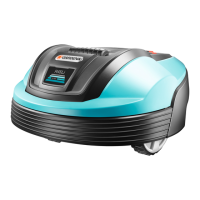
General overview of the robotic lawnmower, its benefits, and features.
Information on the lawn size, mowing performance, and battery charging times.
Explains the cutting principle and recommended mowing conditions.
Describes how the mower operates, navigates obstacles, and uses sensors.
Explains the random mowing pattern and importance of blade maintenance.
Details how the mower finds the charging station using the guide wire.
Lists and illustrates all components of the robotic lawnmower and its accessories.
Explains the meaning of various safety and operational symbols on the product.
Defines warning symbols and terms used in the manual for safety.
Outlines general safety guidelines for operating the appliance.
Covers operator responsibility, child supervision, power supply safety, and battery handling.
Provides specific safety rules for operating the robotic lawnmower.
Details appropriate usage, supervision, and warning signs for public areas.
Step-by-step instructions for safely lifting and moving the lawnmower.
Safety precautions to be taken during maintenance procedures.
Safety measures to protect the mower and charging station during thunderstorms.
Overview of the installation chapter and contents of the carton.
Identifies the four main components required for installation.
Guidance on planning the installation and initial steps before setup.
Lists the tools required for installing the robotic lawnmower.
Explains the functions of the charging station.
Provides criteria for selecting the optimal location for the charging station.
Guidelines for placing and connecting the power supply unit.
Step-by-step instructions for installing and connecting the charging station.
How to charge the robotic lawnmower's battery.
Explains the different methods for installing the boundary wire.
Guidance on planning the boundary wire layout around the working area and obstacles.
Details how to position the boundary wire relative to various obstacles.
Instructions for isolating areas like flowerbeds using the boundary wire.
How to set up and manage secondary mowing areas.
Advice on handling narrow passages and their impact on mowing.
Guidelines for laying the boundary wire on slopes and cutting area limits.
Detailed instructions on how to staple or bury the boundary wire.
How to create an eyelet for connecting the guide wire to the boundary wire.
Instructions and cautions for splicing the boundary wire using original couplers.
Step-by-step guide to connecting the boundary wire to the charging station.
Explains the purpose and installation of the guide wire for navigation.
Detailed steps for laying and connecting the guide wire to the charging station.
How to verify the loop signal and installation using the charging station indicator.
Guides through the initial setup, language selection, and calibration process.
Procedure to test the mower's ability to dock correctly with the charging station.
Overview of the control panel's display and keypad functions.
Detailed explanation of accessing functions via menus.
Describes the function of each button group on the keypad.
Explains the information displayed on the control panel screen.
How to navigate and select options within the submenus.
Visual representation of the menu hierarchy for different models.
Explains the timer function for controlling mowing periods and avoiding lawn damage.
Provides recommended timer settings based on lawn area and work days.
Step-by-step instructions for setting the timer functions like work hours and days.
Specific installation settings for R70Li and R80Li models, including guide width and remote start.
Explanation of guide width settings and corridor formation.
How to use remote start to reach distant garden areas.
Setting the frequency for remote start based on remote area size.
How to set the distance for remote start to reach a specific area.
Instructions for setting up a second remote start function.
How to test installation settings for remote start functions.
Procedure for testing guide width and calculating remote area distance.
Procedure for testing the robotic lawnmower's docking with the charging station.
Setting the distance the mower travels past the boundary wire before turning.
Settings related to security features like PIN code and alarm.
Steps to change the mower's PIN code for security.
Options for setting security levels (Low, Medium, High).
How the time lock feature prevents operation without a PIN.
Setting the mower to request a PIN on startup or hatch open.
Configuring the alarm function triggered by incorrect PIN or lifting.
How to generate a new loop signal for unique mower-charging station links.
Access to general settings like ECO mode, time, language, and country.
How to activate ECO mode to save energy by turning off loop signals.
Setting the current time, date, and their formats.
How to select the preferred language for the mower's interface.
Selecting the country where the robotic lawnmower will operate.
Options for controlling display backlight for visibility.
Using guide wire for remote start functionality.
Testing the guide wire following capability of the mower.
Function to reset all user settings to factory defaults.
Displays information about the mower's serial number and software versions.
A diagram illustrating the menu structure for specific models.
A diagram showing the menu structure for R70Li and R80Li models.
Examples of garden layouts and recommended installation settings.
Installation and timer settings for an open, level garden area.
Recommended settings for a 400 m² open garden area.
Installation advice for gardens with islands and slopes.
Settings for an L-shaped garden with islands and a narrow passage.
Installation for a U-shaped garden with a narrow passage.
Settings for asymmetrical areas with narrow passages and islands.
Setup for areas connected by multiple narrow passages.
How to manage and cut a secondary mowing area.
Instructions for operating the main power switch.
Step-by-step guide on how to start the robotic lawnmower.
Explains how to choose between HOME, AUTO, and MAN operating modes.
How to stop the robotic lawnmower and open the hatch.
Instructions for switching off the robotic lawnmower using the main switch.
Managing the timer and understanding standby periods for optimal operation.
Information on the inbuilt standby periods for the mower.
How to calculate and set the timer for mowing schedules.
An example illustrating timer settings for a specific model.
Procedures for charging a depleted battery.
Step-by-step guide to adjust the cutting height of the mower.
Importance of regular maintenance for reliability and service life.
General instructions for cleaning the mower, including cautions.
Cleaning the chassis and checking the blade disc for rotation and damage.
Cleaning the underside of the chassis.
Cleaning the mower's wheels for optimal performance.
How to clean the exterior body of the robotic lawnmower.
Regular cleaning of the charging station to ensure proper docking.
Safety warnings and instructions for replacing the mower blades.
Detailed steps for safely removing and installing new blades.
Information on the battery's service life and replacement.
Step-by-step guide for safely replacing the battery.
Recommendations for servicing the mower before winter storage.
Overview of troubleshooting messages and symptoms.
Lists common error messages, their causes, and recommended actions.
Explains the meaning of different indicator lamp lights and troubleshooting steps.
Lists common symptoms of malfunction and their potential causes and actions.
Step-by-step guide to locate and repair breaks in the boundary wire.
Guidelines for safely transporting the product, especially the battery.
Instructions for preparing the mower and charging station for winter.
Steps for cleaning and storing the robotic lawnmower for winter.
How to store the charging station and its related wires.
Checks and actions needed after the winter storage period.
Information on proper disposal and recycling of the product.
Instructions for removing the battery for recycling purposes.
Specifications for R38Li, R40Li, and R45Li models, including dimensions and electrical data.
Specifications for R50Li, R70Li, and R80Li models, including dimensions and electrical data.
Details of the GARDENA product guarantee and terms of coverage.
Statement of compliance with relevant EU directives and applied standards.
| Type | Robotic lawn mower |
|---|---|
| Cutting Height | 20 - 50 mm |
| Recommended Lawn Size | Up to 400 m² |
| Battery Type | Li-ion |
| Battery Voltage | 18 V |
| Battery Capacity | 2.1 Ah |
| Sound Level Measured | 58 dB |
| Grass Collector Capacity | Not applicable |
| Cutting System | 3 pivoting razor blades |