EasyManua.ls Logo

GE BreakMaster - User Manual

GE BreakMaster
29 pages
Print Icon
To Next Page IconTo Next Page
Loading...
imagination at work
GE Consumer & Industrial
Electrical Distribution
BreakMaster
Load
Interrupter Switch
Installation and Maintenance
Question and Answer IconNeed help?

Do you have a question about the GE BreakMaster and is the answer not in the manual?

Summary

Section 1 - Introduction

1.0 Basic Description and Application

Provides a foundational understanding of the BreakMaster Load Interrupter Switch and its applications.

1.2 Safety Features

Outlines the built-in safety features designed to reduce hazards and ensure proper operating sequences.

1.3 Safe Practices

Specifies essential safety precautions for qualified personnel working with high voltage circuits.

Section 2 - Receiving

2.0 Receiving and Inspection

Details the process of inspecting switchgear upon receipt to check for damage or shortages.

Section 4 - Installation

4.0 Joining BreakMaster Enclosures

Details the procedures for connecting multiple BreakMaster enclosures together at shipping splits.

4.1 Connection of Switchgear to Transformer

Explains how to connect the switchgear to a transformer for both indoor and outdoor configurations.

4.4 Grounding

Describes the grounding arrangements for connecting the BreakMaster equipment to the station ground.

4.5 Medium Voltage Electrical Connections

Covers making electrical connections using supplied cables or bus bars.

4.6 Connections to Metal Clad Switchgear Assembly

Provides instructions for connecting the BreakMaster to metal clad switchgear, indoor and outdoor.

4.7 Connection of Customer Power Cables

Addresses the installation of customer power cables, ensuring adequate clearances and support.

4.11 Switch Inspection Before Setup

Provides a procedure for inspecting switch operation and contact resistance before initial startup.

4.11.1 Switch Alignment and Adjustment Procedure

Details the steps for aligning switch blades and adjusting contacts for proper operation.

Section 5 - Operation

5.2 Fuse Replacement Steps

Provides a step-by-step guide for safely replacing fuses in the switchgear.

5.4 Motor Operator

Details the components and operation of the motor operator assembly for automated switch control.

Section 6 - Maintenance

Section 7 - Selector Switch Configuration

Section 8 - Duplex Switchgear Configuration

Section 9 - Auto Transfer Switchgear (LIS-ATS) Configuration

Section 10 - Troubleshooting

Section 11 - How To Contact GE

11.0 GE Resolve

Information on contacting GE Resolve for post-shipment service and technical assistance.

Overview

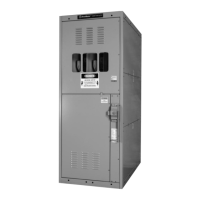
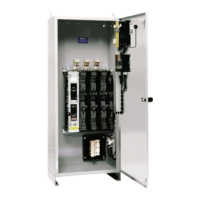
The GE BreakMaster Load Interrupter Switch is an air-insulated, three-pole, gang-operated, quick-make, quick-break load interrupter switch housed in a floor-mounted metal enclosure. It is designed for medium voltage circuit applications, ranging from 2.4kV through 15kV, with 600 or 1200 load ampere interrupting ratings. The switch can be used with power fuses and other protective devices to provide safe and economical switching and circuit protection where infrequent disconnecting means are required. The quick-make, quick-break mechanism allows the switch to open and close independently of the operating handle's speed, whether manually or power-operated. The switchgear meets or exceeds applicable ANSI, NEMA, and IEEE standards, as well as UBC zone 4 and CBC zone 4 seismic requirements. UL-listed switches are available as an option.

Important Technical Specifications:

  • Rated Maximum Voltage: 15 kV
  • Impulse Withstand (BIL): 95 kV
  • Norm. Freq. Withstand: 36 kV
  • Frequency: 60 Hz
  • Continuous Current: 600 A SYM
  • Load Interrupting Current: 600 A SYM
  • Momentary Current: 40 kA ASYM
  • Short Time - Current: 25 kA ASYM for 2 seconds
  • Fault Closing Current: 40 kA ASYM
  • Integrated Switch & Fuse Short Circuit Current: 40 kA ASYM
  • Main Bus Bracing: 50 kA ASYM
  • Enclosure Type: Category B, Indoor
  • Electrical Clearances (minimum):
    • Between live parts of adjacent phases: 3.5" (through air), 3.5" (over surface) for 2.4 kV - 5 kV; 5.75" (through air), 5.75" (over surface) for 7.2 kV - 15 kV.
    • Between live parts and grounded metal: 3.5" (through air over surface) for 2.4 kV - 5 kV; 5.75" (through air over surface) for 7.2 kV - 15 kV.
  • Bolting Torque Values (nominal for aluminum or copper connections):
    • 1/4" bolts: 4 lb. ft.
    • 5/16" bolts: 9 lb. ft.
    • 3/8" bolts: 16 lb. ft.
    • 1/2" bolts: 39 lb. ft.
    • 5/8" bolts: 80 lb. ft.
  • Space Heaters: Supplied for 120 or 240 volt sources to prevent condensation.
  • Ambient Temperature: Do not exceed 40°C maximum.

Usage Features:

  • Safety Interlocks:
    • Door interlock prevents opening the front doors while the switch is in the closed position.
    • Switch interlock prevents manual operation of the handle mechanism with the doors open.
    • Upper door interlock on the lower switch access door ensures the upper door is closed before the lower door can be closed.
    • Key interlocks (when provided) enforce a specific sequence of operation, preventing access to energized parts or paralleling incoming lines in duplex configurations.
  • Viewing Window: Provided to visually verify each switch contact position.
  • Padlocking Facilities: Allows padlocking the switch in either the open or closed position.
  • Mechanical Indicators: Show whether the switch mechanism is open or closed.
  • Load Interruption: Achieved by a flicker blade and engaging contact fingers within an arc chute. Main blades open first, shunting current through spring-loaded flicker blades, which then snap out, causing arcing within the arc chutes.
  • Fault Closing: The quick-make mechanism provides power to overcome blowout forces during fault closing, without transmitting these forces to the operating handle, allowing safe closing under short circuit conditions.
  • Motor Operator (Optional): Utilizes a direct drive motor assembly to charge the latching spring mechanism for opening and closing the interrupter switch. This provides a predetermined speed independent of the electric drive.
  • Shunt Trip (Optional): Allows the switch to be tripped "Open" manually or electrically via a trip solenoid.
  • Selector Switch Configuration (Optional): A two-position non-load break selector switch connected in series with the BreakMaster load break switch, key-interlocked to ensure the BreakMaster switch is in the off position before operating the selector switch.
  • Duplex Switchgear Configuration (Optional): Two BreakMaster Load Interrupter Switches connected by a common load side bus, allowing selection of either of two incoming lines. Key interlocking ensures only one switch is closed at a time and both switches are locked open to access main doors.
  • Auto Transfer Switchgear (LIS-ATS) Configuration (Optional): Two motor-operated BreakMaster Load Interrupter Switches with a central control panel (MX250 module, RT box, relays) for automatic selection between normal and emergency incoming lines. Key interlocking ensures safe operation and prevents access to energized parts.

Maintenance Features:

  • Periodic Checking: Load break switches should be examined and checked annually or sooner if conditions require (e.g., numerous operations, polluted atmosphere, overloading). Open and close the switch 2-5 times annually.
  • Cleaning: All switches, insulators, and operating arms should be cleaned periodically with a clean cloth to prevent dust accumulation. A light coat of non-corrosive, high-temperature grease (SCH-32 Mobiltemp) should be applied to contact surfaces after cleaning.
  • Contact Inspection: Check for good contact. Measure contact resistance between jaw spade terminal and hinge spade terminals (should be 35-100 micro-ohms). Verify blades can be "opened" from jaw casting with a pulling force of 30-36 pounds.
  • Insulator Inspection: Surfaces must be kept clean, especially in harsh environments. Use alcohol cleaner or light detergent. Replace insulators showing signs of tracking.
  • Insulation Check: Annually examine all insulation for tracking, cracks, or streaked discoloration. Replace affected insulation.
  • Bus and Conductor Check: Annually inspect buses and connections for overheating or damage. Measure resistance to ground and between phases of insulation.
  • Chain Drive: Check that turnbuckles and locking nuts are tight. No adjustments are necessary.
  • Operating Shaft: Light lubricant should be applied to bearing surfaces. No adjustments are necessary.
  • Pushrods: Examine for damage at either end during maintenance. Replace if damaged.
  • Stored Energy Mechanism: Check that latches rotate freely and for loose bearing bolts. Factory adjusted, typically no field adjustment needed.
  • Lubrication: Bearing points and sliding surfaces require infrequent lubrication (annually) with a thin film of low-temperature lubricant. Remove hardened grease and dirt before lubricating. Clean and grease movable and stationary contact surfaces with SCH-32 Mobiltemp.
  • High Potential Tests: Not necessary if insulation maintenance instructions are followed. If performed, test voltage should not exceed 14 kV A.C. for 4.16KV and 27 kV A.C. for 13.8 kV, conforming to ANSI standards (75% of factory test voltages).
  • Switch Alignment and Adjustment Procedure: Detailed steps for disconnecting pushrods, main blade alignment, arcing blade alignment, hinge contact pressure adjustment, and jaw contact pressure adjustment are provided. Requires de-energizing all power sources.

GE BreakMaster Specifications

General IconGeneral
BrandGE
ModelBreakMaster
CategorySwitch
LanguageEnglish

Related product manuals