EasyManua.ls Logo

GE UNC15NP - User Manual

GE UNC15NP
92 pages
Print Icon
To Next Page IconTo Next Page
Loading...
Write the model and serial
numbers here:
Model # _________________
Serial # _________________
Find these numbers on a label
on the top inner case liner of the
unit toward the front.
GE is a trademark of the General Electric Company. Manufactured under trademark license.
OWNER’S MANUAL
AND INSTALLATION
INSTRUCTIONS
ICE MACHINE
49-1000610 Rev. 2 10-22 GEA
UNC15NP
ENGLISH/FRANÇAIS/
ESPAÑOL
SAFETY INFORMATION .........3
USING THE ICE MACHINE
Packaging ............................6
Controls ..............................6
Features ..............................8
Starting the Ice Machine ................8
INSTALLATION INSTRUCTIONS
Grounding the Ice Machine ..............9
Before You Begin ......................9
Location and Preparation ...............9
Advance Planning .................... 11
Dimensions ..........................12
Door Swing ..........................13
Door Panel ...........................15
Handle Reversing Instructions ..........18
Plumbing ............................18
Toe Kick Location ....................19
Drain Pump Kit UPK4 Accessory
Installation ....................... 20
CARE AND CLEANING ......... 24
TROUBLESHOOTING TIPS ......27
LIMITED WARRANTY ...........28
ACCESSORIES .................. 29
CONSUMER SUPPORT ......... 30
Question and Answer IconNeed help?

Do you have a question about the GE UNC15NP and is the answer not in the manual?

Overview

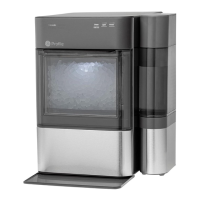
This document describes the GE Appliances UNC15NP Ice Machine, a household appliance designed for indoor use in a controlled environment.

Function Description

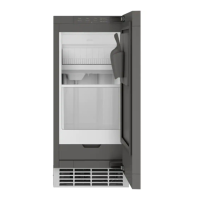
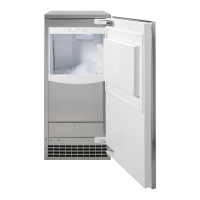
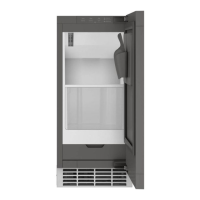
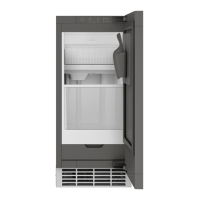
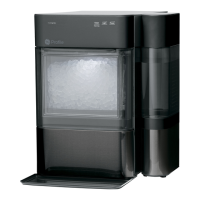
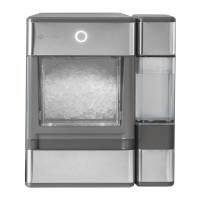
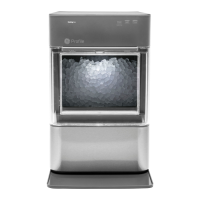
The GE Appliances UNC15NP Ice Machine is designed to produce nugget ice continuously. It operates by sensing the ice level in its storage bin, making ice when the level is low and stopping when the bin is full. The machine consists of two main systems: the ice-making system and the ice storage system. The ice storage bin is insulated and includes a drain at the bottom for melting ice, ensuring that the bin contains fresh ice. Nugget ice drops into the bin at an irregular rate, with varying amounts falling at different times.

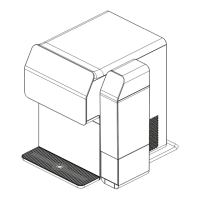
The machine draws ambient air from its lower right front and expels warm air from its lower left front. Restricting airflow or operating the machine in very hot or cold environments will negatively impact ice production.

A drain pump kit (UPK4 accessory) is available for installations where a gravity drain is not feasible, allowing water to be pumped up to 8 feet high.

Important Technical Specifications

Environmental Operating Conditions:

  • Minimum air temperature: 55°F (12.8°C)
  • Maximum air temperature: 100°F (38°C)
  • Optimal air temperature: 60°F to 80°F
  • Minimum water temperature: 40°F (4.5°C)
  • Maximum water temperature: 90°F (32°C)
  • Optimal water temperature: 50°F to 60°F
  • Minimum water pressure: 30 psi (1.06 bar)
  • Maximum water pressure: 120 psi (8.27 bar)

Electrical Requirements:

  • Voltage: 120 volts
  • Frequency: 60 Hz
  • Amperage: 15 amps
  • The appliance must be connected to a properly grounded 3-prong outlet.
  • No extension cords or 2-prong adapters should be used.

Dimensions (Cutout & Product):

  • Product Width: 14-7/8 inches (38.1 cm)
  • Product Height: Adjustable from 34-1/2 inches (min) to 35 inches (max)
  • Product Depth: 22-3/4 inches (to stainless steel door front)
  • Cabinet Depth: 24 inches
  • Countertop Overhang: 3/4 inch
  • Minimum Clearances: 0 inches on sides, 1/8 inch on top, 1-1/4 inches in back.

Custom Door Panel Specifications:

  • Width: 14-7/8 inches
  • Height: Between 29-5/8 inches and 30-5/8 inches
  • Thickness: 5/8 inch to 3/4 inch
  • Weight: Not to exceed 15 lbs (6.8 kg)

Water Supply:

  • Must be connected to a potable water supply.
  • Water conductivity must be no less than 10 microSiemens/cm.
  • Deionized water is not recommended.
  • Reverse Osmosis (RO) water can be used, but the system should include post-treatment or blending to address potential aggressiveness.
  • Water softeners may not improve water conditions for ice machines.

Ice Storage Capacity:

  • Approximately 20 lbs (9 kg) of ice when full.

Usage Features

Control Panel: The control panel features several buttons and indicator lights:

  • Power: Press and hold for 3 seconds to turn the machine ON or OFF. If turned OFF during ice production, the "Making Ice" light will flash for 1-3 minutes to complete the cycle, and the machine will drain residual water.
  • Clean: Press and hold for 3 seconds to start the cleaning cycle.
  • Filter Reset: Press after changing the water filter to reset the filter timer.
  • Wi-Fi: Press and hold "Clean" and "Filter Reset" simultaneously to activate Wi-Fi connectivity. The Wi-Fi symbol will flash.
  • Making Ice (Indicator): Illuminates when the machine is producing ice.
  • Time to Clean (Indicator): Illuminates after 5 months to signal that cleaner should be ordered, and flashes after 6 months to signal that cleaning is required.
  • Replace Filter (Indicator): Illuminates when it's time to order a new filter, and flashes when replacement is required.

Sabbath Mode:

  • Designed for use on the Jewish Sabbath and holidays.
  • Prevents ice production during Sabbath mode.
  • If activated during ice production, the cycle will complete within 1-2 minutes to clear any remaining ice.
  • If equipped with a drain pump, it will continue to operate normally.
  • Automatically exits Sabbath mode after 96 hours.
  • Activation/Deactivation: Press and hold "Power" and "Filter Reset" simultaneously for 3 seconds. "Making Ice," "Time to Clean," and "Replace Filter" lights will all illuminate to indicate Sabbath mode is active.

Door Alarm:

  • An audible alert sounds if the door is left open for 2 minutes.
  • The alarm stops when the door is closed.
  • Activation/Deactivation: Press "Power," "Clean," and "Filter Reset" simultaneously.

SmartHQ App Connectivity:

  • Allows remote control and monitoring via the SmartHQ app (available for iPhone and Android).
  • Users can create an account, register their appliance, and connect to the machine's Wi-Fi module.
  • The Wi-Fi password is found on the "Connected Appliance Information" label near the water filter access door.

Initial Startup:

  1. Turn on the water supply.
  2. Power on the appliance.
  3. Press and hold "Power" for 3 seconds. The "Making Ice" light will illuminate.
  4. Ice production begins in approximately 10 minutes. The first batch of ice should be discarded.
  5. The bin will take 6-7 hours to fill completely.

Maintenance Features

Cleaning the Outside:

  • Stainless steel door and handle can be cleaned with a commercially available stainless steel cleaner.
  • Cleaners with oxalic acid (e.g., Bar Keepers Friend Soft Cleanser™) can remove surface rust, tarnish, and blemishes.
  • Use a liquid cleanser free of grit and a damp soft sponge, rubbing in the direction of the brush lines.
  • Do not use appliance wax or polish on stainless steel.

Cleaning the Condenser:

  • The condenser has fins and tubes that can become clogged with dirt and lint.
  • To clean:
    1. Unplug the icemaker.
    2. Remove the kickplate (2 screws on sides, 2 on front) and the door (by removing hinges).
    3. Open the water filter access door and remove 2 screws from the filter cover.
    4. Remove the hinge cover plate on the opposite side by pressing in and sliding down.
    5. Pull the filter cover forward.
    6. Vacuum the surface to remove dust and lint.
    7. Re-install the filter cover, hinge cover plate, kickplate, and door.
  • Caution: Do not dent the fins.

Removing Scale from the Ice Making System:

  • Requires rubber gloves and a descaling cleaner (GE Appliances part number WX01X40745).
  • To clean:
    1. If ON, press and hold "Power" for 3 seconds. The "Making Ice" light will flash until ice is expelled.
    2. Remove and discard all ice from the bin.
    3. Press and hold "Clean" for 3 seconds. The "Time to Clean" light will slowly flash.
    4. After a few seconds, the "Time to Clean" light will flash quickly and an audible chime will sound.
    5. Open the door and add 1 ounce of cleaner mixed with 3 ounces of water into the water tank access hole (upper left of the compartment).
    6. Press "Clean." The cleaning process takes approximately 40 minutes.
    7. Once complete, the "Time to Clean" light will turn OFF, and the machine will return to standby.
    8. Mix 1 ounce of cleaner with 1 quart of water and clean the ice bin, interior door, and gasket surfaces.
    9. Sanitize the bin by pouring a mixture of 1 ounce of household bleach with 2 gallons of water into the bin.
    10. Rinse the bin with hot water.
    11. Press and hold "Power" for 3 seconds to restart ice production.
    12. The ice scoop should be washed regularly.

Water Filter (GSWF):

  • Located at the bottom of the icemaker, behind the water filter access door.
  • The "Replace Filter" indicator illuminates after 5 months (or sooner with high ice consumption) to signal that a new filter should be ordered. It flashes after 6 months when replacement is required.
  • Replacement:
    1. Open the water filter access door.
    2. Grasp the filter and slowly turn it counter-clockwise about 1/4 turn until it can be pulled out. A small amount of water may drip.
    3. Insert the new filter, aligning it with the housing.
    4. Slowly turn the filter clockwise until it stops (do not overtighten). It will automatically adjust to the correct position (about 1/4 turn or 90 degrees).
    5. Close the filter access door.
    6. Press "Filter Reset" for 3 seconds to reset the timer.
  • A bypass plug (WR02X11613) can be used if a replacement filter is not available.

Winterization:

  • If the machine is in "Making Ice" mode, open the door and press "Power" to turn it OFF. The "Making Ice" light will flash for 1-2 minutes, and the water tank will drain automatically. (Unplugging without turning OFF first will not drain the tank).
  • Close the water supply.
  • For models with a drain pump, pour approximately 1/2 gallon of RV antifreeze (propylene glycol) into the ice storage bin drain.
  • Unplug the machine.

Vacations:

  • For prolonged absences, it is recommended to turn OFF the ice machine.
  • Press and hold "Power" for 3 seconds.
  • If the machine is producing ice when turned OFF, the "Making Ice" indicator will flash for 1-3 minutes to complete the process, and the machine will drain residual water.

GE UNC15NP Specifications

General IconGeneral
BrandGE
ModelUNC15NP
CategoryIce Maker
LanguageEnglish

Related product manuals