PRE..INSTALLATiONCHECKLIST
ThisOpenerincludespartsandsuppliesneededto installin most
garagesandconnectto most garagedoors,Therearemanyvariations
of garagesandgaragedoors,A fewadditionalpartsandsuppliesmay
beneededto installOpenerinto your garageandconnectto your
garagedoor, Whilecheckingitemslistedbelow,noteanyadditional
itemsyouwiII need,
Tools used in this section:
.12'+ Tape Measure . Pencil . Ladder . Level
Cheek following items before assembling Opener:
CHECK DOOR CONDmON
AND THmCKNESS
Checkconditionof verticalstib incenterofdoor,anditsconnectionto
door'stopandbottombeams,(Figure1)
A Ifdoor frameisnailedtogetherandnot asolidconnection,door
framemustbebracedorreinforcedbeforeinstallingOpener,
B Ifdoor is"Iightweight"(madewith frameandskin- not solid),
door (includingdoor frame)must be bracedor reinforced before
installing Opener,
¢ Adooropenerreinforcementbracketmayalsobeneededto
connectgaragedoorto Opener'sDoorBracket,ThisOpeneris
designedfor instalBtionona properly bracedsectionaldooror
solidly bracedone-piecedoor,
D ContactyourGenieFactoryAuthorizedDeabror deabrof your
garagedoorfor anynecessarybracingandadooropener
reinforcementbracket(if needed)beforeproceeding,
E Ifyouhaveawoodendoor,measuredoor'sthickness,If yourdoor
isbssthan2"thick, bracedooror useshorterDoorBracketLagScrews
(1/4"x1-1/4"- not included)
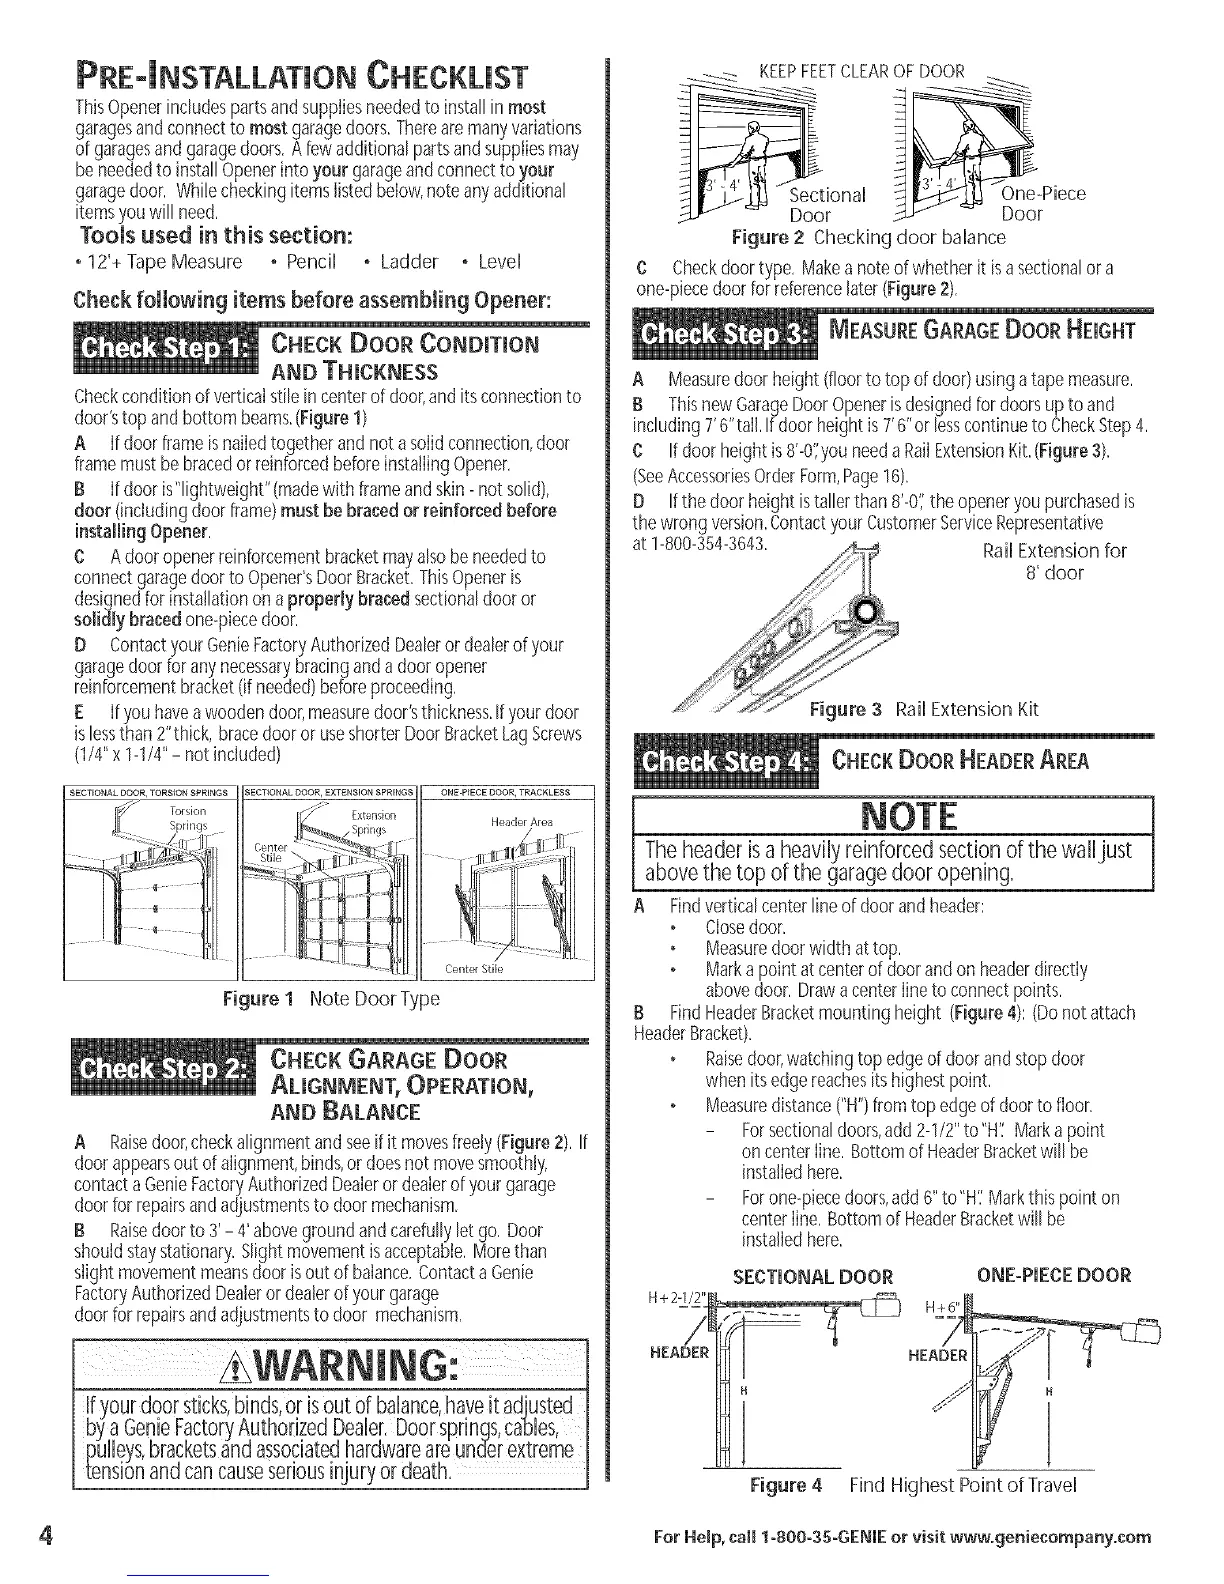
SECTIONAL DOOR, TORSfON SPRINGS SECTIONAL DOOR, EXTENSION SPRINGS ONE-PIECE DOOR, TRACKLESS
Header Area
Center Stile
Figure I Note DoorType
CHECK GARAGE DOOR
AUGNMENT, OPERATmON,
AND BALANCE
A Raisedoor,checkalignmentandseeifit movesfreeiy(Figure2),[f
doorappearsout ofalignment,binds,or doesnot movesmoothly,
contactaGenieFactoryAuthorizedDealeror dealerof yourgarage
doorforrepairsandadjustmentsto doormechanism,
B Raisedoorto 3'- 4'abovegroundandcarefullyJetgo,Door
shouldstaystationary,Slightmovementisacceptable,Morethan
slightmovementmeansdoorisout of balance,ContactaGenie
FactoryAuthorizedDealerordealerofyour garage
doorforrepairsandadjustmentsto door mechanism,
WAR*"*'a "
KEEPFEETCLEAROFDOOR
_ional 1 _-Piece
- Door _ - Door
Figure 2 Checking door balance
C Checkdoortype, Makea noteof whetherit isasectionalor a
one-pbcedoorforreferencelater(Figure2),
MEASURE GARAGE DOOR HEIGHT
Measuredoor height(floorto topof door)usingatapemeasure,
Thisnew GarageDoorOpenerisdesignedfor doorsupto and
including7'6"tail If doorheightis7'6"orbsscontinueto CheckStep4,
C Ifdoor heightis 8'-0':youneeda RailExtensionKit,(Figure3),
(SeeAccessoriesOrderForm,Page16),
D Ifthe door heightistaIbr than 8'-0','the openeryou purchasedis
the wrongversion,Contactyour CustomerServiceRepresentative
at1-800-354-3643, _L_ Rail Extension for
.. _ 8' door
.... _.>" _<J°
/ :_ _,:1s Figure S RailExtension Kit
A
B
CHECK DOOR HEADER AREA
The headerisa heavilyreinforced sectionof the waiUust
above the top of the garagedoor opening.
A Findverticalcenterlineofdoorandheader:
• Closedoor,
• Measuredoorwidth attop,
• Marka pointatcenterof doorandonheaderdirectly
abovedoor, Drawacenterlineto connectpoints,
B FindHeaderBracketmountingheight (Figure4): (Donotattach
HeaderBracket),
• Raisedoor,watchingtop edgeof doorandstopdoor
whenitsedgereachesitshighestpoint,
• Measuredistance("H")fromtop edgeof doorto floor,
Forsectionaldoors,add2-1/2"to"H'i Marka point
on centerline,Bottomof HeaderBracketwill be
installedhere,
Forone-piecedoors,add6"to"H'.'Markthis pointon
centerline,Bottomof HeaderBracketwill be
installedhere,
SECTmONAL DOOR
HEADER I H
Figure 4
ONE-PIECEDOOR
HEADER
Find Highest Point of Travel
4 For Help, ca[[ 1-800-SS-G[NI[ or visit www.geniecompany.com