- 29 - System Hardware Installation
3-5 Installing the GPU Card
• Voltages can be present within the server whenever an AC power source is connected. This
voltage is present even when the main power switch is in the off position. Ensure that the
system is powered-down and all power sources have been disconnected from the server prior to
installing a PCI card.
Failure to observe these warnings could result in personal injury or damage to equipment.
• The PCI riser assembly does not include a riser card or any cabling as standard. To install a PCI
card, a riser card must be installed.
For GPU1/GPU2/GPU3/GPU4/GPU13/GPU14/GPU15/GPU16
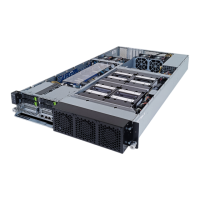
Follow these instructions to install the GPU card:
1. [For GPU6/GPU7] Loosen and remove the two screws securing the PCI cage at the top of the system.
[For GPU0/GPU1] Loosen and remove the single screw at the top of the system and the two screws
at the rear of the system securing the PCI cage.
2. Pull the two plastic handles to lift up the PCI cage from the system.
3. Insert the card into the selected slot. Make sure that the card is properly seated.
4. Secure the GPU cards in place with two screws.
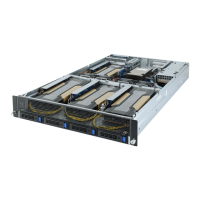
Front Rear
Top to Bottom:
GPU Card #13 (Slot 1)
GPU Card #15 (Slot 3)
GPU Card #16 (Slot 4)
GPU Card #14 (Slot 2)
Top to Bottom:
GPU Card #1 (Slot 1)
GPU Card #3 (Slot 3)
GPU Card #4 (Slot 4)
GPU Card #2 (Slot 2)
(For GPU13/GPU14/GPU15/GPU16)
2
1
1
2

 Loading...