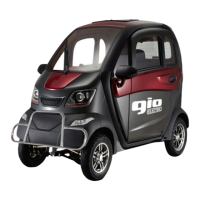
The GIO Electric Golf Mobility Scooter is a fully enclosed, recreational electric scooter designed for outdoor use, primarily on sidewalks, and is not street legal unless local regulations require otherwise. It offers a comfortable and stylish riding experience, protecting the user from the elements.
Function Description:
The GIO Electric Golf Mobility Scooter serves as a personal mobility device, providing transportation for one adult with an additional rear bench for occasional use, though the maximum load capacity should never be exceeded. It is designed for ease of operation and features a range of amenities for user comfort and convenience. The scooter is powered by a 60V 45Ah lead-acid battery system, connected in series, and is driven by a 1200-watt motor. Acceleration is controlled via a variable twist throttle on the right handlebar, and braking is handled by front disc and rear drum brakes. The scooter includes a media center with an integrated backup camera, heater, fan, and opening windows, enhancing the user experience.
Important Technical Specifications:
- Motor: 1200 Watts
- Battery: 60V 45Ah lead acid (5 batteries connected in series)
- Brakes: Front Disc / Rear Drum
- Tires: 10 x 4.00 Tubeless Tires
- Top Speed: 25 km/h (18.5 mph)
- Range per Charge: Up to 50 km (30 miles)
- Charge Time: 8-10 hours
- Max Incline: 17°
- Ground Clearance: 13 cm (5")
- Dimensions: 198 x 98 x 155 cm (79" x 39" x 62")
- Interior Measurements: 93 x 78 x 120 cm (37" x 31" x 48”)
- Step in Height: 35 cm (14")
- Max Load: 225 kg (500 lbs)
- Dry Weight: 305 kg (670 lbs)
Usage Features:
- Operation: The scooter can be turned ON/OFF using a key in the ignition or remotely with an included fob. The LCD display activates upon startup, showing "READY" when the scooter is operational.
- Acceleration: A variable twist throttle on the right handlebar controls acceleration. Users are advised to twist gently to avoid sudden acceleration.
- Braking: Both brake levers should be squeezed to slow or stop the scooter, especially at higher speeds. The motor automatically deactivates when brakes are applied.
- Parking Brake: A parking brake feature is integrated into the brake handle. Squeeze the brake lever fully and press up on a small lever to engage the catch. Squeeze the handle again to release.
- Speed Gears: A red button near the throttle toggles through 3 speed gears.
- Driving Modes: A vertical switch marked RND (Reverse, Neutral, Drive) allows switching between driving directions. The display shows the rearview camera when in reverse. Users must bring the scooter to a complete stop before switching modes.
- Lighting: A 3-position horizontal black switch controls lights: All lights including headlight ON, Daytime signal & running lights only, and All lights OFF. An upper switch on the left handlebar adjusts headlight intensity (low/high beam).
- Turn Signals & Horn: A center switch on the left handlebar controls turn signals. Pushing it in the desired direction activates the signal; returning it to the center turns it off. A small green button activates the horn, and a larger red button activates hazard lights.
- Windshield Wiper: A button on the left side of the console controls the windshield wiper. Pressing up activates it, down to the center turns it off. Holding the button down manually adjusts the wiper position.
- Heating/Cooling System: A button on the right side of the console controls the fan (press up) and heater (press down). Returning the button to the center turns them off. The heater requires time to warm up.
- Media Center: Located on the left lower portion of the console, it includes controls for:
- Power Button: Toggle Media Center On/Off
- Skip Forward/Seek Forward/FM Frequency Up (Radio)
- Skip Back/Seek Back/FM Frequency Down (Radio)
- USB Port: For media storage
- TF Card Slot: For media storage card
- Bluetooth Pairing Button
- Headset Jack
- Volume Up/Down
- MOD Button: Cycles through FM Radio, MP3, MP4, Bluetooth modes.
- LCD Display: Provides information such as Battery Level (state of charge % and voltage), Trip Odometer (resets on shutdown), Speedometer (km/h), Speed Gear Setting, Media Center Display (volume, mode details), "READY" message, and Odometer (km).
- Seat Adjustment: The driver's seat has three adjustment points: headrest (up/down), seat back angle (left handle), and seat position (forwards/backwards, right handle).
Maintenance Features:
- Regular Inspection: Users should visually inspect the scooter regularly for any signs of damage, especially after collisions.
- Battery Care:
- Always charge the battery with the included charger after use.
- Avoid completely draining the battery; recharge before the meter reaches zero.
- Perform maintenance charging at least once a month, even when not in use, especially during extended storage periods.
- Protect batteries from extreme temperatures (subzero temperatures can cause damage) and direct sunlight.
- Avoid contact with flames or alkaline materials.
- Tire Care:
- The scooter is equipped with tubeless tires, which require less maintenance but should be checked for cuts, punctures, and proper inflation (refer to sidewall for recommended PSI).
- Replace worn tires as necessary, as tread condition is crucial for handling and safety.
- Cleaning: Use a damp cloth with neutral soap to wipe surfaces. Avoid high-pressure water or excessive water to prevent corrosion or electrical shorts.
- Safety Inspection List (Before First Ride and Periodically):
- Brakes: Check if they prevent movement when squeezed, if power supply cuts out during braking, and for any friction or noise.
- Tires: Check for proper inflation and good condition.
- Lights: Verify turn signals and headlight function properly.
- Steering Handle: Ensure it turns freely and the throttle functions properly.
- General: Check for any loose parts, nuts, or bolts.
- Troubleshooting Guide: The manual includes a comprehensive troubleshooting section for common issues like the scooter not turning on, not moving, noise, sudden power off, slowing down, reduced trip distance, uneven tire wear, and braking problems, along with possible causes and solutions.
- Warranty: GIO Electric offers a 12-month limited warranty covering manufacturing defects for the product, charger, motor, and controller, commencing from the date of shipment. The warranty does not cover normal wear and tear items, misuse, neglect, accident, improper assembly, setup, storage, maintenance, or servicing. For warranty requests or spare parts, customers are advised to contact GIO Electric directly with their order number. For purchases from authorized dealers, customers should refer to the dealer's warranty conditions.