30 31
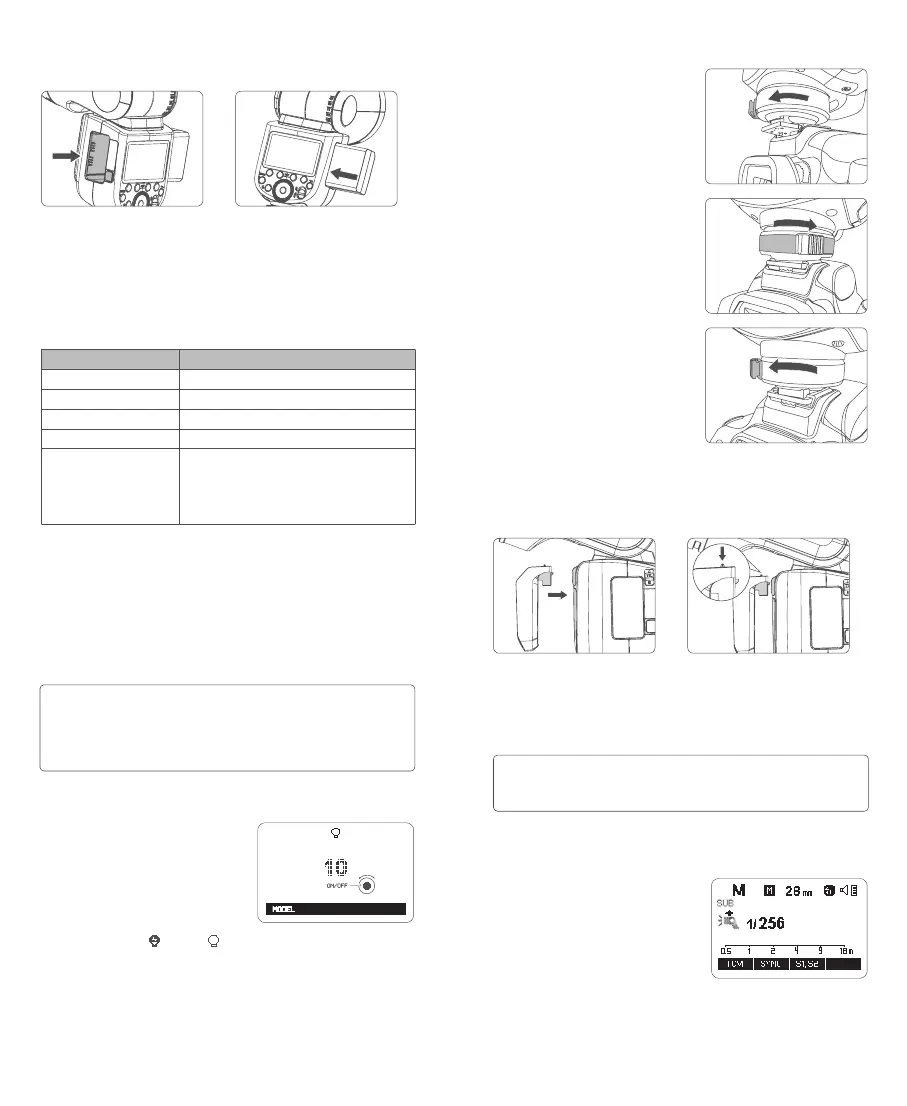
Detaching the camera ash:
Press and rotate the hot shoe fi xing
buckle to the left until it is loosened,
then take off the camera flash.
Then rotate it to the right until it locks
up.
Battery
Installing battery:Detaching battery
:
Press and hold the battery remove
button, then push the battery out
of the battery compartment.
Insert the battery into the battery
compartment in the direction
as referred below until it’s fi rmly
locked.
Power Management
Use ON/OFF power switch to power the flash unit on or off. Turn off if it will
not be used for an extended period of time.
Setting as a transmitter unit, the flash will turn the power off automatically
after a certain period (approx. 90 seconds) of idle use. Press the camera
shutter halfway or press any flash button will wake up the flash unit. Setting
as a receiver flash, it will enter sleep mode after 60 minutes (or 30 minutes)
of idle use. Pressing any flash button will wake it up.
1. Setting the C.Fn-STBY function to OFF is recommended when the flash is used
off camera.
2. Auto power off timer function of a receiver unit is set to 60 minutes by default.
Another option “30 minutes” is available in C.Fn-RX.
3. The LCD panel will lighten on when operating the buttons or select dial.
Note:
Battery Level Indication
Make sure the battery pack is securely loaded in the flash. Check the battery
level indication on the LCD panel to see the remaining battery level.
Battery Level Indication
3 grids
2 grids
1 grid
Blank grid
Blinking
Meaning
Full
Middle
Low
Lower battery, please recharge it.
The battery level is going to be used out, and
the flash is not functional in this status.
Note: Please recharge the battery as soon as possible
(within 10 days). Then, the battery can be used or be
placed for long period.
Modeling Lamp
Press the modeling lamp button to set
the modeling lamp, press the set button
to turn on or off the modeling lamp.
When turning the modeling lamp on, turn
the select dial to adjust its brightness in
10 levels (01~10).
Press the function button 1 <MODEL> to
switch modeling lamp, the modeling
lamp icon will be off
<
>
or on
< >
.
Mounting/Detaching the Camera Flash
Mounting the camera flash:
Press the hot shoe fi xing buckle and
rotate it to the left, insert the camera
flash into the camera's hot shoe.
Using SU-1
With detachable sub flash SU-1 attached
to the external flash interface of V1Pro S,
better fi lling light effects can be achieved
in M (manual) flash/TTL auto flash mode,
this is helpful for portrait shooting.
Installing/Detaching SU-1
Installing:
Align the detachable sub flash
SU-1 with the external flash
interface of V1Pro S and insert
it parallelly, then press it down, a
"click" sound means it’s properly
installed.
Detaching:
Push the detaching pusher on
SU-1 and pull it up at the same
time to detach it.
Please turn off the V1Pro series flashes before Installing and detaching
SU-1.Do not insert in or pull out SU-1 when the V1Pro series flashes are in
power on status or working, otherwise malfunctions may occur.
Note: