Do you have a question about the Gold's Gym GGBE0867.0 and is the answer not in the manual?
| Product Type | Home Gym |
|---|---|
| Brand | Gold's Gym |
| Model Number | GGBE0867.0 |
| Butterfly | Yes |
| High Pulley | Yes |
| Low Pulley | Yes |
| Resistance Type | Weight Stack |
| Resistance | Up to 210 Lbs. |
| Type | Home Gym |
| Maximum User Weight | 300 lbs |
| Warranty | 90 Days |
Contact information for customer support and product inquiries.
Warning to read all precautions and instructions before use.
Instructions for applying warning decals if missing or illegible.
Illustrates specific warning labels related to user weight and safety.
Guidelines for safe use, including consulting a physician and user limitations.
Lists health conditions that may make using the inversion system inadvisable.
Explains benefits like intervertebral dimension increase and pain relief.
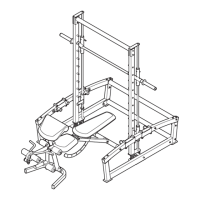
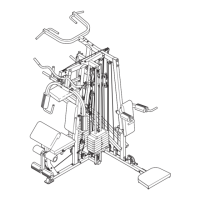
Diagram identifying key components of the inversion system.
Instructions for registering the product for warranty service.
Illustrations and key numbers for small parts used in assembly.
Tips for easier assembly, required tools, and two-person requirement.
Instruction for opening legs and positioning link bars.
Attaching the front leg frame to the front legs.
Attaching the bases to the front and rear legs.
Attaching the backrest frame to the center frame.
Attaching the foot frame to the adjustment frame.
Installing foam pads and the ankle lock mechanism.
Inserting the pad tube and attaching small foam pads.
Orienting and installing pivot bars and pulleys.
Connecting the adjustment frame to the backrest frame.
Attaching the backrest to the backrest frame.
Attaching the right and left handles to the legs.
Sliding and attaching the left and right covers.
Attaching the safety strap to the backrest frame and front leg frame.
Instructions for locking the system to prevent unsupervised use.
Guide to selecting the correct pivot bar position based on user weight and desired responsiveness.
Instructions for adjusting the strap to limit rotation angle.
How to adjust the frame length based on user height.
Steps to properly secure ankles using the ankle lock mechanism.
Procedure for locking the inversion system when not in use.
Steps for adjusting and folding the system for storage.
Instructions on how to rotate backward using arm movements.
Procedure for returning to the starting position, including rest period.
Tips on managing nausea and maximizing benefits from inversion.
Recommendations for initial use, focusing on short durations and low angles.
Suggestions for increasing angle, duration, and incorporating gentle stretching.
Guidance for advanced users aiming for greater angles and full inversion.
Comprehensive list of parts with key numbers, quantities, and descriptions.
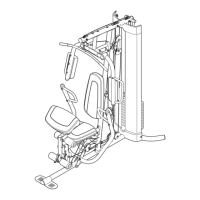
Visual representation of all parts and their assembly order.
Information required when ordering replacement parts.
Details of the product's limited warranty coverage and limitations.