Do you have a question about the Gold's Gym GGBE99610.0 and is the answer not in the manual?
| Brand | Gold's Gym |
|---|---|
| Model | GGBE99610.0 |
| Category | Fitness Equipment |
| Language | English |
Provides the toll-free number and website for customer support and inquiries.
Advises users to read all precautions and instructions before use for future reference.
Shows where warning decals should be placed and how to request replacements.
Lists critical safety instructions regarding machine use and moving parts.
Recommends consulting a physician before starting any exercise program, especially for older individuals.
Covers safe operation, maintenance, user limitations, and proper weight placement.
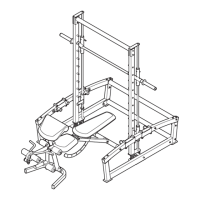
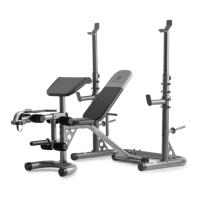
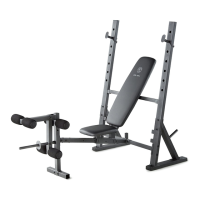
Introduces the GOLD'S GYM XR 10.1 weight bench and its benefits for fitness goals.
Illustrates and labels the key parts of the weight bench for user familiarization.
Displays drawings and key numbers for various nuts, bolts, and washers used in assembly.
Details requirements like needing two people and recommended tools for assembly.
Instructions for attaching upright bases to stabilizers using carriage bolts and locknuts.
Attaching the crossbar to the upright bases with bolts, washers, and locknuts.
Sliding the uprights onto the left and right upright bases.
Connecting braces to stabilizers and uprights using bolts and locknuts.
Attaching the front stabilizer to the front leg with bolts and locknuts.
Attaching the seat frame to the crossbar using bolts and locknuts.
Securing the seat carriage and attaching the adjustment pin for seat positioning.
Positioning the backrest support in the upright brackets and ensuring pins are inserted.
Connecting the backrest frames to the backrest using screws and washers.
Attaching backrest frames to the seat carriage with a bolt, washers, and locknut.
Securing the seat to the seat carriage using screws.
Attaching the leg lever to the front leg using a bolt and locknut.
Connecting the weight tube to the leg lever with a bolt, washers, bushing, and locknut.
Inserting pad tubes into the front leg and attaching foam pads to their ends.
Inserting remaining pad tubes into the leg lever and attaching foam pads.
Inserting weight rests into uprights and securing them with locking clips at the same height.
Ensuring all parts are properly tightened before using the weight bench.
Instructions for moving the seat to the desired position using the adjustment pin.
Steps to adjust the backrest height by repositioning the backrest support in the uprights.
How to use the leg lever, including weight limits and securing weights.
Instructions for inserting and securing weight rests at the same height.
Information about the optional curl pad for additional exercises.
Explains Muscle Building, Toning, Weight Loss, and Cross Training workout methods.
Covers warm-up, workout structure, cooling down, and proper exercise form.
Tips for staying motivated, including tracking workouts and body measurements.
Complete list of all parts with key numbers, quantities, and descriptions for the model.
An exploded view illustrating the assembly of all components with corresponding part numbers.
Details the information needed, such as model number and part key numbers, when ordering replacement parts.
Emphasizes the need to register the product within 30 days to avoid added fees for service.
Outlines what the warranty covers, its duration, and conditions under which it is voided.