Quick Start Guide
Copyright © 2020 Shenzhen Goodix Technology Co., Ltd. 2
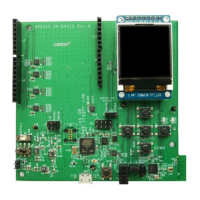
1. Connect the GR5515 SK Board to a PC with a Micro USB 2.0 cable. The Micro USB connector is used for power
supply and programming through J-Link.
2. Switch S6 (power switch) to the right side (as shown in the figure above) to power the board with current
passing through the on-board LDO; switch S6 to the left side to power the board by lithium batteries.
3. Switch S5 (power switch) to the right side (marked with ON) to turn on the power.
4. D102 starting flashing indicates that the PC begins to detect the J-Link port. If the detection succeeds, D102
stops flashing and remains on.
5. When D102 remains on, open the File Explorer of the PC, and check whether J-Link is in the list of Device
Manager > Ports (COM & LPT). J-Link in the list indicates that power and connection settings are completed,
and downloading and programming for GR551x are permitted; otherwise, check whether the J-Link driver is
installed properly, and reinstall the J-Link driver in the latest version if necessary.
2.3 Example Running
The GR551x SDK provides various example projects, which are in SDK_Folder\projects. After completing
power supply and connection settings, you can run any example project. For more information about compiling
and downloading example projects with Keil, see the GR551x Developer Guide.
2.4 Mobile Connection Test
Install GRToolbox App on a mobile phone (Android), and enable Bluetooth on the phone. Run the GRToolbox to
start scanning and establish connection with the GR5515 SK Board.