Priming Piston S
ervice
Priming Pisto
n Service
Disconnect th
ePump
WARNING
PRESSURIZED FLUID HAZARD
This equipment stays pressurized until pressure is
relieved manually. To help prevent serious injury
from moving parts, or from pressurized fluid, such
as splashing in the eyes or on skin, follow the
Pressure Relief Procedure in your system manual
when you stop pumping and before you clean,
check, or service the equipment.
PERSONAL
PROTECTIVE EQUIPMENT
Wear appropriate protective equipment when
intheworkareatohelppreventseriousinjury,
including eye injury, hearing loss, or inhalation of
toxic fumes.
This procedure involves thoroughly disassembling
and cleaning the individual parts in the pump lower
unit. Prior to performing this procedure, flush the
pump and relieve pressure as described in the
system manuals, disconnect all hoses, and remove
thepumpfromthesystem.
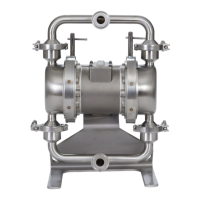
1. Release the upper clamp (123) holding the
displacement pump to the tie rod plate (122).
2. Slide the pump down from the air motor. Tilt the
pump and pull the displacement rod (117) out of
the coupler (C). Remove the gasket (102).
Note: Be careful not to scratch the displacement
rod.
Figure 1 Remove displacement pump.
Disassemble the Pump
Note: Pump Repair Kit 24G550 is available.
Purchase the kit separately. Kit parts are
marked with an * in the parts section. See
Priming Piston Displacement Pump Model 25M906,
25M906C31, page 9 .
1. Remove the retaining pin (116) from the
connecting rod (109). Slide off the priming piston
(108).
2. Release the lower clamp (123) to remove the
intake valve housing (107) from the pump
cylinder (101). Remove the gasket (102).
3. Remove the poppet (114), spring (113), and
valve stop (111) off the connecting rod (109).
4. Remove the bearing (112) from the center of the
valvestop(111).
5. Remove the packings (115) from the cen
ter of
the poppet (114).
Figure 2 Remove priming piston.
6. Push the displacement rod (117) out through the
bottom of the cylinder (101).
3A5564A 5

 Loading...