Read the sprayer manual 3A8070 for complete instructions
and warnings. This Quick Guide is not a substitute for reading
and understanding all instructions and warning labels supplied
with the equipment.
CHEMICAL HAZARD: Follow chemical warnings on
disinfectant container label and as listed in manual.
Do not spray humans or animals. Wear protective equipment.
FIRE AND EXPLOSION HAZARD: Do not use any alcohol-based
or other flammable liquid in sprayer. Follow fire and explosion
warnings as listed in your manual.
SKIN INJECTION HAZARD: High pressure equipment. Keep
clear of spray tip and leaks. Follow the Pressure Relief
Procedure whenever you stop spraying.
FAILURE TO FOLLOW ALL WARNINGS CAN RESULT IN
SERIOUS INJURY, AMPUTATION, OR DEATH.
WARNING
NOTICE
Do not run sprayer without fluid.
Running the sprayer dry will cause damage to the pump.
Disinfectant left in the sprayer will damage the sprayer. To avoid
damage, always completely flush with warm water after every use.
Do not store sprayer with disinfectant in it.
Foam in disinfectant may cause operation issues that could damage
the sprayer. Wait until foam has subsided to fill FlexLiner.
KNOW YOUR SPRAYER
Pressure Relief Procedure
Follow this procedure whenever instructed
to perform PRESSURE RELIEF PROCEDURE.
Disconnect power (unplug cord
or remove battery).
Turn Prime Knob down to PRIME
position to relieve pressure.
To begin a new job, first
perform the PRESSURE
RELIEF PROCEDURE.
Insert one FlexLiner into the
Cup Support and fill with
properly diluted disinfectant.
• NOTE: Verify there is no
damage, such as a crease, on
the top surface of the FlexLiner.
If damaged DO NOT USE.
Prime the pump with disinfectant
as follows:
A. Verify Electrostatic Charge Power
Switch is in the OFF position.
B. Verify Prime Knob is pointed
down to PRIME position.
C. Plug the sprayer into a grounded
power source or install a fully
charged battery onto the sprayer.
D. Turn the sprayer upside down.
• Pull the Trigger for 5 seconds.
• NOTE: Disinfectant will not spray
out, but will recirculate through
the pump and back into the cup.
E. Turn the sprayer upright and open
the VacuValve cap.
F. Tilt the sprayer so the VacuValve
is the highest point.
G. Gently squeeze the FlexLiner until
disinfectant enters the VacuValve
reservoir and all air is evacuated
from the cup.
G. While continuing to squeeze
the FlexLiner, close the
VacuValve cap.
• NOTE: If FlexLiner is not
squeezed while VacuValve Cap is
open, air will quickly pull into the
FlexLiner. If any air bubbles are
visible in the cup, repeat steps
E-G.
Firmly tighten Cup Lid onto
Cup Support to ensure an
air tight seal.
Turn Prime Knob forward to
SPRAY position.
Verify Spray Tip is forward in
the SPRAY position.
Pull the Trigger to verify disinfectant
sprays from the sprayer. If sprayer
does not spray within 5 seconds,
STOP and repeat START UP.
YOU ARE NOW READY TO SPRAY!
Install the cup onto the sprayer:
A. Verify Pump Filter is installed
and clean.
B. Align VacuValve (on Cup Lid)
with Prime Knob (on sprayer).
C. Push cup assembly onto the
sprayer. Twist to lock.
Review Important User Information in your sprayer manual to understand
which types of disinfectants are compatible with your sprayer.
This sprayer arrives from the factory with a small amount of test fluid
in the system. It is important that you flush the sprayer with warm
water before using for the first time. See Flushing a New Sprayer in
your sprayer manual.
Refer to disinfectant label for manufacturer’s directions on proper use. If
dilution is required, properly dilute disinfectant in a separate container.
START UP
START UP
continued
1
1
5
6
7
8
Turn Electrostatic Charge Power
Switch to ON position before
starting to spray.
9
2
3
4
2
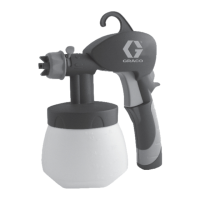
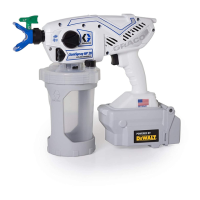
ELECTROSTATIC SERIES HANDHELD
Spray Tip
Spray Tip
Guard
Pump
Filter
Cup lid
Cup
Support
Electrostatic
Charge Power
Switch
Electrostatic
Headlight
Prime
Knob
Trigger
Speed
Control
VacuValve
™
FlexLiner
™