How to set up lighting scenes
Page 7
FOR
THIS
LOAD
TYPE . . .
SET
THE
ZONE’S
LEDs
LIKE
THIS:
INCANDESCENT,
HALOGEN
(TUNGSTEN)
1. Set all zones connected to HP 2•4•6 Dimming Modules as shown—
no matter what load type they are (including non-dim or switching). The
HP 2•4•6 can be used to switch non-capacitive ballasts. To fine-tune
the dimming of these “HP-powered” zones, you must adjust high- and
low-end trim on the HP 2•4•6 Dimming Module as described in the
Instruction Sheet supplied with the unit. Do NOT use HP 2•4•6
Dimming Modules with generator-supplied line/mains voltage.
2. All electronic low-voltage (ELV) lighting used with the Electronic Low-
Voltage Interface (ELVI) must be rated for reverse phase control
dimming. Before installing an ELV light source, verify with the
manufacturer that their transformer can be dimmed. When dimming, an
ELVI MUST be used with the 3000 Series Control Unit.
3. Any zones set for Lutron Hi-lume or Eco-10 fluorescent lighting must have
GRX-FDBI or GRX-TVI Fluorescent Interfaces. Consult Lutron for more
information.
4. Please note that the Tu-Wire Compact Fluorescent, unlike other fluorescent load
types, does not require an FDBI interface. This load type is not available in
GRX-CE models.
5. Use non-dim for any lights to be switched on and off only—not dimmed (unless
using HP Dimming Module).
■ Fluorescent non-dim loads with electronic or magnetic ballasts must: use a
GRX-TVI Interface
and
be set for non-dim mode, or use an HP 2•4•6
and
be set for HP 2•4•6 loads.
What is a scene?
* The S and M indicators under the FADE window show
whether FADE is “M”inutes or “S”econds. To set FADE in
minutes, you press FADE
5 to scroll through 1—59
seconds . . . the M lights. FADE is now expressed in minutes.
To get back to seconds, press FADE
6 until the window
shows “S”econds.
Note: Control Unit must be in
mode. See page 9 for more
information regarding Save Options.
To set up scenes 1 through 4:
1. Select a scene. Press the Scene button for the scene you want to
adjust. (First button for Scene 1, second button for Scene 2, and so
on.) Note that the last button is the “Off” Scene. You do not set
intensities for this button.
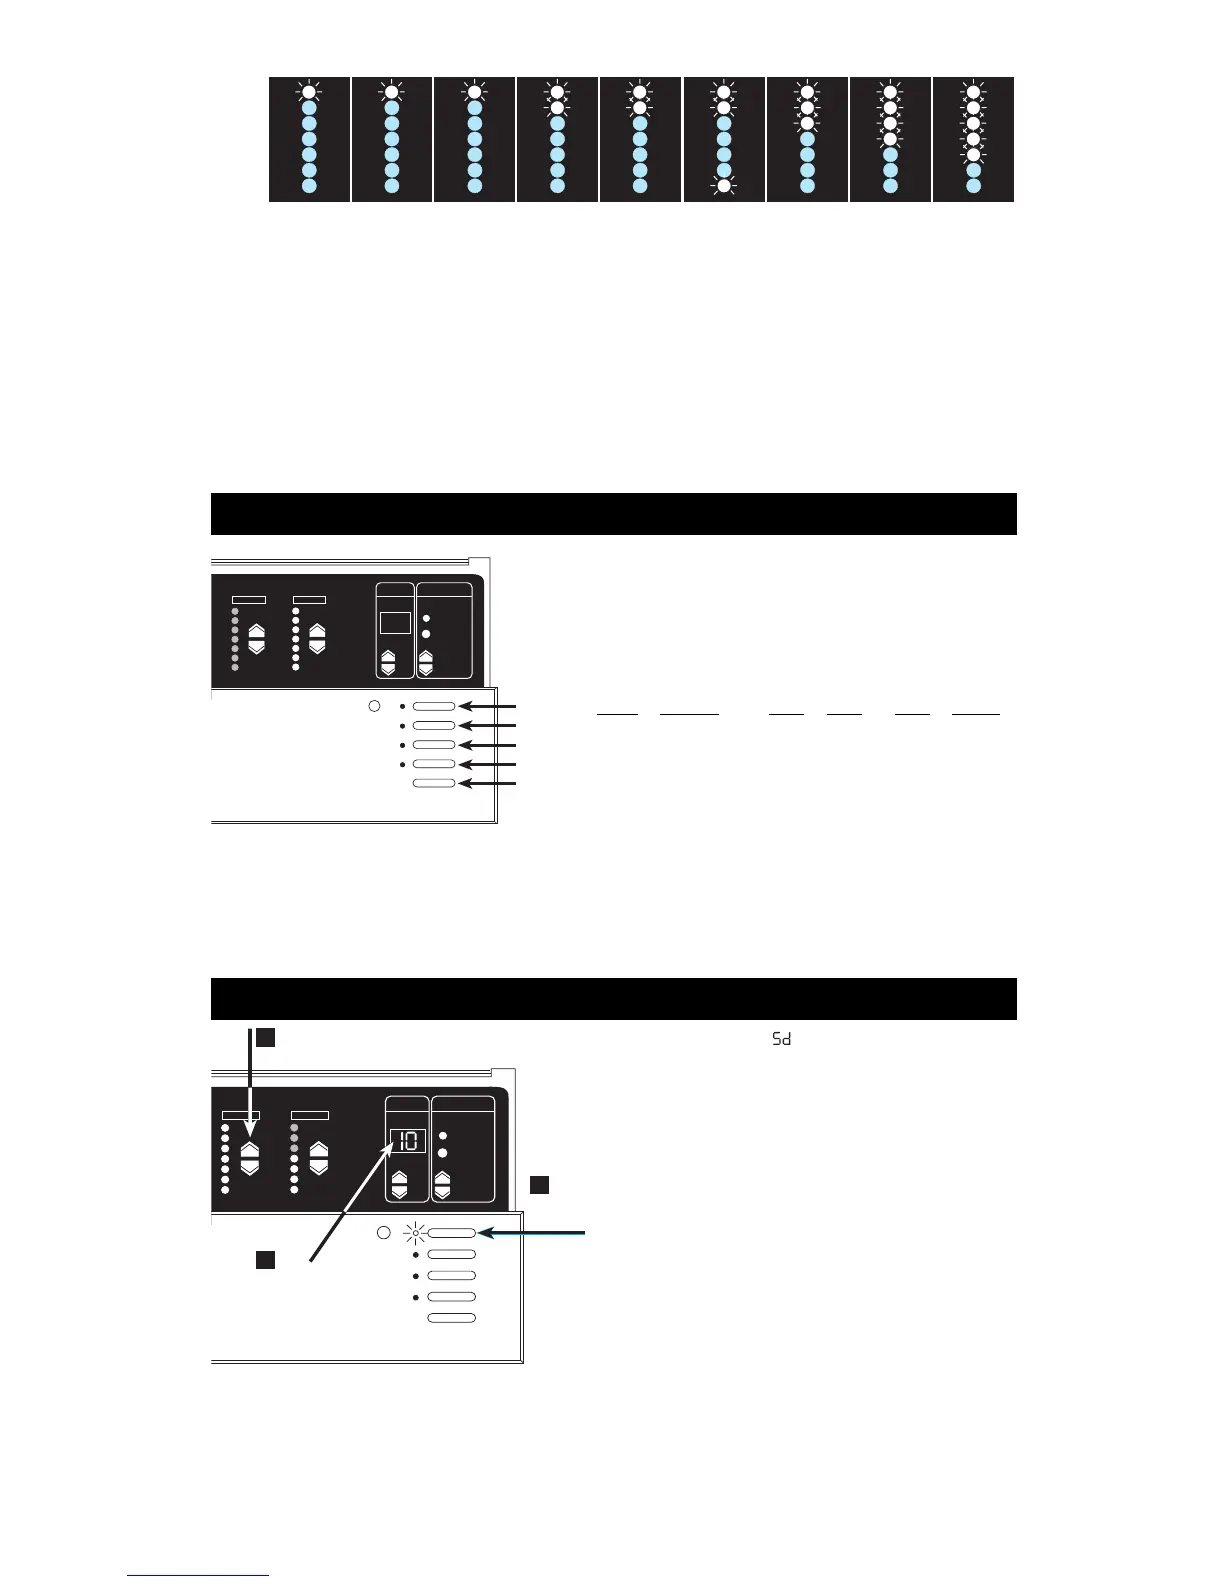
2. Set each zone’s light levels. Press ZONE
5 and 5 to adjust
each ZONE to the right visual intensity for this scene. (ZONE LEDs
show intensity bargraph-style. Each LED represents ~ 15% intensity
change. In this example, ZONE 6 is set to 60%.) To program scenes 5
through 16, or for more precise zone intensity adjustment with a
GRAFIK Eye 3500 Control Unit, refer to page 8.
3. Set scene’s FADE-in time. Press FADE
5 and 5 to make
FADE-in time anything from 0—59 seconds or 1—60 minutes*. (A
scene’s FADE-in time is how long it takes light intensities to adjust to
their new levels when the scene is selected.)
Repeat this process to set up each of the remaining scenes. Note that you
can also set up a “FADE-to-off” time. Press the OFF button and adjust
FADE as desired.
Scenes are the preset light levels and fade times stored in the Control
Unit. To create a scene, set the appropriate intensity for each ZONE. To
recall a scene, simply press one of the buttons. The first button calls up
Scene 1; the second, Scene 2; and so on. The last button turns lights Off.
For example, typical scene settings for a living room might be:
LIGHT LEVELS FOR ZONES
ACTIVITY Cove Hanging Down
SCENE OR EVENT Lights Lights Lights Sconces
1 General use 70% 10% 20% 20%
2 Entertaining 80% 25% 90% 40%
3 Reading 10% 60% 40% 0%
4 TV 20% 0% 30% 20%
Scenes 1—4 can be selected on the Control Unit. However, all Control
Units are capable of storing up to 16 scenes. Scenes 5 through 16 can be
selected using Wallstations.
MAGNETIC
LOW VOLTAGE
HP 2•4•6
LOADS
1
(120V SUPPLY
ONLY)
ELECTRONIC
LOW VOLTAGE
2
Hi-lume
®
OR Eco-10™
FLUORESCENT
3
TU-WIRE™
COMPACT
FLUORESCENT
4
NEON/COLD
CATHODE
NON-DIM
5
(LAST ON, FIRST
OFF)
NON-DIM
5
(FIRST ON, FIRST
OFF)
FADE TEMPORARY
MASTER
ZONES
ZONE 5 ZONE 6
ZONE
M S
1
3
2
SET THE LIGHT LEVELS OF ALL ZONES
SET SCENE’S FADE-IN TIME
SELECT A
SCENE
FADE TEMPORARY
MASTER
ZONES
ZONE 5 ZONE 6
M S
SCENE 1
SCENE 2
SCENE 3
SCENE 4
OFF

 Loading...