33700 SMART-BOX - Graupner HoTT 2.4 16
5. Firmware Update SMART-BOX
Firmware updates for the SMART-BOX are transferred via the DATA interface in conjunction with a PC run-
ning Windows XP, Vista or 7. For this you also require the USB interface, Order No. 7168.6, and the adapter
lead, Order No. 7168.6A or 7168.S, which are available separately.
The programs and fi les required for this are available from www.graupner.de in the Download area for the
corresponding products.
Install the Firmware_Upgrade_grStudio and the USB drivers on your computer. Check the system requi-
rements!
The fi rst step is to connect the lead to the USB interface, Order No. 7168.6.
This socket is also polarised; note the small chamfer on one edge. Never use
force - the plug should engage easily and fully.
Disconnect the cable connecting the transmitter and plug the USB interface cable instead on the right side
of the SMART-BOX. The socket polarity is so marked on the case: the black wire (-) must be at the top, the
orange wire (S) at the bottom.
The power supply cable (3.6 - 9 V) is inserted on the left side as shown on
the fi gure. This socket is also polarised; note the small chamfer on one edge.
Never use force - the plug should engage easily and fully.
The socket polarity is also marked on the case: the black wire (-) must be at
the bottom, the red wire (+) at the top.
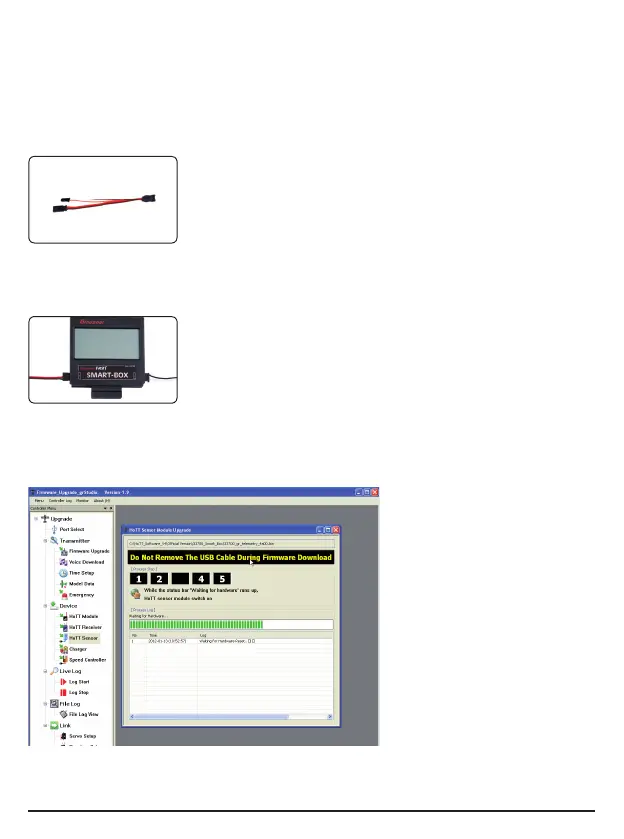
5.1. Update procedure
Ensure that the adapter lead is confi gured as shown in the illustrations, and is connected correctly to the
SMART-BOX.
Start the Graupner Firmware Update
Utility.
Under [COM Port Setup] select the
correct COM port, i.e. the one to which
the USB lead is connected. Please read
the software manual for this point. Now
choose the program „HoTT Sensor“.
Click on the “File Browse” button and
select the folder containing the pre-
viously loaded fi rmware fi le ending in
*.bin. If everything is correct, the fi le will
appear in the corresponding window.
The fi rmware fi les are encoded in pro-
duct-specifi c form, i.e. if you acciden-
tally select a fi le which does not match
the product (e.g. transmitter update fi le
instead of receiver fi le), then the pop-up
window “Product code error” will ap-
pear, and you will not be able to start
the update procedure.
Press the “Download Start“ button (Fig. A) in the software. Now connect the power supply on the left side
of the SMART-BOX.
A