GB - 32
Using Proper Fuel
Use regular grade unleaded fuel with an
octane rating of 87 octane or higher. Fuel
blends containing up to 10% ethanol or up to
15% MTBE reformulated fuel are acceptable.
Do not use fuel or additives containing
methanol as engine damage can occur.
Always use fresh, clean fuel that is purchased
in a quantity that can be used within
approximately 30 days, or add fuel stabilizer.
Fuel is blended to give best seasonal
performance. To avoid engine performance
problems such as hard starting or vapor lock,
use in-season fuel. Use fuel during warm
weather that was purchased during that
season, and use fuel during cold weather that
was purchased during that season.
Fuel can become stale in units with engines
that are used seasonally or infrequently
during a season. Stale fuel can produce
varnish and plug carburetor components
which can affect engine performance.
Keep fuel storage container tightly covered
and in a cool area out of direct sunlight. Fuel
can break down and degrade if not sealed
properly or exposed to sun and heat.
Condensation may collect in the fuel tank
because of a variety of operating or
environmental conditions and, over time, may
affect your unit’s operation. Fill fuel tank at
the end of daily use and store fuel in plastic
containers to reduce condensation.
For best year-round performance and fuel-
handling, add stabilizer to fuel immediately
after fuel purchase. This practice helps
prevent engine performance problems and
allows fuel storage in the unit all year without
draining.
To add fuel to the fuel tank:
1. Put the unit in an open area.
2. Stop the engine.
3. Allow engine to cool.
4. Clean the fuel cap and the area around
the fuel cap to prevent dirt from entering
the fuel tank.
5. Remove the cap from the fuel tank.
6. Fill the fuel tank. Be careful not to spill.
7. Install the cap on the fuel tank and
tighten.
8. Clean up any spilled fuel before starting
the engine.
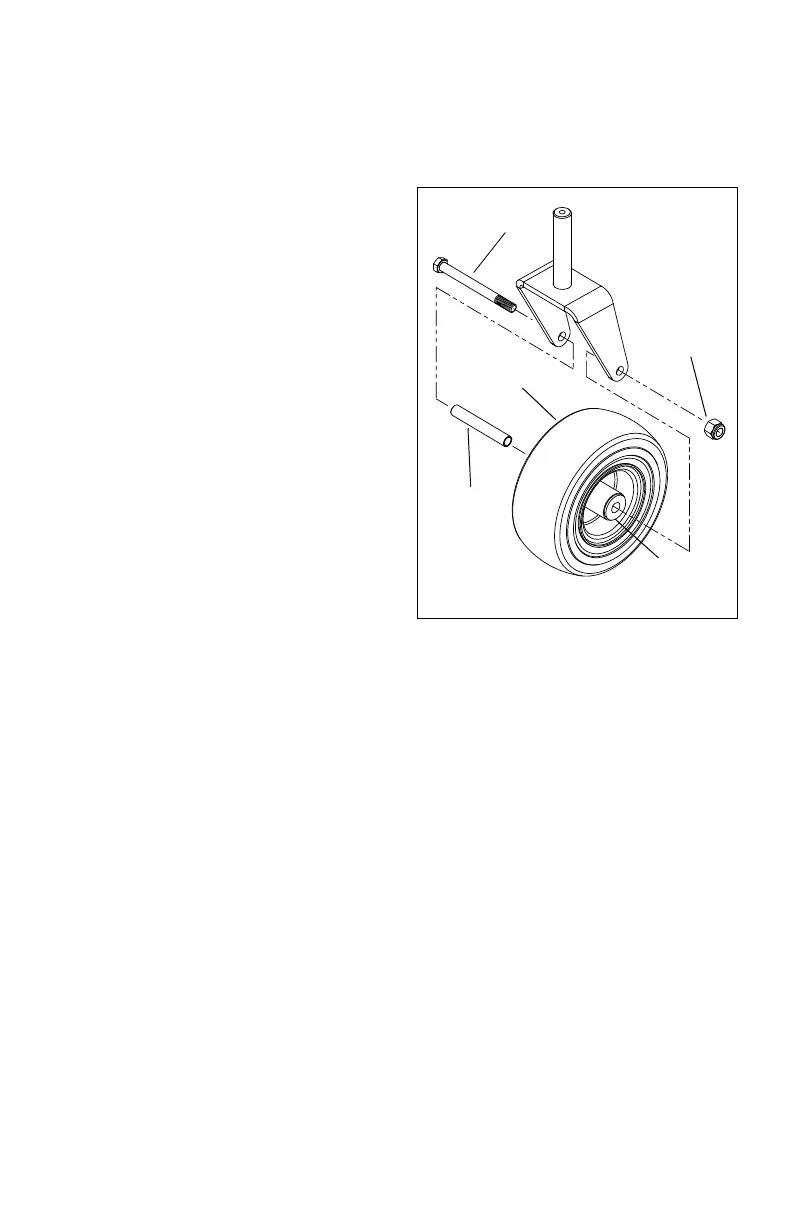
Servicing Caster Wheel Roller
Bearings
1. Park unit safely. See Using the Parking
Brake on page 13.
2. Raise and securely support the front of
the mower.
3. Remove nut (A), hex bolt (B) and wheel
assembly (C).
4. Remove bearing sleeve (D), bearing
retainer (E), and roller bearing (F) from
wheel.
5. Clean bushing and roller bearing and
pack with clean grease.
6. Install wheel assembly (C), roller bearing
(F), bearing retainer (E), bearing sleeve
(D), bolt (B) and nut (A).
Replacing Caster Pivot Bearing
Bushings
1. Park unit safely. See Using the Parking
Brake on page 13.
2. Raise and securely support the front of
the mower deck.
3. Support caster yoke/wheel assembly.
4. Remove hex bolt (A), lock washer (B)
and flat washer (C) from caster yoke (E).
Lower caster yoke/wheel assembly from
caster weldment.
5. Remove and discard upper and lower
bushings (D) from caster weldment.