13
DISASSEMBLY
Removing the PURIFICATION PLATE:
Grasp the PURIFICATION PLATE on the ceramic portion and gently pull it out of the grooves
on the sides. Clean (see “CLEANING” page 16) and set the PURIFICATION PLATE aside.
Removing the ARC CELL:
1. Locate the ARC CELL CONNECTOR on the right of the rear of the unit almost
halfway up the unit (beside the PURIFICATION PLATE slot). Squeeze the tabs on the
top and bottom of the ARC CELL CONNECTOR and pull gently until free from the
ARC CELL CONNECTOR outlet.
2. Remove the ARC CELL RETAINING NUTS from the Screw Posts on the right and left
below the ARC CELL. Place the ARC CELL RETAINING NUTS where you will find them
easily during reassembly.
3. Gently slide the ARC CELL out of the unit. Clean (see “CLEANING” page 16) and set
the ARC CELL aside.
Clean the interior of the unit (see “CLEANING” page 16).
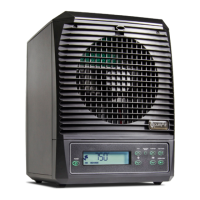
Removing the FRONT GRILLE:
1. Locate the four FRONT GRILLE SCREWS in the two upper corners of the FRONT
GRILLE. Using your screw driver, carefully remove the two FRONT GRILLE SCREWS.
Place the FRONT GRILLE SCREWS where you will find them easily during reassembly.
2. Remove the FRONT GRILLE by tilting the top away from the unit until the FRONT
GRILLE can be lifted free. Ensure that the IONIZATION NEEDLE (in the top center of
the front of the unit) is not damaged. Clean the FRONT GRILLE if necessary (using
compressed air, vacuum cleaner, damp cloth or warm soapy water) and set the
FRONT GRILLE aside.
3. Clean the IONIZATION NEEDLE if necessary (see “CLEANING” page 16).
The unit should be powered OFF and the POWER CORD disconnected whenever
cleaning or servicing.
ARC Cell contains Hg (Mercury) and should be disposed of according to disposal laws.
Find disposal centers at www.earth911.org. DO NOT handle if broken or hot.
Refer to the Diagram Section (Pg. 5-6) for further illustrations of part names and locations.
 Loading...