Small notch must face forward!
La petite encoche doit se trouver vers l’avant!
La muesca pequeña debe mirar hacia delante.
De kleine inkeping moet naar voor gericht zijn!
Die kleine Kerbe muss nach vorne zeigen!
La scanalatura più piccola deve essere rivolta in avanti.
小さな切込みが前方を向くこと。
小开口必须向前!
小型缺口必須朝前!
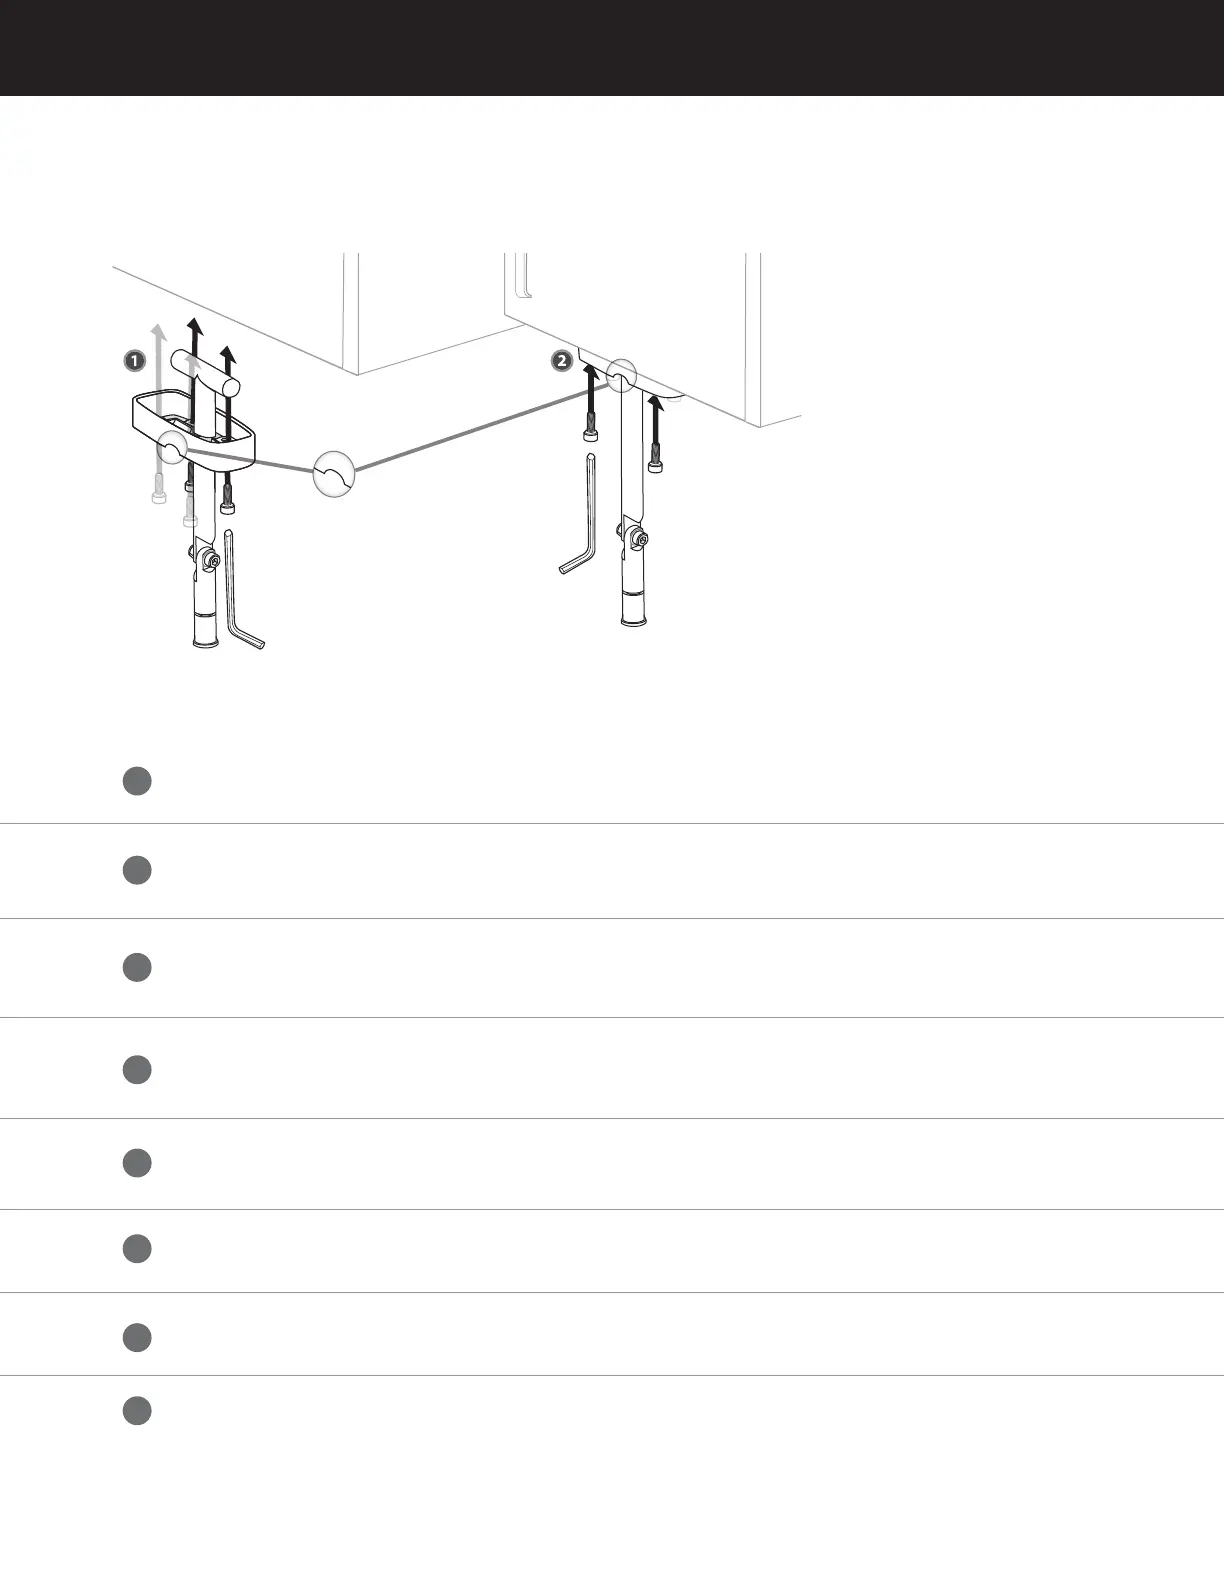
Take care to ensure the Mounting Cover is attached with the large notch facing the rear of the cabinet and the small notch
facing toward the front of the cabinet. This will allow the Arm and Frame to swing up and out of the way when not in use.
Use the included hex wrench to tighten the two rear screws, then tighten the two front screws.
ÉTAPE 5
Fixez le bras
à la plaque
de montage
PASO 5
Conecte el brazo
montado a la
placa de montaje
STAP 5
Maak de
armassemblage
vast aan de
montageplaat
SCHRITT 5
Arm-Baugruppe
mit der
Befestigungsplatte
verbinden
PASSAGGIO 5
Collegate il gruppo
del braccetto alla
piastra di fissaggio
手順 5
アームアセン
ブリと取り付 け
プレートの接続
第 5 步
将臂组件连
接到安装盘
步驟 5
將臂組件安
裝於吊掛盤
FR
SP
DU
DE
IT
JP
SC
TC
STEP 5: Connect the Arm Assembly to the Mounting Plate
Assurez-vous de fixer le couvercle de montage de sorte que la grande encoche se trouve vers l’arrière
de l’armoire et que la petite encoche se trouve vers l’avant de l’armoire. Cela permet de déplier le bras
et le cadre ou de les replier lorsque vous ne les utilisez pas. Utilisez la clé Allen fournie pour serrer les
deux vis arrière, puis serrez les deux vis avant.
Asegúrese de colocar la tapa de montaje con la muesca grande hacia la parte posterior del armario y
la muesca pequeña hacia la parte delantera del armario. Esto permitirá plegar el brazo y el marco, y
dejarlos apartados cuando no se esté utilizando el soporte. Utilice la llave Allen incluida para apretar
los dos tornillos posteriores y, a continuación, apriete los dos tornillos delanteros.
Zorg ervoor dat de montageplaats is vastgemaakt met de grote inkeping naar de achterkant van de
kast gericht en de kleine inkeping naar de voorkant van de kast. Hierdoor zullen de arm en de houder
omhoog en uit de weg worden gezwaaid wanneer het toestel niet in gebruik is. Gebruik de bijgeleverde
inbussleutel om de twee achterste schroeven vast te maken en maak vervolgens de twee voorste
schroeven vast.
Achten Sie darauf, die Befestigungsabdeckung so anzubringen, dass die große Kerbe zur
Schrankrückseite und die kleine Kerbe zur Schrankvorderseite zeigt. So kann der Arm mit dem
Rahmen bei Nichtverwendung nach oben geklappt werden. Ziehen Sie mit dem mitgelieferten
Innensechskantschlüssel zuerst die beiden hinteren und dann die beiden vorderen Schrauben fest.
Prestate attenzione che il rivestimento sia montato con la scanalatura più grande rivolta verso la parte
posteriore del pensile e quella più piccola rivolta verso la parte anteriore. In questo modo, braccetto e
cornice potranno essere ripiegati in alto e riposti quando non in uso. Utilizzate la chiave esagonale in
dotazione per fissare le due viti posteriori, quindi stringete le due viti anteriori.
取り付けプレートカバーは、大きな切り込みがキャビネットの後方を向き、小さな切込みがキャビネット
の前方を向くようにして取り付けます。この切り込みにより、使用していないときにアームとフレームを
折りたたみ位置まで移動させることができます。付属の六角レンチを使用して、後方の2本のネジを締
めてから、前方の2本のネジを締めます。
安装时,请确保安装板盖较大的开口朝向橱柜的背面,较小开口朝向橱柜的前面。这样臂和支架才
能顺利向上摆动,以便不使用时将其收合。用附送的六角扳手依次紧固两颗后螺丝和两颗前螺丝。
請注意在固定吊掛蓋時,需將大型缺口朝向櫃後,小型缺口朝向櫃前。 這可讓拉桿與外框在未使
用時向上擺動收起而不會佔據空間。請使用隨附的六角扳手來鎖緊兩個背面螺絲,然後將兩個前
面螺絲鎖緊。
 Loading...