EasyManua.ls Logo

Grizzly G0715P - User Manual

Grizzly G0715P
88 pages
Print Icon
To Next Page IconTo Next Page
Loading...
MODEL G0715P
POLAR BEAR SERIES
®
10" HYBRID TABLE SAW
w/RIVING KNIFE
OWNER'S MANUAL
8DENG><=I?JAN!'%&%7N<G>OOAN>C9JHIG>6A!>C8#G:K>H:99:8:B7:G!'%&&7A
WARNING: NO PORTION OF THIS MANUAL MAY BE REPRODUCED IN ANY SHAPE
OR FORM WITHOUT THE WRITTEN APPROVAL OF GRIZZLY INDUSTRIAL, INC.
;DGBD9:AHB6CJ;68IJG:9H>C8:)$&&&(%,'IG8G7AIH?7EG>CI:9>C8=>C6
'('-*,

Questions and Answers

  • K
    Karen DavisAug 10, 2025
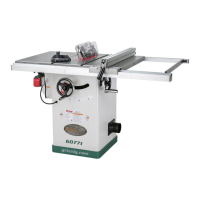
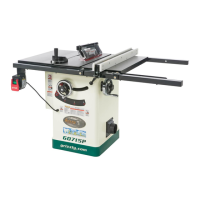
    What to do if the board binds or burns when feeding through my Grizzly G0715P?
    • T
      Tricia HowardAug 10, 2025
      If the board binds or burns when feeding through the Grizzly table saw, possible reasons include: * A dull blade - replace it. * A warped blade - replace it. * The fence is not parallel to the blade - make fence parallel to blade. * The table top is not parallel to the blade - make the table parallel to the blade.
  • R
    raymondjohnsonAug 14, 2025
    What causes the blade on my Grizzly G0715P Saw to not reach 90 degrees?
    • J
      Jessica Lopez PhDAug 14, 2025
      If the blade does not reach 90° on your Grizzly Saw, it could be due to: * The 90° stop collar being out of adjustment - adjust the 90° stop collar. * Sawdust stuck on the stop collar - clean the sawdust off the stop collar.
  • G
    gardnerericAug 20, 2025
    What to do if the blade hits the insert at 45 degrees on my Grizzly G0715P Saw?
    • L
      Laura MirandaAug 20, 2025
      If the blade hits the insert at 45° on your Grizzly Saw, consider these possibilities: * The 45° stop collar is out of adjustment - adjust the 45° stop collar. * Sawdust is stuck on the stop collar - clean the sawdust off the stop collar. * The slot in the insert is inadequate - file or mill the slot in the insert. * The table is out of alignment - align the blade to the table. * The blade position is incorrect - adjust the blade position.
  • M
    Mrs. Leslie KellyOct 25, 2025
    How to troubleshoot a Grizzly Saw that won't start or trips a breaker?
    • H
      hbryantOct 25, 2025
      If your Grizzly Saw does not start or a breaker trips, there are several potential causes: * The locking pin might be installed—remove it from the START button. * A fuse could be blown—replace the fuse and ensure there are no shorts. * The wall circuit breaker might have tripped—ensure the circuit size is correct or replace a weak breaker. * The power supply could be switched OFF or at fault—ensure the power supply is on and has the correct voltage. * The plug/receptacle might be faulty or wired incorrectly—test for good contacts and correct the wiring. * The motor connection might be wired incorrectly—correct the motor wiring connections. * The wiring might be open or have high resistance—check and fix broken, disconnected, or corroded wires. * The motor START/STOP switch...
  • L
    Laura DavisOct 30, 2025
    Why does my Grizzly G0715P Saw stall or seem underpowered?
    • R
      roberto35Oct 30, 2025
      If the Grizzly Saw stalls or is underpowered, consider the following: * The feed rate or cutting speed might be too fast—decrease it. * The workpiece material might be unsuitable—only cut wood and ensure moisture is below 20%. * The workpiece might be crooked, or the fence mis-adjusted—straighten or replace the workpiece, or adjust the fence. * The machine might be undersized, or the wrong blade is in use—use the correct blade and reduce the feed rate or depth of cut. * The run capacitor might be at fault—test, repair, or replace it. * The belt might be slipping—tension or replace the belt. * The motor might be wired incorrectly—wire the motor correctly. * The plug/receptacle might be at fault—test for good contacts and correct the wiring. * The pulley/sprocket might be ...
  • X
    xlucasNov 3, 2025
    How to reduce vibration and noise in my Grizzly G0715P?
    • Y
      yvonne49Nov 3, 2025
      If your Grizzly Saw has excessive vibration or noisy operation, check these potential causes: * A motor or component might be loose—inspect and replace any damaged bolts or nuts, and re-tighten with thread locking fluid. * The blade might be at fault—replace a warped or bent blade, or resharpen a dull blade. * Belts might be worn or loose—tension or replace the belts. * A pulley might be loose—realign or replace the shaft, pulley, setscrew, and key. * The motor mount might be loose or broken—tighten or replace it. * The machine might be incorrectly mounted—tighten mounting bolts or relocate/shim the machine. * The arbor pulley might be loose—retighten or replace the arbor pulley. * The motor fan might be rubbing on the fan cover—fix or replace the fan cover, or replace a l...

Summary

INTRODUCTION

Manual Accuracy

Details on the accuracy of manual instructions and potential discrepancies with the machine.

Contact Info

Grizzly Industrial's contact details for technical support and feedback.

Machine Description

Overview of the table saw's features, design, and components.

Identification

MACHINE DATA SHEET

Main Specifications

Blade Information

Specifications related to the saw blade, arbor, and speed.

Cutting Capacities

Details on maximum cut depths and rip capacities.

Table Information

Dimensions and specifications for the table and extension wings.

Fence Information

Specifications for the fence type, size, and rails.

Miter Gauge Information

Specifications for the miter gauge slot type and dimensions.

Construction

Details on materials used for table saw construction.

Other Related Information

Information on paint, dust ports, and mobile base compatibility.

Other Specifications

Features

List of key features and attributes of the table saw.

SECTION 1: SAFETY

Safety Symbols and Signal Words

Explanation of hazard symbols (DANGER, WARNING, CAUTION, NOTICE) used in the manual.

General Safety Instructions

Fundamental safety guidelines for operating the machine.

Machine Operation Safety

Crucial safety advice for operating the table saw, covering power, guards, and environment.

Additional Safety for Table Saws

Specific safety precautions for table saw operations, including kickback and blade handling.

Kickback Prevention and Protection

Guidance on preventing and protecting oneself from kickback incidents.

Glossary of Terms

SECTION 2: POWER SUPPLY

Availability

Considerations for power supply circuit availability and installation requirements.

Full-Load Current Rating

Information on the machine's amperage draw and circuit sizing.

Circuit Information

Details about power supply circuits and the importance of proper sizing.

Circuit Requirements for 220 V

Specific electrical requirements for operating the saw on a 220V circuit.

Circuit Requirements for 110 V

Specific electrical requirements for operating the saw on a 110V circuit.

Grounding Requirements

Essential information on proper grounding for electrical safety.

Extension Cords

Recommendations and requirements for using extension cords with the machine.

Voltage Conversion

Instructions on how to convert the machine from 220V to 110V.

SECTION 3: SETUP

Needed for Setup

List of items not included with the machine required for setup.

Unpacking

Instructions for safely unpacking the machine and inspecting for damage.

Hardware Recognition Chart

Inventory

Box Contents

List of main components shipped with the table saw.

Hardware (Not Shown)

List of hardware items not visually depicted in the main inventory figures.

Components

Detailed list of components and their part numbers for assembly.

Hardware and Tools (Not Shown)

List of hardware and tools not shown in the component diagrams.

Cleanup

Site Considerations

Weight Load

Guidance on ensuring the installation surface can support the machine's weight.

Space Allocation

Recommendations for adequate workspace around the machine.

Physical Environment

Optimal environmental conditions for machine operation and longevity.

Electrical Installation

Advice on placing the machine near a power source and protecting cords.

Lighting

Requirements for adequate lighting around the machine for safe operation.

Assembly

Power Connection

Instructions for connecting the machine to the power source.

Dust Collection

Test Run

Recommended Adjustments

Key adjustments to verify for safe and accurate saw operation.

SECTION 4: OPERATIONS

Operation Overview

Basic understanding of how the machine is used in a typical operation.

Basic Controls

Explanation of the START/STOP switch, blade tilt, and blade height controls.

Non-Through & Through Cuts

Defines and illustrates non-through and through cuts and safety requirements.

Workpiece Inspection

Guidelines for inspecting workpieces for safe cutting and material suitability.

Blade Requirements

Specifications for saw blades, including body and kerf thickness.

Blade Selection

Guidance on selecting appropriate saw blades for different cutting tasks.

Blade Installation

Step-by-step instructions for installing or changing the saw blade.

Blade Guard Assembly

Information on the blade guard, spreader, and anti-kickback pawls.

Riving Knife

Details on the riving knife's function, installation, and usage.

Ripping

Instructions for performing rip cuts, including safety precautions.

Crosscutting

Instructions for performing crosscuts using the miter gauge.

Miter Cuts

Procedure for making angled crosscuts (miters) with the miter gauge.

Blade Tilt;Bevel Cuts

How to adjust blade tilt for bevel, compound miter, and chamfer cuts.

Dado Cutting

Instructions for cutting dadoes using a dado blade or standard blade.

Rabbet Cutting

Procedures for cutting rabbets using a dado or standard blade.

Resawing

Guidance and safety for resawing operations, including building a resaw barrier.

SECTION 5: SHOP MADE SAFETY ACCESSORIES

Featherboards

Instructions for making and mounting featherboards for safety.

Push Sticks

Guide on using and making push sticks to keep hands safe.

Push Blocks

Instructions for using and making push blocks for workpiece control.

Narrow-Rip Auxiliary Fence & Push Block

Jig for increasing safety during very narrow rip cuts.

Outfeed & Support Tables

Benefits of using outfeed and support tables for large workpieces.

Crosscut Sled

How a crosscut sled improves safety and accuracy.

SECTION 6: AFTERMARKET ACCESSORIES FROM GRIZZLY

Mobile Base

Information on the heavy-duty mobile base for the table saw.

Dust Collector

Details on the G1163 1HP dust collector and its specifications.

Tablesaws Guide Book

Description of the 'Success with Tablesaws' book.

Zero Clearance Insert

Information on the T23279 Zero Clearance Insert.

Saw Blades

Overview of Forrest Woodworker II Saw Blades.

Dado Blades

Information on Forrest Dado Blades for clean grooving.

Dust Collection Accessories

Selection of dust collection components for machines with 4" dust ports.

Tabletop Protection Products

Recommended products for protecting the cast iron table top.

SECTION 7: MAINTENANCE

Schedule

Recommended maintenance schedule based on frequency of use.

Cleaning

Procedures for cleaning the table saw, including dust removal.

Unpainted Cast Iron

Instructions for cleaning and protecting unpainted cast iron surfaces.

Lubrication

Guide to lubricating key components like trunnions and gears.

SECTION 8: SERVICE

Troubleshooting

Common problems and their possible causes and solutions.

Blade Tilt Stops

How to adjust the 90° and 45° blade tilt stop collars.

Miter Slot to Blade Parallelism

Procedure for aligning the miter slot parallel to the saw blade.

Spreader or Riving Knife Alignment

Checking and adjusting the alignment of the spreader or riving knife.

Fence Adjustments

Adjusting fence height, squareness, parallelism, and clamping pressure.

Miter Gauge Adjustments

How to adjust the miter gauge's 90°, 45°, and 30° stops.

Belt Tension & Replacement

Procedures for tensioning and replacing the drive belt.

SECTION 9: WIRING

Wiring Safety Instructions

Critical safety warnings and guidelines for working with electrical wiring.

Wiring Diagram

Schematic illustrating the electrical connections for the machine.

Electrical Components

Identification and location of key electrical components.

SECTION 10: PARTS

Body

Exploded view and parts list for the main body assembly.

Trunnion Parts List

Detailed parts list and diagram for the trunnion assembly.

Power Switch

Parts list and diagram for the power switch assembly.

Miter Gauge

Parts list and diagram for the miter gauge assembly.

Blade Guard

Parts list and diagram for the blade guard assembly.

Fence

Parts list and diagram for the fence assembly.

Rails

Parts list and diagram for the fence rails.

Machine Labels

Identification and location of various labels on the machine.

WARRANTY CARD

WARRANTY AND RETURNS

Grizzly G0715P Specifications

General IconGeneral
BrandGrizzly
ModelG0715P
CategorySaw
LanguageEnglish

Related product manuals