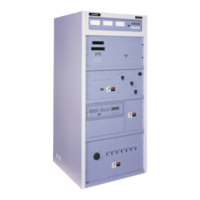
Compartment end of the cabinet and should be fork lifted from
this end. If roller bars are used, lead with the heavier end.
CAUTION
UNIT MUST NOT BE DROPPED. MAKE A RAMP TO ROLL FROM
SKID TO FLOOR.
NOTE
ALONG THE BOTTOM OF THE CABINET FRAME ARE LEV-
ERAGE POINTS FOR ELEVATING THE CABINET TO ALLOW
HEAVIER PRY-BARS TO BE POSITIONED UNDERNEATH
THE FRAME.
After the PA Cabinet is in position, position the Output Network
Cabinet. Maneuver the Output Network Cabinet carefully when
joining the two cabinets together so as not to damage any of the
exposed fan blades. Make sure that none of the interconnecting
wires are exposed while positioning the cabinets. Shim and level
the cabinets before bolting together.
If the transmitter is to be positioned into a predetermined wall
opening, be sure to allow for the fan blades of the Output
Network Cabinet and any final leveling needed when determin-
ing the wall opening dimensions.
2.6.3
Cabinet Bolts
Fastenthecabinets together usingthe1 inch 1/4-20 stainlesssteel
bolts, flat washers, split washers, and nuts provided in the instal-
lation hardware kit. Plastic plugs are provided to cover the
hardware access holes in the cabinets. These will prevent air
leakage for optimum transmitter cooling.
2.6.4
Cabinet Ground Strap
After the two cabinets are bolted together, fasten the 2 inch
copper interconnect strap from the PA Cabinet to 2E1 in the
Output Network Cabinet.
2.6.5
Cabinet Grounding Plate
Unbolt the Cabinet Grounding Plate on top of the PA Cabinet
and rotate 180 degrees. Secure to the PA Cabinet and Output
Network Cabinet with 10-32 screws, flat washers and split
washers.
2.7 Air System And Cooling
Refer to Sheet 2 of the DX-25U Cabinet Outline Drawing,
839-7855-152, forinformation onair flowCFM, heat dissipation
and duct work dimensions.
Cooling air for the transmitter enters through the rear of the
Output Network Cabinet and exhausts through the top-front half
of the PA Cabinet. If an exhaust duct is used, static pressure in
the duct must be neutral or slightly negative. Static pressure for
air intake at the rear of the transmitter must be neutral or slightly
positive. The exhaust grill opening on the top of the PA Cabinet
must not be restricted. The dimension from the front edge of the
transmitter to the exhaust opening is only 2.3 inches (5.84 mm).
This is an important consideration when a wall will be installed
along the front of the transmitter.
2.8 Electrical Installation
Refer to sheet 3 of the DX-25U Cabinet Outline Drawing,
839-7855-152, for electrical information.
Sheet 1 of the DX-25U Overall Schematic, 839-7855-151, de-
tails the interconnections between the PA Cabinet and the Step
Start panel.
2.8.1
Step Start Panel
The Step Start panel is intended to be wall mounted and should
be located as close as possible to the PA Cabinet. The conduit
may be attached to any of the four sides or the back of the Step
Start panel, however, there are no knock-out holes provided on
the back of the panel. All transmitter AC power is routed through
the Step Start panel to utilize the MOV surge protectors. The
grounding strap 3E1, should be connected to a good station
ground with 2" copper strap for optimum protection.
2.8.2
AC Power
There are two separate AC power feeds needed for the DX-25U:
athreephase105 kVA inputfor T1, PA Powersupplytransformer
and a single phase 1 kVA supply for T2, Low Voltage supply
transformer. The input voltage for T1 can be from 360 VAC to
PA Supply Voltage 230 VDC Blower Wires #123, #124, & #125
Line Line to Jumper Line Line Frequency
Voltage T1 Tap Voltage 60 Hz 50Hz
502 Vac 485 485 to +4% 502 Vac -4% tap 380 tap
485 Vac 485 485 to 0 485 Vac -4% tap 380 tap
468 Vac 485 485 to -4% 468 Vac -4% tap 380 tap
447 Vac 430 430 to +4% 447 Vac +4% tap 380 tap
430 Vac 430 430 to 0 430 Vac +4% tap 380 tap
413 Vac 430 430 to -4% 413 Vac 485 tap 380 tap
397 Vac 380 380 to +4% 397 Vac 430 tap 0 tap
380 Vac 380 380 to 0 380 Vac 485 tap 0 tap
363 Vac 380 380 to -4% 363 Vac 485 tap 0 tap
Table 2-2. Transformer Tapping for T1 and Blowers
Section II - Installation
Rev. AA: 8/9/2000 888-2297-002 2-3
WARNING: Disconnect primary power prior to servicing.
 Loading...

