2-4
RF-7800W
SYSTEM INSTALLATION
e. Configure the Frequency and Channel Size based on frequency availability, and select Apply & Save
All. These settings must be the same for all radios that are to be linked.
f. Change the Tx Power, if necessary, and select Apply & Define Link. This navigates to the Subscriber
Link Configuration screen. See Figure 3-19.
g. In the Subscriber Link Configuration screen, enter a name for the Link, as well as the unique MAC
address of the SS radio if using Normal Links. Otherwise, ensure that the STID and STID Password
match those on the SS radio if using Link Templates. Then select Apply.
h. Perform the Link Configuration for any other subscriber Links, if using Normal Links or multiple Link
Templates. In the navigation menu go to Configuration > Subscriber Links, click the Add Link button,
then repeat Step g.
i. Select Save All in the Dashboard once all Links have been added.
2.4 INSTALLATION
2.4.1 Hardware Installation
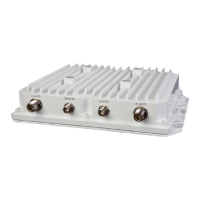
a. Mounting the Radio
A radio ancillary kit is available with a bracket that is designed to mount the radio and an antenna to a
vertical pipe or mast with a diameter of 1.5 to 4.0 inches. The radio can be mounted on either side of
the bracket but should be installed with the Ethernet port facing the ground (see Figure 2-2). 7/16” tools
(Items 1 & 2) are needed to assemble the bracket and install the radio. If using an RF-7800W-PA50x,
refer to the RF-7800W-PA50x Op Card (10515-6835) for additional information.
b. Mounting the Antenna
Most of the antennas designed for use with the radio will mount to the front portion of the mounting
bracket. Support for other mounting styles like a vertical whip antenna can be achieved by swapping
out the front bracket with another design. The antenna bracket that comes in the ancillary kit is designed
to tilt the antenna through 45° of elevation about the horizon.
c. Lightning Protection (recommended)
Cables running down from equipment that is mounted on a roof, tower, or portable mast system provide
a path for lightning to surge into other equipment on the premise. A properly grounded lightning
protector installed at the bottom of the mast or at the entrance to a building can protect both personnel
and other equipment from damage due to lightning.
 Loading...