Only use spare parts supplied by Hayward
®
brand
Page 8 on 22Xxxxxx xxxx
EN
English
PROGRAMMING CUSTOM SCHEDULES
To customize your pump’s schedule, the pump must be stopped. Ensure that the Start/Stop LED is not illuminated.
When programming, the LED next to the parameter you are editing will blink.
“ Speed” - Run Speed
“ Time” - Start Time
“Duration” - Run Time
To program a Custom Schedule:
1. Press Start/Stop to stop the pump.
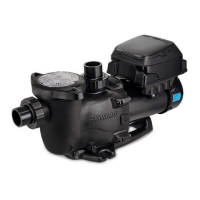
2. Press “1”. The SPEED 1 LED and the “Speed”
parameter LED will blink while editing. See Figure 3.
3. Use “+” and “-” to adjust the speed in RPM for SPEED 1,
use the “<” and “>” move the cursor.
Note:Move the cursor to adjust the individual, ten and hundred
digit values when you move the cursor, the coresponding location
LED will blink.
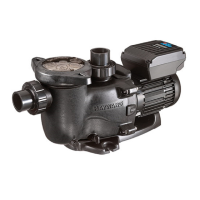
4. Press “1”. The SPEED 1 start time will display.
The “Time” parameter LED will begin to blink. See Figure 4.
5. Use “+” and “-” to adjust the SPEED 1 start time.
use the “<” and “>” move the cursor.
Note: Move the cursor to adjust the hour and minute (HH:MM).
when you move the cursor, the corresponding location LED will blink.
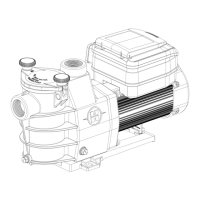
6. Press “1”. SPEED 1 duration will display. The
“Duration” parameter LED will begin to blink. See Figure 5.
7. Use “+” and “-” to adjust the SPEED 1 duration
in hours and minutes,use the “<” and “>” move the cursor.
Note: Move the cursor to adjust the hour and minute (HH:MM).
When you move the cursor, the coresponding location LED will blink.
Note: If the duration is set to 0 hours, the pump
will not run this program segment during this period
8. SPEED 1 is now successfully programmed.
Note: Pressing “1” will continue to cycle through these parameters,
but changes are immediately saved as they are adjusted.
9. Press “2”. The SPEED 2 LED and “Speed” parameter
LED will blink while editing.
10. Use “+” “-” “<” and “>” to adjust the speed in RPM for SPEED 2.
11. Press “2”. The SPEED 2 duration will display.
12. Use “+” “-” “<” and “>” to adjust the duration of
SPEED 2 in hours and minutes.
13. Repeat steps 9-12 to program SPEED 3、4 and QUICK CLEAN.
14. Press Start/Stop and ensure the Start/Stop LED is
illuminated. The pump is now active and will runthe
programmed schedule.
Note: If the pump was stopped using the Start/
Stop button, the pump will not run until the Start/
Stop button is pressed again. If the Start/Stop
LED is illuminated, the pump is on and will run the
programmed schedule.
Figure 4
Figure 3
Figure 5
 Loading...