Introduction
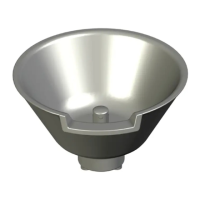
The Hayward Water Bowl is a bowl-shaped water feature containing an LED light that together cre-
ate a stunning flickering fire effect designed to enhance your backyard pool or spa experience. The
Water Bowl must be installed as specified by these instructions. Please follow ALL of the instructions
enclosed with this unit. It is recommended to keep the unit in its original packaging until the site is
prepared for installation.
What's Included
Refer to the table and graphic below for a list of all items included with the Hayward Water Bowl.
Item # Part Description Quantity
1 Niche Assembly 1
2 LED Light Assembly 1
3 Bowl Assembly (round or square) 1
4 Water Spout Assembly 1
Installation
Preparation
Determine the install location(s) for the Water Bowl. Be sure to follow all NEC and local codes during
installation. For optimal performance, the lip of the bowl should be aligned with or slightly hanging
over the edge of the pool or spa. The electrical junction box and/or low voltage transformer should
be located at least 48 inches from the edge of the pool or spa and at least 4 inches above ground
and 8 inches above the bowl's water level.
Once you have determined the install location(s), gather all necessary tools and refer to the following
sections to rough-in plumbing and electrical lines.
Overview
Refer to the diagram on the following page for a basic installation overview. Note that the plumbing
for the Water Bowl requires a check valve to prevent drain off when the system is not in use. A flow
control valve should also be used in order to obtain the optimal water effect in the bowl.
USE ONLY HAYWARD GENUINE REPLACEMENT PARTS
2
USE ONLY HAYWARD GENUINE REPLACEMENT PARTS
2
 Loading...