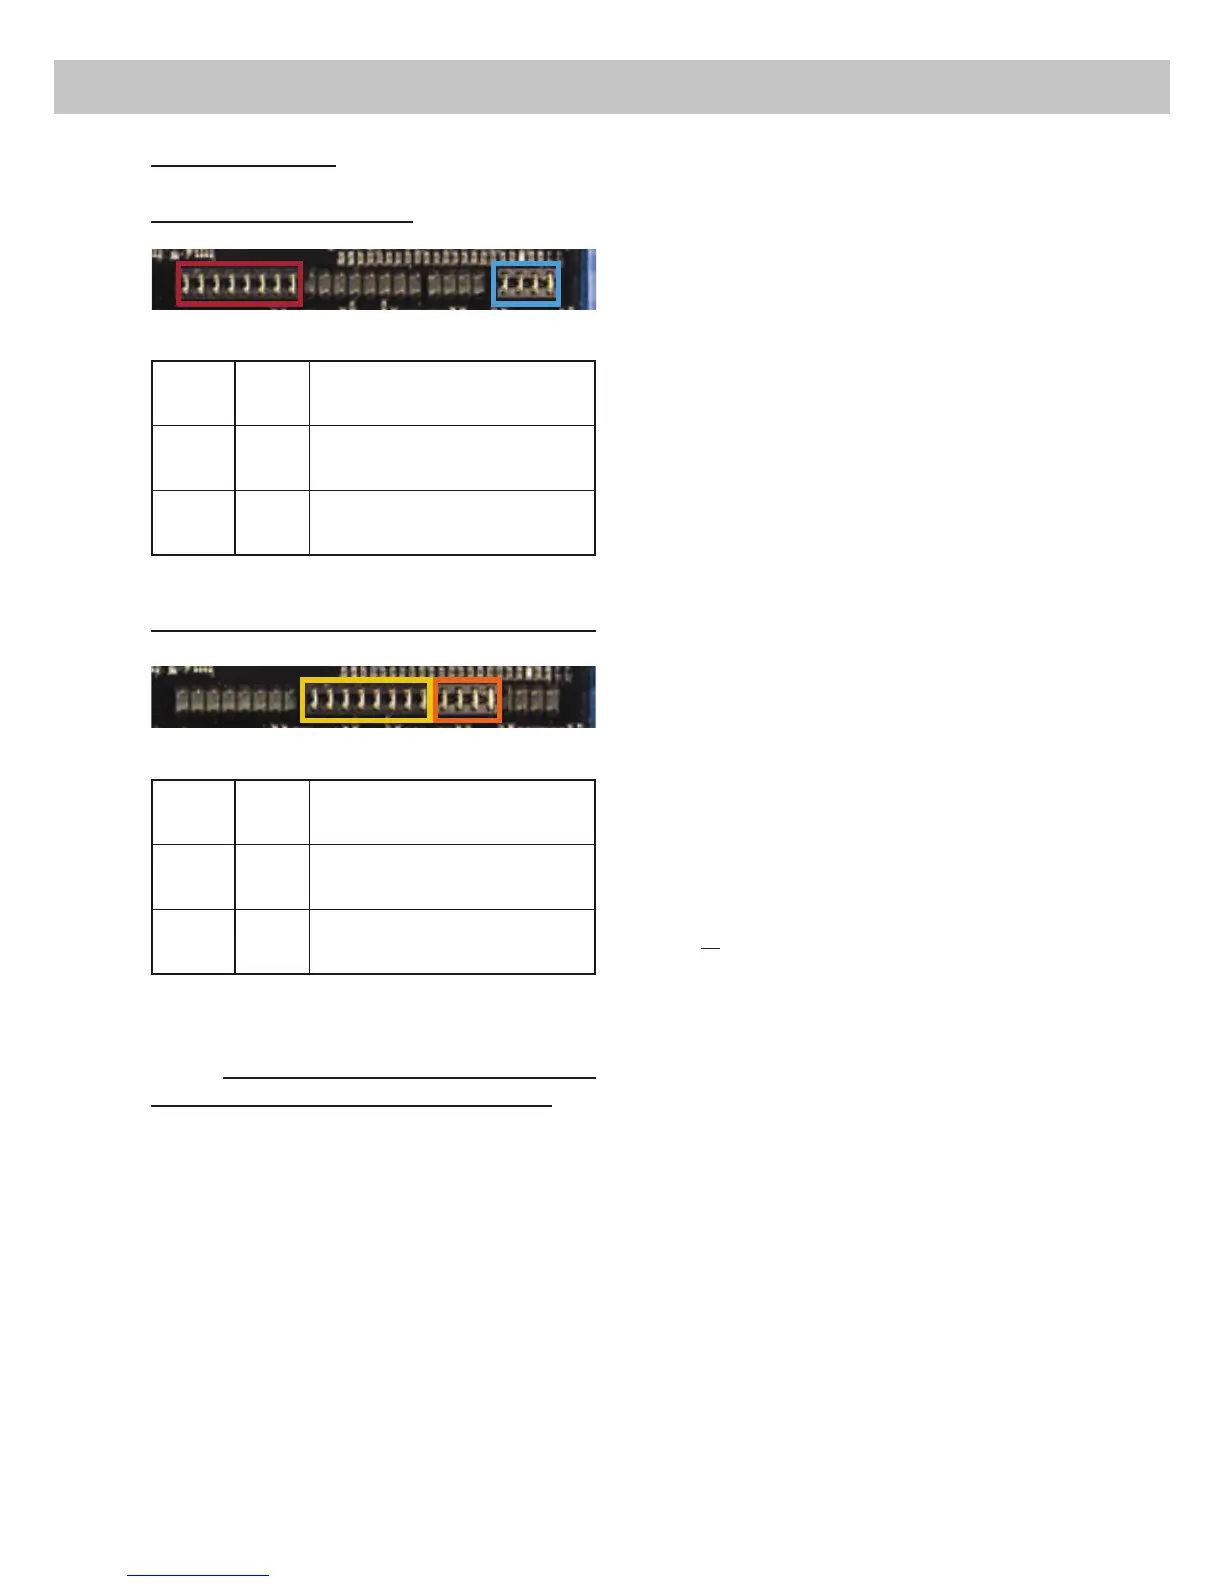
Jumper positions:
([IDFWRU\MXPSHUSRVLWLRQV
Jum-
per
Posi-
tion
Value range
A1+LJKOHYHO$'±9ROWV
RCA A - D: 2 – 4 Volts
B1+LJKOHYHO()±9ROWV
RCA E - F: 2 – 4 Volts
-XPSHUSRVLWLRQVIRUH[WHQGHGDGMXVWPHQWUDQJH:
Jum-
per
Posi-
tion
Value range
A2+LJKOHYHO$'±9ROW
RCA A - D: 4 – 8 Volt
B2+LJKOHYHO()±9ROW
RCA E - F: 4 – 8 Volt
Important: To change the position of a jumper
LW KDV WR EH UHPRYHG E\ SXOOLQJ LW VWUDLJKW XS-
wards. Make sure that the jumper is reinsert-
ed properly and all pins are fully inserted. The
position of each jumper can be changed inde-
pendently.
Follow the subsequent steps if you like to per-
IHFWO\ DGDSW WKH DPSOL¿HUV LQSXW VHQVLWLYLW\ WR
your audio source by using the control:
'RQµWFRQQHFWDQ\DPSOL¿HUVRUORXGVSHDNHUV
to the outputs of the HELIX V EIGHT DSP
during this setup.
7XUQRQWKHDPSOL¿HU
$GMXVW WKH YROXPH RI \RXU UDGLR WR DSSUR[
RI WKH PD[ YROXPH DQG SOD\EDFN D
N+]IXOOVFDOHWHVWWRQHG%YLD&'GULYH
4. If the Clipping LED already lights up, you
KDYHWRUHGXFHWKHLQSXWVHQVLWLYLW\YLDFRQ-
trol (Page 18 point 9; Input SensitivityXQWLO
the LED turns off.
,I WKH FRQWURO LV DOUHDG\ VHW WR PD[LPXP
CCW position then it will be necessary to
FKDQJHWKHVHQVLWLYLW\UDQJHE\UHSRVLWLRQLQJ
the internal jumper.
,QFUHDVHWKHLQSXWVHQVLWLYLW\E\WXUQLQJWKH
control clockwise until the LED lights up.
Now turn the control counterclockwise until
the Clipping LED turns off again.
4. Connecting a digital signal source
,I\RXKDYHDVLJQDOVRXUFHZLWKDQRSWLFDOGLJ-
LWDO RXWSXW \RX FDQ FRQQHFW LW WR WKH DPSOL¿HU
using the appropriate input.
,Q VWDQGDUG FRQ¿JXUDWLRQ WKH +(/,;
9(,*+7'63DXWRPDWLFDOO\DFWLYDWHVWKHXVHG
digital input if a digital audio signal is detect-
HG 7KLV IXQFWLRQ FDQ EH GHDFWLYDWHG YLD WKH
'63 3&7RRO VRIWZDUH $OWHUQDWLYHO\ \RX FDQ
PDQXDOO\DFWLYDWHWKHGLJLWDOLQSXWLI\RXDUHXV-
ing the optional remote control. The automatic
turn-on circuit does not work when the digital
input is used. Therefore it is mandatory to con-
nect the remote input (REM
Please note that it is possible to connect a
source to the digital input and the Highlevel In-
put or the Line Input at the same time.
Important: The signal of a digital audio source
normally does not contain any information
DERXWWKHYROXPHOHYHO.HHSLQPLQGWKDWWKLV
ZLOOOHDGWRIXOOOHYHORQWKHRXWSXWVRIWKH+(/,;
9(,*+7'63DQG\RXU FRQQHFWHG DPSOL¿HUV
7KLV PD\ FDXVH VHYHUH GDPDJH WR \RXU
speakers. We strongly recommend to use an
RSWLRQDOUHPRWHFRQWUROIRUDGMXVWLQJWKHYROXPH
OHYHORIWKHGLJLWDOVLJQDOLQSXW
Information: The HELIX V EIGHT DSP can
only handle uncompressed digital stereo
signals in PCM format with a sample rate be-
tween 12 kHz and 96 kHz and no Dolby-coded
signals.
5. Connection to power supply
Make sure to disconnect the battery before
installing the HELIX V EIGHT DSP!
&RQQHFWWKH9SRZHUFDEOHWRWKHSRVLWLYH
WHUPLQDO RI WKH EDWWHU\ 7KH SRVLWLYH ZLUH IURP
A1 B1
A2 B2
20
Installation
 Loading...