21
WKH EDWWHU\ WR WKH DPSOL¿HU SRZHU WHUPLQDOV
QHHGV WR KDYH DQ LQOLQH IXVH DW D GLVWDQFH RI
OHVV WKDQ LQFKHV FP IURP WKH EDWWHU\
7KH YDOXH RI WKH IXVH LV FDOFXODWHG IURP WKH
PD[LPXP WRWDO FXUUHQW GUDZ RI WKH ZKROH FDU
DXGLRV\VWHP9(,*+7'63 PD[$506
DW9SRZHUVXSSO\,I\RXUSRZHUZLUHVDUH
VKRUWOHVVWKDQP´WKHQDZLUHJDXJHRI
PPð $:* ZLOOEH VXI¿FLHQW,Q DOORWKHU
cases we strongly recommend gauges of 25 -
35 mm² / AWG 4 – 2!
The ground cable (same gauge as the +12 V
ZLUHVKRXOGEHFRQQHFWHGWRDFRPPRQJURXQG
reference point (this is located where the neg-
DWLYHWHUPLQDORIWKHEDWWHU\LVJURXQGHGWRWKH
PHWDO ERG\ RI WKH YHKLFOH RU WR D SUHSDUHG
PHWDO ORFDWLRQ RQ WKH YHKLFOH FKDVVLV LH DQ
area which has been cleaned of all paint res-
idues.
6. Connecting the remote input
The remote input (REMKDVWREHFRQQHFWHGWR
WKHUDGLRUHPRWHRXWSXWLIWKHDPSOL¿HUVSUHDP-
SOL¿HULQSXWVRUWKHOptical Input are solely used
as signal inputs. We do not recommend con-
WUROOLQJWKH UHPRWHLQSXW YLDWKH LJQLWLRQVZLWFK
WRDYRLGSRSQRLVHGXULQJWXUQRQRII
If the Highlevel Input is used this input does not
need to be connected as long as the car radio
has BTL output stages.
&RQ¿JXUDWLRQRIWKHUHPRWHLQSXW
The V EIGHT DSP will be turned on automati-
cally if the Highlevel Input is used or if a signal
is applied to the remote input (REMWHUPLQDO
7KH³$XWR5HPRWH´VZLWFKDOORZVWRGHDFWLYDWH
the automatic turn-on feature.
7KHIHDWXUH VKRXOGEH GHDFWLYDWHGLIWKHUHDUH
e.g. disturbing noises while switching on/off the
DPSOL¿HU
Note: If the automatic turn-on function is deac-
WLYDWHGLWLVPDQGDWRU\WRXVHWKHUHPRWHLQSXW
WHUPLQDOWRSRZHUXSWKHDPSOL¿HU7KHKLJKOHYHO
signal will be ignored in this case.
Note:7KHDFWLYDWLRQRIWKHDPSOL¿HUYLDVSHDNHU
LQSXWLVDFWLYDWHGH[ZRUNV
7RGHDFWLYDWHWKHDXWRPDWLFWXUQRQIHDWXUH\RX
KDYHWRRSHQWKHGHYLFHDQGFKDQJHWKHSRVL-
WLRQRIWKH³$XWR5HPRWH´VZLWFK
Therefore dismantle the side panel (where the
86%LQSXWLVORFDWHGE\UHPRYLQJWKHWZR3KLO-
lips and two allen screws.
Now you can pull out the bottom plate and get
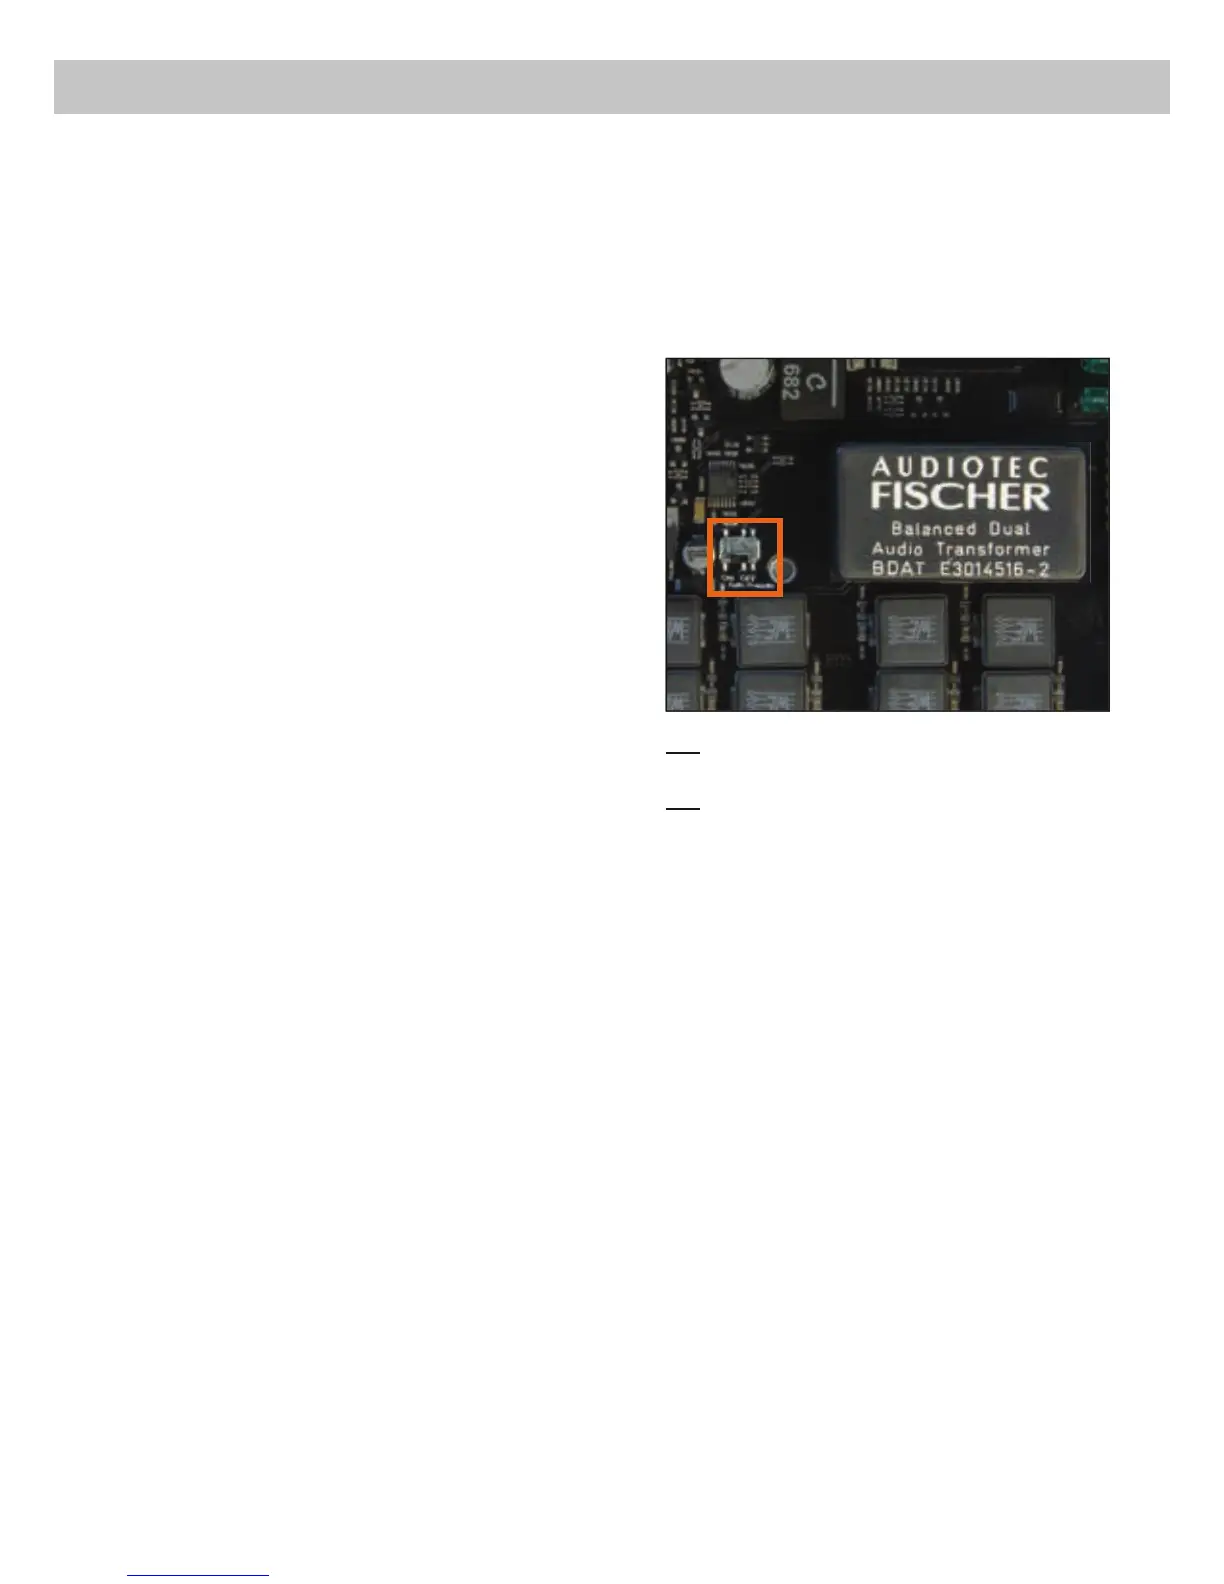
access to the switch. The switch is located near
E\WKH³%DODQFHG'XDO$XGLR7UDQVIRUPHU´VHH
PDUNLQJLQWKHIROORZLQJSLFWXUH
On: $FWLYDWLRQ YLD KLJKOHYHO VSHDNHU LQSXW LV
HQDEOHGH[ZRUNV
Off: $FWLYDWLRQ YLD KLJKOHYHO VSHDNHU LQSXW LV
disabled.
&RQ¿JXUDWLRQRIWKHLQWHUQDO'63
7KH JHQHUDO DPSOL¿HU VHWWLQJV VKRXOG EH FRQ-
ducted with the DSP PC-Tool software before
XVLQJWKHDPSOL¿HUIRUWKH¿UVWWLPH
,JQRULQJ WKLV DGYLFH PD\ UHVXOW LQ GDPDJLQJ
WKHFRQQHFWHGVSHDNHUVDPSOL¿HUV(VSHFLDOO\
LI WKH 9(,*+7'63 ZLOO EH XVHG WR GULYH IXOO\
DFWLYHVSHDNHUV\VWHPVDZURQJVHWXSFDQGH-
stroy your tweeters right away.
Information about connecting the V EIGHT DSP
to a computer can be found on page 24.
9. Connecting the loudspeaker outputs
The loudspeaker outputs can be connected di-
UHFWO\ WR WKH ZLUHV RI WKH ORXGVSHDNHUV 1HYHU
connect any of the loudspeaker cables with the
chassis ground as this will damage your ampli-
¿HUDQG\RXUVSHDNHUV
Ensure that the loudspeakers are correctly con-
QHFWHG LQ SKDVH LH SOXV WR SOXV DQG PLQXV
WRPLQXV([FKDQJLQJSOXVDQGPLQXVFDXVHVD
total loss of bass reproduction. The plus pole is
indicated on most speakers. The impedance of
 Loading...