Do you have a question about the HermanMiller Setu Lounge Chair and is the answer not in the manual?
List of necessary tools including hammers, screwdrivers, safety glasses, and utility knife.
Guidance on identifying plastic recycling codes and segregating ferrous/non-ferrous metals.
Lay chair on back and remove casters from the base.
Loosen and detach the chair base from the cylinder using a rubber mallet.
Disengage the height adjustment cable from the cylinder top.
Separate the cylinder and remove screws using a T-20 Torx driver.
Detach and remove the height adjustment assembly from the chair.
Cut seat fabric with a utility knife and remove shoulder bolts using a T-27 bit.
Detach the arms and remove inner bushings.
Remove T-Nuts from arms and no-arm plugs from the beam.
Remove more inner bushings from the chair structure.
Remove screws and the tilt assembly from the seat assembly.
Detach the rear links and front link.
Remove pressed T-Nuts from both links using a small shaft or screwdriver.
Pull seat fabric from grooves and remove T-Nuts from the seat frame.
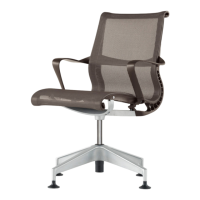
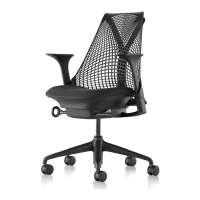
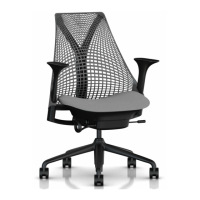
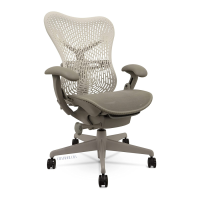
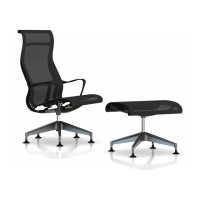
The provided manual outlines the disassembly process for a Setu® chair, primarily for recycling purposes. This suggests the Setu chair is a piece of office or task furniture designed with sustainability and end-of-life material recovery in mind. The detailed instructions for separating various components and identifying material types indicate a thoughtful approach to product lifecycle management.
The Setu chair is designed to provide seating, likely for office or work environments, given the presence of features like height adjustment and casters. Its primary function is to support a user comfortably during tasks, allowing for mobility and ergonomic adjustments. The disassembly guide implies that the chair is constructed from a variety of materials, including plastics, ferrous metals, and non-ferrous metals, which are common in modern office furniture to achieve a balance of durability, flexibility, and aesthetic appeal. The presence of a "Tilt Assembly" suggests the chair offers a recline or rocking function, enhancing user comfort and adaptability to different postures. The "Height Adjustment Assembly" further confirms its ergonomic design, allowing users to customize the chair's height to suit their workstation and body type. The "Arms" are likely designed to provide support for the user's arms and shoulders, contributing to overall comfort and reducing strain during prolonged use. The "Seat Fabric" indicates a cushioned or upholstered seating surface, designed for comfort and potentially breathability.
While the manual focuses on disassembly, the tools and components mentioned provide insight into the chair's usage features. The presence of casters indicates that the chair is designed for mobility, allowing the user to move around their workspace easily without standing up. This is a common feature in office chairs, facilitating access to different areas of a desk or multiple workstations. The "Height Adjustment Cable" and "Height Adjustment Assembly" point to an intuitive mechanism for adjusting the chair's height, a crucial ergonomic feature that allows users to maintain proper posture and reduce strain on their back and neck. The "Tilt Assembly" suggests that the chair offers a recline function, enabling users to lean back and change their posture, which can be beneficial for circulation and comfort during long periods of sitting. The "Arms" provide support for the user's upper body, which can help alleviate pressure on the shoulders and wrists, especially when using a keyboard and mouse. The "Seat Fabric" implies a comfortable seating surface, likely designed to be durable and easy to maintain in a typical office environment. The overall design, as inferred from the components, suggests a chair that is both functional and adaptable to various user needs and work settings.
The manual itself serves as a guide for end-of-life maintenance, specifically for disassembly and recycling. This highlights a key aspect of the Setu chair's design: its maintainability and recyclability. The detailed instructions for separating components, such as removing casters, disengaging the height adjustment cable, separating the cylinder from the base, and removing various bolts and bushings, indicate that the chair is designed to be taken apart systematically. This modular design facilitates the replacement of individual components if they wear out or break, extending the chair's lifespan and reducing waste. The emphasis on identifying and segregating materials (plastics with ASTM recycling codes, ferrous metals with magnets, and non-ferrous metals) is a direct maintenance feature aimed at environmental responsibility. It ensures that when the chair reaches the end of its useful life, its materials can be efficiently recovered and recycled, minimizing its environmental footprint. The use of standard tools like hammers, screwdrivers (T-20 Torx, T-27 bit), power drivers, utility knives, and rubber mallets suggests that the disassembly process is designed to be accessible and does not require highly specialized equipment. This ease of disassembly contributes to the chair's overall maintainability, making it practical to repair or recycle. The instructions for cutting the "Seat Fabric" in half and removing "metal clips from fabric" suggest that the upholstery is also designed for removal and potentially replacement or recycling, further contributing to the chair's long-term maintainability and sustainability. The removal of "T-Nuts" from the seat frame and arms also points to a design where components are fastened in a way that allows for eventual separation and material recovery.
| Category | Indoor Furnishing |
|---|---|
| Manufacturer | Herman Miller |
| Design | Studio 7.5 |
| Weight Capacity | 300 lbs |
| Warranty | 12-year warranty |
| Design Style | Contemporary |
| Materials | Polyester, aluminum |
| Frame | Aluminum |
| Base | Aluminum |
| Seat Height | 16.5 in |