Do you have a question about the HIKVISION 1200KI and is the answer not in the manual?
Connect keyboard RS-485 to back-end KB interfaces, T+ to D+, T- to D- through twisted pair.
Configure Back-end Device No, this number ranges from 0-255(0 is not recommended).
Login keyboard, use FOCUS+/A button to switch between number, capital and lower case letters.
Go to keyboard system menu, 4.Serial Port, RS-485 to configure keyboard 485 parameter.
Press MODE button, enter 3. DVR by IP Mode.
Click Num button + DEV button to select device you want to control.
Press ESC button to quit to top menu, move joystick to see device under top menu.
Press NUM button to select the camera you want to see.
Push joystick left/right to change camera; press FOCUS-/MULT to create window division.
Press IRIS-/PTZ button to enter PTZ mode; Press PRESET/REC + NUM to call camera preset.
Press NUM button to select the camera you want playback.
Use PATTERN/PLAY button to select date, use joystick to make switch.
Push joystick up/down to speed up/slow down playback; move joystick left/right for 30s forward/backward.
This document outlines the method for using the Hikvision 1200KI and 1006KI 485 control keyboards with a back-end GUI4.0 system, specifically recommending NVR version 4.21.000 for optimal performance. The guide covers hardware connection, initial configuration, and operational procedures for both live view and playback functionalities.
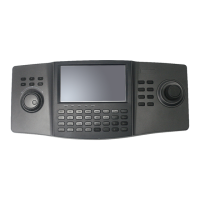
The Hikvision 1200KI and 1006KI are 485 control keyboards designed to interface with Hikvision NVR/DVR back-end systems running GUI4.0. These keyboards provide a physical interface for controlling various aspects of the surveillance system, including camera selection, PTZ (Pan-Tilt-Zoom) operations, live view management, and playback control. The primary function is to offer a tactile and intuitive method for navigating and managing a complex surveillance setup, reducing reliance on mouse and on-screen interfaces for critical operations. The keyboards connect via an RS-485 interface, ensuring reliable communication with compatible back-end devices.
The usage of these keyboards begins with a straightforward hardware connection. The keyboard's RS-485 interface (T+ and T-) must be connected to the back-end KB interfaces (D+ and D-) using a twisted pair cable. It is crucial to note that only back-end devices equipped with a dedicated KB interface on their rear panel can be controlled by these 485 keyboards. The 485 interface typically found on NVRs/DVRs is generally for controlling analog PTZ cameras directly, not for keyboard control of the back-end system itself.
Once the physical connection is established, the next step involves configuring the back-end device number. This number, which can range from 0 to 255 (though 0 is not recommended as it implies control over all devices), can be set either through the back-end's GUI or its web interface. This unique device number allows the keyboard to target and control a specific NVR or DVR within a larger system.
After configuring the device number, the keyboard itself needs to be logged in. This is achieved by using the FOCUS+/A button to toggle between number, capital, and lower-case letters to input the login credentials. The keyboard offers a "remember password" option for subsequent logins, streamlining the process.
To configure the keyboard's 485 parameters, users must navigate to the keyboard's system menu, specifically to 4.Serial Port, and then select ① RS-485. Here, essential communication parameters must be set to match the fixed parameters of the back-end KB interface. These fixed parameters typically include a Baud Rate of 9600, Bit Rate of 8, Stop Bit of 1, and Parity None. After setting these values, the OK button must be pressed to save the settings.
Controlling the back-end system involves a specific sequence of actions. First, the MODE button on the keyboard is pressed to enter 3. DVR by IP Mode. Then, to select a specific device for control, the user presses the Num button corresponding to the back-end device number (as previously configured) followed by the DEV button. Upon successful selection, the keyboard gains control over the back-end, and the GUI4.0 interface will respond to keyboard operations.
The GUI4.0 system has multiple layers, and users can navigate these layers using the ESC button to return to the top menu. It might require pressing ESC several times to reach the main menu. The joystick can be used to confirm if the device is under the top menu, indicated by a blue icon when the stick is pushed.
In Liveview Mode, several functionalities are available:
NUM button allows users to select a specific camera. For instance, to view camera 11, the number 1 is pressed twice quickly.FOCUS-/MULT button can be used to create different window divisions (e.g., 2, 4, 6 screens), and the joystick facilitates switching between these pages.IRIS-/PTZ button enters PTZ mode, enabling the joystick to control pan, tilt, and zoom functions of compatible cameras.PRESET/REC button combined with the NUM button can be used to recall camera presets.To control playback, the process is similar:
NUM button to select the camera for which playback is desired.PATTERN/PLAY button is used to select the date for playback. The joystick helps in navigating the date selection, and OK confirms the choice.A comprehensive list of button functions is provided, detailing actions such as entering/switching ON/OFF, starting/stopping auto-switch in liveview, starting/stopping playback, quitting PTZ mode, returning to superior/liveview menus, switching play/reverse, switching input methods, switching multi-screens, deleting characters, and controlling PTZ. The AUX/F2 button switches the Menu Property Page, and the joystick also controls PTZ, changes cameras in liveview, adjusts playback speed, and navigates backward/forward in playback.
While the document does not explicitly detail maintenance features in a dedicated section, several aspects can be inferred. The recommendation to use NVR version 4.21.000 and to ensure the latest NVR firmware version for best compatibility suggests that software updates are a form of maintenance to ensure optimal performance and access to the full range of functions. The fixed parameters of the back-end KB interface (Baud Rate, Bit Rate, Stop Bit, Parity) imply that these settings are stable and generally do not require frequent adjustment, simplifying long-term operation. The ability to configure the device number via the back-end GUI or web interface provides flexibility for system administrators to manage and reconfigure devices as needed without direct physical access to the NVR/DVR. The "remember password" feature on the keyboard, while a convenience, also contributes to operational efficiency by reducing login times. The clear instructions for hardware connection and configuration serve as a guide for initial setup and troubleshooting, which are essential aspects of device maintenance. Any issues with keyboard control might necessitate checking the RS-485 connection or verifying the configured device number and serial port parameters. The note about mouse interference on the back-end GUI and the need to press ESC multiple times to exit menus highlights areas where user awareness and potential future software optimizations (as indicated by "under optimization development now") contribute to the overall user experience and system maintainability.
| Video Compression | H.265+/H.265/H.264+/H.264 |
|---|---|
| Working Humidity | 10% to 90% |
| Category | NVR |
| Channels | 16 |
| Network Interface | 1 RJ-45 10/100/1000 Mbps self-adaptive Ethernet interface |
| USB Interface | USB 2.0 |
| HDMI Output | 1 HDMI output |
| VGA Output | 1 VGA output |
| Audio Output | 1 RCA audio output |
| Two-Way Audio | Yes |
| Decoding Format | H.265/H.264 |
| Working Temperature | -10 °C to 55 °C (14 °F to 131 °F) |
| Type | 16 PoE 4K NVR |