R = x (2)
30
RH [ft]
(d1 + d2) [inch]
4
R = x (1)
10
RH [m]
(d1 + d2) [mm]
4
NOTE
The tool switches itself off automatically after approx.
15 min.
7.1.3 Deactivating the automatic power-off
feature
Press and hold the on-button for approx. 4 sec. until
the laser beam blinks three times as confirmation.
NOTE
The tool will be switched off when the on-button is
pressed or when the batteries are exhausted.
7.1.4 Inclined line function
1. Lay the tool on its back.
The tool does not level itself automatically.
The tool blinks every two seconds.
7.1.5 Using the tool with the PMA 31 laser
receiver
For further information, please refer to the PMA 31
operating instructions.
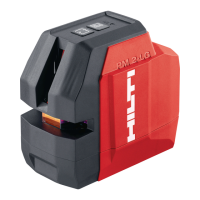
7.2 Examples of applications
7.2.1 Transferring heights 3
7.2.2 Setting out drywall track for a partition
wall 4
7.2.3 Aligning pipes vertically 5
7.2.4 Aligning radiators 6
7.2.5 Aligning door and window frames 7
7.2.6 Marking out the position of light fittings 8
7.3 Checking
7.3.1 Checking the plumb point 9
1. Make a mark on the floor (a cross) in a high room
(e.g. in a stairwell or hallway with a height of 5–10
m).
2. Place the tool on a smooth, level (horizontal)
surface.
3. Switch the tool on.
4. Position the tool with the lower beam on the
center of the cross.
5. Mark the position of the vertical beam on the
ceiling. Attach a piece of paper to the ceiling
before making the mark.
6. Pivot the tool through 90°.
NOTE The lower plumb beam must remain on
the center of the cross.
7. Mark the position of the vertical beam on the
ceiling.
8. Repeat the procedure after pivoting the tool
through 180° and 270°.
NOTE The resulting 4 marks form a circle in
which the intersection of the diagonals d1 (1 –
3) and d2 (2 – 4) marks the exact center of the
plumb point.
9. Calculate the accuracy as described in section
7.3.1.1.
7.3.1.1 Calculation of accuracy
The result (R) provided by this formula (RH = room
height) refers to the tool’s accuracy “in mm at 10 m”
(formula (1)). This result (R) should be within the
specification for the tool (3 mm at 10 m).
7.3.2 Checking leveling of the forward beam
1. Place the tool on a smooth, level surface approx.
20 cm from the wall (A) with the laser beam
directed toward the wall (A).
2. Mark the point of intersection of the laser lines on
the wall (A) with a cross.
3. Pivot the tool through 180° and mark the point of
intersection of the laser lines on the opposite wall
(B) with a cross.
4. Place the tool on an even, level surface approx. 20
cm from the wall (B) with the laser beam directed
toward the wall (B).
5. Mark the point of intersection of the laser lines on
the wall (B) with a cross.
6. Pivot the tool through 180° and mark the point of
intersection of the laser lines on the opposite wall
(A) with a cross.
7. Measure the distances d1 between 1 and 4 and
d2 between 2 and 3.
en
19

 Loading...