4
FLOOR SANDING TECHNIQUE
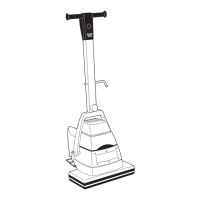
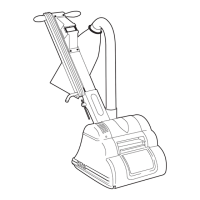
HT8-1.2 Floor Sander (Drum)
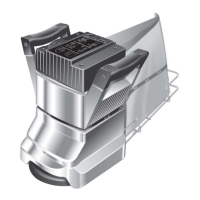
HT7-2 Disc Floor Sander (Edger)
HTF-2 Floor Sander (
Hand Sanding
- a powerful floor
sander designed for the rapid leveling and sanding of
all types of wood flooring excluding thin laminated or
veneered floors. Load the sander with abrasive
making sure that it is skin tight around the drum.
Loose sheets will tear. Place the sander on the right
hand wall (unless you are making an angled cut on
uneven floors) with about two thirds of the floor in
front of you. Start the sander with the drum off the
floor then walk forward at an even pace and ease the
drum on to the floor. As you near the end of the pass,
gradually raise the drum off the floor. Practice this
technique before turning on the sander.
Cover the same path you made on the forward cut by
pulling the machine backwards and easing the drum
to the floor as you begin the backward pass until you
reach the original starting point, then ease the drum
off the floor.
When two thirds of the floor is sanded, turn the floor
sander around and sand the remaining third in the
same way. Overlap the one third area by
( ) with the two thirds area to blend
the two areas together.
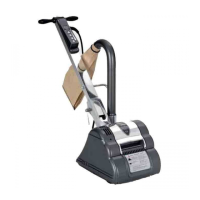
- a powerful disc
floor sander designed for sanding along the edges of
a floor without damaging the baseboards or
moldings. Also suitable for smaller areas where the
HT8-1.2 Floor Sander will not reach like stair treads
and closets. Load the abrasive disc making sure the
retaining bolt is tight. Start the edger with the disc off
the floor then lower the disc to the floor as you move
the sander.
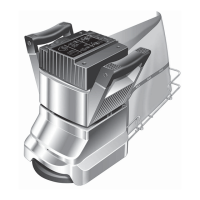
- an orbital action
floor sander designed for re-finishing, sanding
between coats of varnish and re-surfacing floors in
good condition. Load the abrasive sheet, pad or strip.
Start the sander, move immediately and sand in the
direction of the grain using the same technique as the
drum floor sander. For difficult to reach areas use a
heavy duty hand held orbital sander or sand by hand.
- to sand difficult to reach areas
scrape and sand the floor by hand. Use a scraper to
remove old finishes, always scraping in the direction
of the grain, and then sand by hand using the same
grit abrasive as you finished with when machine
sanding. See Floor Sanding Technique diagrams on
page 5.
0.6 to 0.9
meters 2 to 3 feet
Work progressively moving the sander in
a sweeping motion from side to side.
WARNING - never bounce the sanding
drum or dwell in one place as this will
sand dips and hollows in the floor.
Orbital)
FLOOR TYPES
SOLID WOOD PLANK & STRIP FLOORS
VENEERED, LAMINATED & THINNER FLOORS
Old floors in good condition
Uneven floors
Floors with an existing finish
Hiretech
- when the floor is in
good condition - no uneven edges, cupping or
crowning of planks and strips - and you want to re-
surface the floor, sanding back to new wood, start
sanding in the direction of the planks or strips - with
the wood grain. Start with a medium grit abrasive.
Complete the first cut with the HT8-1.2 Floor Sander
then sand up to the baseboards and door thresholds
with the HT7-2 Disc Floor Sander, using a medium
grit abrasive, blending the edges in with the main
floor area. Sweep the floor. Using a medium/fine grit
abrasive, sand the main floor area with the drum
sander and then complete the floor with the edger
using a fine grit abrasive. Sweep the floor. Finish
sanding the main floor area with the drum floor
sander using a fine grit abrasive. If the floor is in
particularly good condition (level with no deep
scratches or blemishes) you may re-surface the floor
using the HTF-2 Floor Sander, however, as the
sanding action of this machine is less aggressive than
the HT81.2 Floor Sander the job will take more time.
- when the floor is uneven sand
diagonally at 45 across the room in both directions
using the HT8-1.2 Floor Sander with a coarse grit
abrasive. Only make one cut on both diagonals, this
will achieve a basic level. Now complete the floor as
for a level strip or plank floor. Use the same grit
abrasive as was used on the 45 cut for the first cut
parallel to the planks or strips.
- when re-finishing a
floor remove as little of the existing surface as
possible. If the old finish is worn and the floor is
generally in good condition use the HTF-2 Floor
Sander with abrasive pads and sheets
which have been especially designed for re-finishing
floors. These will maintain the integrity of any stain
used to colour the wood and prepare the surface for a
new coat of finish. If the floor is badly marked and
scratched and has to be sanded back to new wood
use the HT8-1.2 Floor Sander and HT7-2 Disc Floor
Sander. Always try a medium grade paper first,
particularly on a diagonal cut. If 90% of the old finish
is removed and the floor is generally leveled, you do
not need to use a coarse grit abrasive.
Use the HTF-2 Floor Sander for veneered and
laminated floors or thinner floors that may have been
subjected to repeated sanding. The HTF-2 will
remove old surface finishes and prepare the floor for
re-finishing. Sand the floor using the same method
as a strip, plank, or parquet floor. If the floor has
deeper scratches or marks these should be sanded
o
o