BF40AoBFSOA
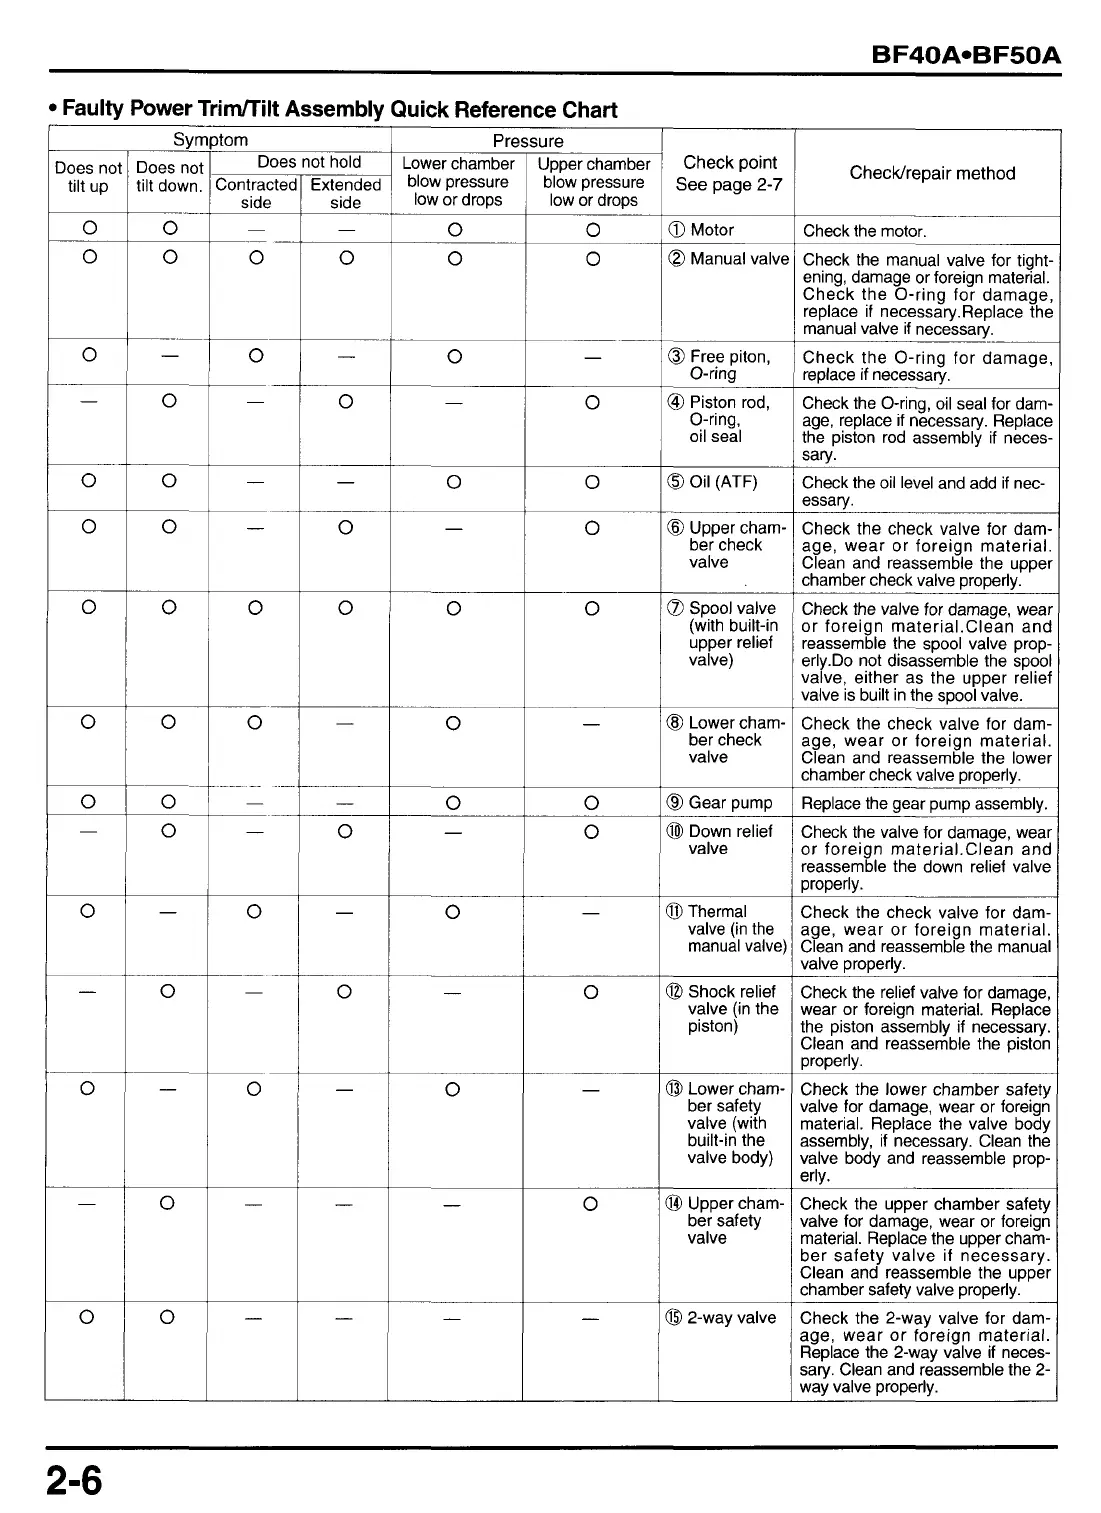
Faulty Power TriMilt Assemblv Quick Reference Chart
~.
SYr
Does no
tilt down
tom
Does not hold
Pre
Lower chamber
ure
Upper chamber
blow pressure
low or drops
Check point
See page
2-7
Ioes no
tilt up
Checkhepair method
blow pressure
low or drops
0
2ontractec
side
-
__
0
Extended
side
-
~
0
0
0
~
0
0
Motor
Check the motor.
0
0
0
0
@
Manual valvc
Check the manual valve for tight-
ening, damage or foreign material.
Check the O-ring for damage,
replace if necessary.Replace the
manual valve if necessary.
0
0
0
@
Free piton,
O-ring
@
Piston rod,
O-ring,
oil seal
Check the O-ring for damage,
replace
if
necessary.
Check the O-ring,
oil
seal for dam-
age, replace
if
necessary. Replace
the piston rod assembly if neces-
saw.
0
~
0
0
0
0
0 0
@
Oil (ATF)
Check the oil level and add if nec-
essarv.
0
0
8
Upper cham.
ber check
valve
Check the check valve for dam-
age, wear or foreign material.
Clean and reassemble the upper
chamber check valve DroDerlv.
0
0
0
~
0
~
0
~
0
0 0
0
Spool valve
(with built-in
upper relief
valve)
Check the valve for damage, wear
or foreign material.Clean and
reassemble the spool valve prop-
erly.Do not disassemble the spool
valve, either as the upper relief
valve is built in the
SDOO~
valve.
~
0
0
0
0
~
0
@
Lower cham-
ber check
valve
Check the check valve for dam-
age, wear or foreign material.
Clean and reassemble the lower
chamber check valve properly.
0
0
0
8
Gear pump
ReDlace the aear DumD assemblv.
0
0
@I
Down relief
valve
Check the valve for damage, wear
or foreign material.Clean and
reassemble the down relief valve
DroDerlv.
0
0
@I
Thermal
valve (in the
manual valve'
Check the check valve for dam-
age, wear or foreign material.
Clean and reassemble the manual
valve properly.
0
0
@
Shock relief
valve (in the
piston)
Check the relief valve for damage,
wear or foreign material. Replace
the piston assembly
if
necessary.
Clean and reassemble the piston
DroDerlv.
0
0
0
Lower cham-
ber safety
valve (with
built-in the
valve body)
Check the lower chamber safety
valve for damage, wear or foreign
material. Replace the valve body
assembly, if necessary. Clean the
valve body and reassemble prop-
erly.
0
0
@
Upper cham-
ber safety
valve
Check the upper chamber safety
valve for damage, wear or foreign
material. Replace the upper cham-
ber safety valve if necessary.
Clean and reassemble the upper
chamber safety valve properly.
0 0
0
2-way valve
Check the 2-way valve for dam-
age, wear or foreign material.
Replace the 2-way valve
if
neces-
sary. Clean and reassemble the
2-
wav valve properly.
2-6