Honeywell GmbH 7 MU1H-1002GE23 R0804
GB
7. Commissioning
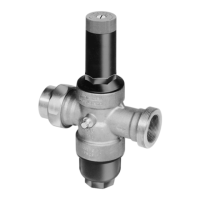
7.1 Setting outlet pressure (fig. 1)
1. Close shut off valves on inlet.
2. Release pressure on outlet side (e.g. through water
tap).
3. Loosen slotted screw.
Do not remove slotted screw.
4. Slacken tension in compression spring.
Turn adjuster knob to the left (-).
5. Close shut off valves on outlet.
6. Slowly open shut off valves on inlet..
7. Setting outlet pressure.
Turn adjuster knob until the adjustment scale
shows the desired value.
8. Retighten slotted screw.
9. Slowly open shut off valves on outlet.
10.Pressure reducing valve is now ready for use.
8. Maintenance
In accordance with DIN 1988, part 8, the following mea-
sures must be taken
:
8.1 Inspection
1. Close shut off valves on outlet.
2. Check outlet pressure with a manometer when no
flow is occurring.
3. Slowly open shut off valves on outlet.
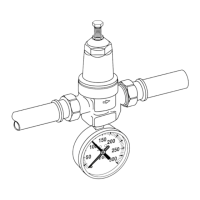
8.2 Maintenance (fig. 2)
1. Close shut off valves on inlet.
2. Release pressure on outlet side (e.g. through water
tap).
3. Loosen slotted screw.
Do not remove slotted screw.
4. Slacken tension in compression spring.
Turn adjuster knob to the left (-).
5. Close shut off valves on outlet.
6. Unscrew spring hood.
Use double ring spanner ZR06K (☞ Accessories).
7. Remove slip ring.
8. Remove valve insert with a pair of pliers.
9. Unscrew filter bowl.
Use double ring spanner ZR06K (☞ Accessories).
10.Remove filter, clean and place back in position.
11. Lightly coat O-ring with silicone grease and place
onto filter bowl.
12.Check that sealing ring, edge of nozzle and slotted
ring are in good condition, and if necessary replace
the entire valve insert.
13.Reassemble in reverse order.
14.Press in diaphragm with finger before inserting slip
ring.
15.Setting outlet pressure (☞ chapter 7).
8.3 Setting adjustment scale (fig. 3)
If the adjustment knob is removed, this setting is lost.
A new setting can be achieved using a manometer (☞
Accessories).
1. Close shut off valves on inlet.
2. Release pressure on outlet side (e.g. through water
tap).
3. Loosen slotted screw.
4. Close shut off valves on outlet.
5. Fit manometer.
6. Slowly open shut off valves on inlet.
7. Set desired outlet pressure (f.e. 4 bar).
8. Align scale in middle of viewing window.
9. Retighten slotted screw.
10.Slowly open shut off valves on outlet.
11. Pressure reducing valve is now ready for use.
i
• Admission pressure should be approx. 1 bar
higher than the outlet pressure that has
been set
i
• We recommend a planned maintenance
contract with an installation company
i
• Frequency: once annually
• To be carried out by an installation company
• To be carried out by the operator
•CAUTION!
If pressure is slowly rises, then proceed as
described under ☞ Maintenance!
i
• Frequency: every 1-3 years (depending on
local operating conditions)
• To be carried out by an installation company
OBJ_BUCH-10-001.book Seite 7 Donnerstag, 11. November 2004 4:43 16

 Loading...