43
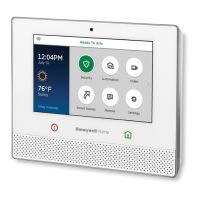
System Settings
Brightness/Volume
Home > Settings
Adjust voice and system sounds with the Volume slider. System sounds include zone alert
chimes and countdown beeps.
Adjust the Gateway touchpad brightness with the Brightness slider.
NOTES: • Move the brightness and volume sliders and press Save to adjust the settings.
• Voice annunciations are controlled by enabling or disabling PANEL VOICE and CHIME.
Wi-Fi (Network) Configuration
Home > Security > Tools > enter Master User Code > Network Config
Manage your system’s router here. Remember that the Gateway, all mobile devices used to
operate the Gateway and all Wi-Fi cameras must be on the same network.
To View or Join Available Wi-Fi Networks
1. On the Tools menu, select Network Config then Configure Network. A list of Wi-Fi
options appears. (If the option is gray, it is not currently available.)
2. Press Scan Access Points. A list of available networks is displayed. Use the up and
down arrows to scroll through the list. Press
to return to the previous screen.
3. Select the desired network and press Edit. The network information is displayed.
4. If a password is required, press Key, enter the password, press DONE and Save.
5. Press JOIN and a confirmation message appears.
6. Press YES and the system announces when connected to the network.
Manually Configure Access Point
IMPORTANT
The Security setting below must match the security protocol used by your network router.
1. From the list of Wi-Fi options select Manual Config AP. The Wi-Fi enrollment menu
appears. (
Network Type cannot be changed.)
2. Press SSID Name, enter your network’s name, press DONE and Save.
3. Press Security and choose the same security protocol as your router. Options include
Open, WPA/WPA2 and WPA2. (WEP is not supported.)
4. If a password is required, press Key, enter your network password, press DONE and
Save.
5. Press JOIN. A confirmation screen appears.
6. Press YES and wait. The Gateway announces when it has connected to the Wi-FI
network.
 Loading...