16
FR
IT
CAPITOLO 5
MESSA IN OPERA
INSTALLAZIONE
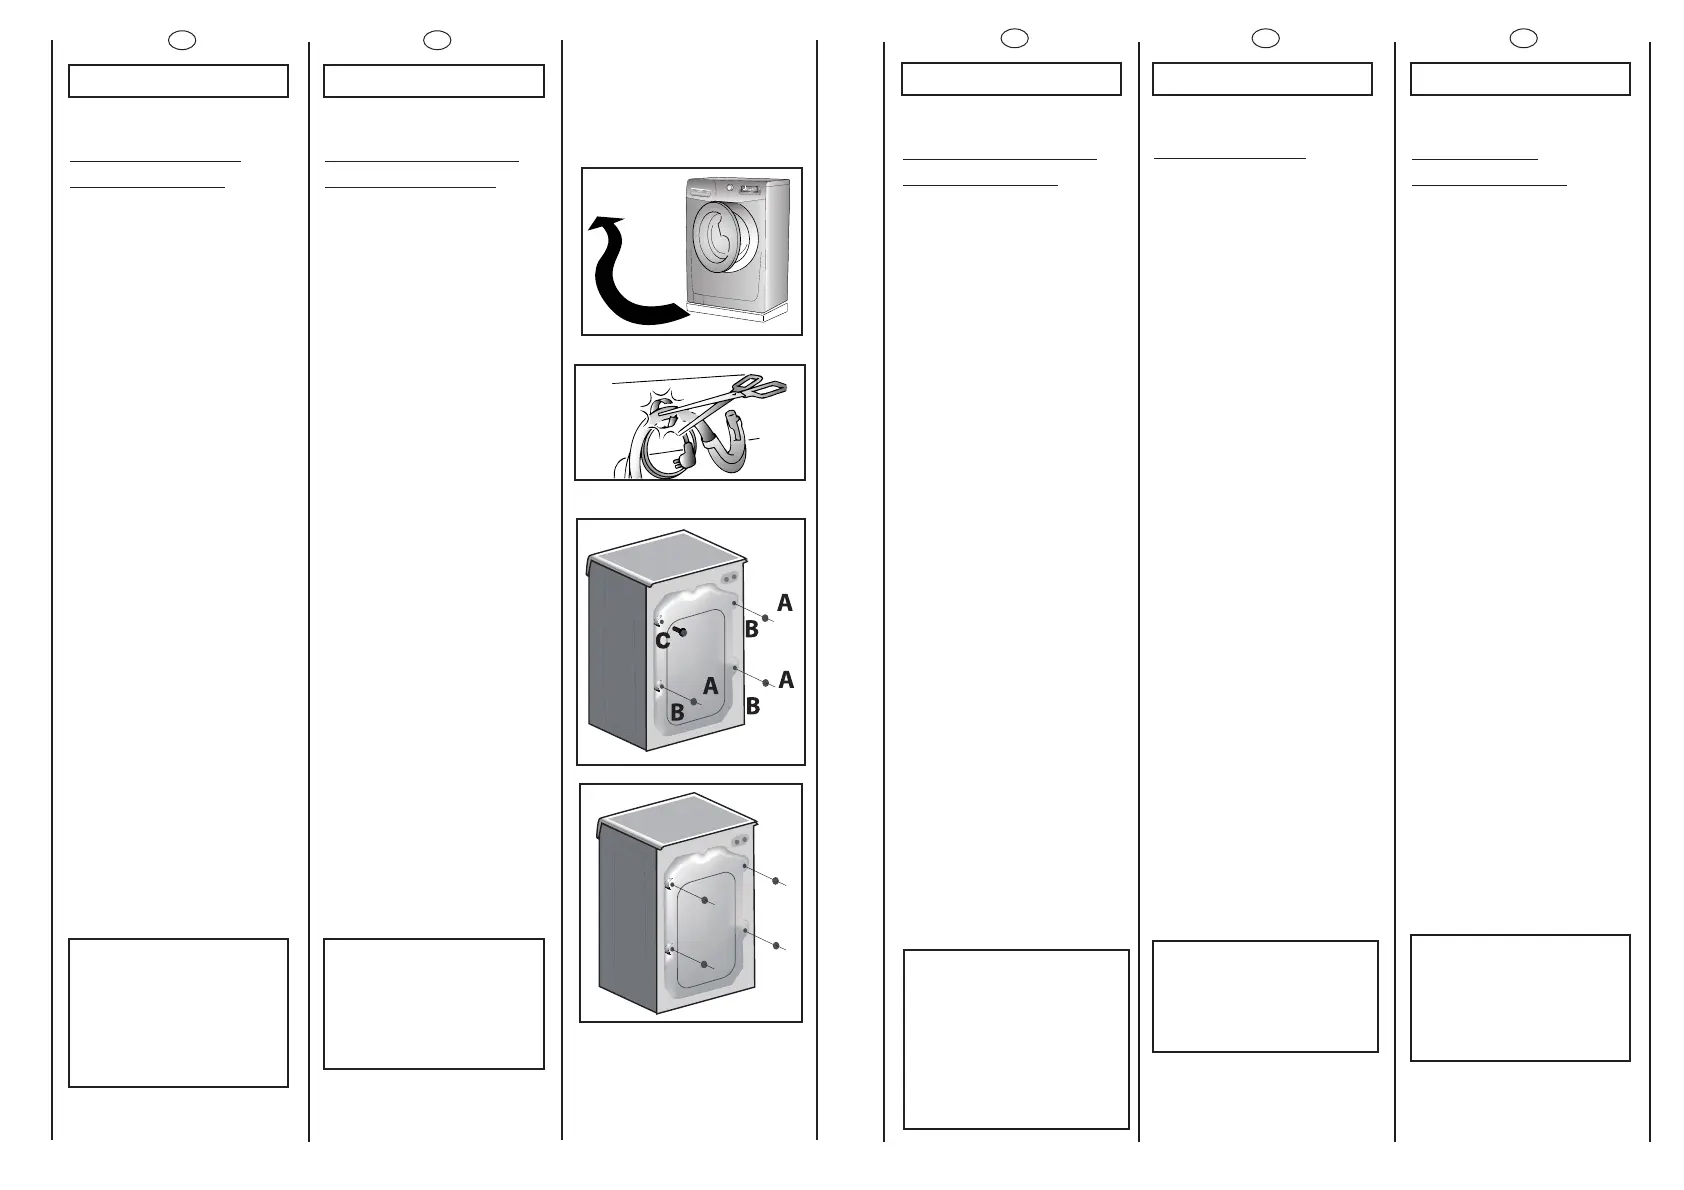
Porti la macchina vicino al
luogo di utilizzo senza il
basamento dell’imballo.
Tagliare le fascette
fermatubo, prestando
attenzione di non
danneggiare il tubo e il
cavo elettrico
Svitare le 3 viti (A) sul lato
posteriore e rimuovere i 3
distanziali (B).
Svitare la vite (C).
Così facendo cadrà all’
interno della macchina un
distanziale.
Inclinare in avanti la
macchina e togliere il
distanziale sopraccitato.
Richiudere i 4 fori utilizzando
i tappi contenuti nella busta
istruzione.
ATTENZIONE:
NON LASCI ALLA
PORTATA DI BAMBINI
GLI ELEMENTI
DELL’IMBALLAGGIO IN
QUANTO POTENZIALI
FONTI DI PERICOLO.
CHAPITRE 5
MISE EN PLACE
INSTALLATION
Placer la machine près du
lieu d’utilisation sans la base
d’emballage.
Couper avec précaution le
cordon qui maintient le
tuyeau d’évacuation et le
cable d’alimentation
Enlever les 3 vis de fixation
indiquées en (A) et enlever
les espaces indiqués en (B)
Dévisser la vis (C).
Un élément en plastique
tombera à l’intérieur de la
machine à laver.
Incliner la machine vers
l’avant et enlever l’élément
plastique ci-dessus.
Couvrir les quatre trous en
utilisant les capuchons
prévus à cet effet dans le
sachet où se trouve la
notice
ATTENTION:
NE PAS LAISSER À LA
PORTÉE DES ENFANTS
DES ELEMENTS
D’EMBALLAGE QUI
PEUVENT CAUSER DES
RISQUES.
17
DE
KAPITEL 5
INBETRIEBNAHME
INSTALLA
TION
Gerät ohne
Verpackungsunterteil in die
Nähe des Aufstellungsortes
bringen.
Schneiden Sie das
Kunststoffband der
Schlauchbefestigung durch.
Achten Sie darauf, den
Schlauch und das Kabel
nicht zu beschädigen.
Schrauben Sie die 3
Schrauben (A) auf der
Rückseite ab und entfernen
Sie die 3 Distanzstücke (B).
Entfernen Sie die Schraube
(C).
Dadurch fällt aus dem
Inneren des Gerätes ein
Distanzstück ab.
Lehnen Sie das Gerät nach
vorne und ziehen Sie das
Distanzstück heraus.
Schließen Sie die 4
Öffnungen mit den im
Beipack mitgelieferten
Stöpseln.
ACHTUNG:
DIE VERPACKUNG IST IN
DEN HÄNDEN VON
KINDERN EINE
GEFAHRENQUELLE. BITTE
ENTSORGEN SIE DAS
VERPACKUNGS-
MATERIAL
ORDNUNGSGEMÄß.
EN
CHAPTER 5
SETTING UP
INSTALLA
TION
Move the machine near its
permanent position without
the packaging base.
Carefully cut the securing
strap that holds the main
cord and the drain hose.
Remove the 3 fixing screws
marked (A) and remove the
3 spacers marked (B)
Remove the screw (C).
A spacer will fall inside the
machine.
By tilting the machine,
remove the above
mentioned spacer.
Cover the 4 holes using the
caps provided in the
instruction booklet pack.
WARNING:
DO NOT LEAVE THE
PACKAGING IN THE
REACH OF CHILDREN
AS IT IS A POTENTIAL
SOURCE OF DANGER.
RU
ÏÀPÀÃPÀÔ 5
ÓÑÒÀÍÎÂÊÀ
Ïîìåñòèòå ìàøèíó âáëèçè
ìåñòà åå èñïîëüçîâàíèÿ áåç
ïîäñòàâêè è óïàêîâêè.
èÂÂÂʸÚ Ô·ÒÚχÒÒÓ‚˚È ıÓÏÛÚ.
ÑÂÈÒÚ‚ÛÈÚÂ ÓÒÚÓÓÊÌÓ, ˜ÚÓ·˚ ÌÂ
Ôӂ‰ËÚ¸ ¯Î‡Ì„ Ë ˝ÎÂÍÚ˘ÂÒÍËÈ
ÔÓ‚Ó‰.
éÚÍÛÚËÚ 3 ‚ËÌÚ‡ (A) ̇ Á‡‰ÌÂÈ
ÒÚÂÌÍÂ Ë ËÁ‚ÎÂÍËÚÂ 3 ‡ÒÔÓÌ˚ı
‚ÚÛÎÍË (B).
쉇ÎËÚ ·ÓÎÚ (C).
èÓÍ·‰Í‡ ÛÔ‡‰ÂÚ ‚ÌÛÚ¸ χ¯ËÌ˚.
LJ˘‡fl χ¯ËÌÛ, Û‰‡ÎËÚ ‚˚¯Â
Ó·ÓÁ̇˜ÂÌÌÛ˛ ÔÓÍ·‰ÍÛ.
á‡ÍÓÈÚ 4 ÓÚ‚ÂÒÚËfl
ÒÔˆˇθÌ˚ÏË Á‡„Îۯ͇ÏË. Ç˚
̇ȉÂÚ Ëı ‚ ÔÓÎË˝ÚËÎÂÌÓ‚ÓÏ
Ô‡ÍÂÚÂ Ò ËÌÒÚÛ͈ËÂÈ.
ÂÍÈÌÀÍÈÅ!
ÍÅ ÎÑÒÀÂËßÉÒÅ
∋ËÅÌÅÍÒÛ
ÓÏÀÊÎÂÊÈ ÄÅÒßÌ
ÄËß ÈÃP.
 Loading...