Do you have a question about the HP R5000 ERM and is the answer not in the manual?
The ERM connects to UPS units or other ERMs, extending runtime up to 30 minutes.
Refer to HP UPS R5000/R7000 User Guides for detailed information and safety notices.
Risk of electric shock and hazardous energy levels. Installation by knowledgeable individuals only.
Symbol indicates ERM exceeds safe handling weight. Follow occupational safety guidelines.
Install heaviest items at the bottom of the rack first, then populate upwards for stability.
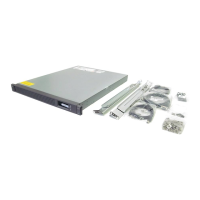
Lists items included in the ERM kit: document, warranty, rails, ERM unit, bezel, and mounting hardware.
Phillips screwdriver and 10-mm hex-nut driver are required for installation.
Kit includes screws, hex nuts, and clip nuts for rack mounting.
Install in temperature/humidity-controlled indoor environment, free of conductive contaminants.
Consider ambient temperature, air flow, circuit overloading, earthing, and electrical requirements.
Check battery recharge date; do not use if date has passed. Contact HP if recharged.
Transport packaged unit to location and unpack near the rack for assembly.
Always plan rack installation with heaviest item at the bottom. Install heaviest item first, then populate from bottom to top.
Loosen nuts and extend brackets to the appropriate length before mounting.
Insert screws through the rack into the mounting rail and front mounting bracket.
Install clip nuts into the rear of the rack, then insert screws through the rail into the clip nuts.
Install rail reinforcement plates and tighten using hex nuts with captive washers.
Install rear mounting brackets using hex nuts; adjust before tightening.
Shut down all load devices and switch load segment circuit breakers to Off.
Navigate LCD to TURN UPS OFF, confirm selection, and wait for UPS to stop beeping.
Disconnect the UPS from utility power and wait 60 seconds for internal circuitry to discharge.
Install the mounting rails as described previously.
Lift chassis with two people, lower to floor, then lift to rail level and slide onto rails.
Install the mounting ears on the chassis using the provided screws.
Attach the chassis to the rack using the supplied screws after sliding onto rails.
Connect split ERM cable ends to ERM connectors on UPS rear panel or previous ERM.
Up to four ERM units can be connected in series.
Connect UPS to power. ERM enters Standby and charges automatically. Allow at least 24 hours charge.
Configure UPS for the number of installed ERMs using front panel controls for maximum runtime.
| Nominal Output Voltage | 230V |
|---|---|
| Nominal Input Voltage | 230V |
| Input Frequency | 50/60 Hz |
| Output Frequency | 50/60 Hz |
| Topology | Double Conversion Online |
| Rack Height | 2U |
| Frequency | 50/60 Hz |
| Battery Recharge Time | 3 hours |
| Transfer Time | 0 ms |
| Warranty | 3 years |
| Power Capacity | 5000 VA |
| Battery Type | Sealed Lead Acid |
| Interface | USB, Serial |
| Output Power Capacity | 4500 Watts |
| Capacity | 5000 VA |
| Operating Temperature | 0°C to 40°C |
| Storage Temperature | 5°F to 113°F (-15°C to 45°C) |
| Humidity | 0 - 95% |