8 English
Equipment Specifications
Electrical
Voltage : 230VAC +10% / -15%, 1 phase, 50/60
Hz, power cable includes NEMA 20
amp plug, L6-20P
Amperage: 10 amperes
Wattage: 3450 watts (peak)
Air
Air Pressure Requirements: 6.9-12.0 bar (100-175 PSI)
Approximate Air Consumption: 4 CFM (110 Liters/Minute)
Atmospherics
Temperature: 0°C to +50°C
Relative Humidity: Up to 95% Non-condensing
Altitude: Up to 3048 m (10000 ft.)
Sound Pressure Level
Equivalent continuous A-weighted sound pressure at operator’s position
does not exceed 70 dB (A).
Explanation of Symbols
These symbols may appear on the equipment.
Alternating current.
Earth ground terminal.
Protective conductor terminal.
l ON (supply) condition.
OFF (supply) condition.
Risk of electrical shock.
Stand-by switch.
Not intended for connection to public
telecommunications network.
End User License AgreementEnd User License Agreement
Use of equipment and it’s operating software is acknowledgment of
agreement to the terms of the End User Licensing Agreement (“EULA”). The
entire EULA can be found by scanning the QR Code below.
Decal 24-51-2 displays model and electrical information for the
HammerHead
®
TDC laser system and the wheel lift.
Decal 24-190-2 informs the operator of the status of SmartWeight Pro
®
/
SmartWeight HN
®
in relation to California’s Proposition 65.
Image 3.
Image 4.
Image 5.
Image 6.
Image 7.
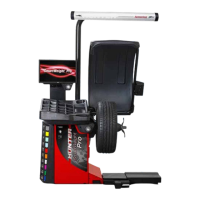
Specific Precautions/Power Source
The SmartWeight Pro
®
/ HN
®
/ Elite
®
Balancer is intended to operate from a
power source that will apply 230VAC +10% / -15%, 1 phase, 10 amp 50/60
Hz, power cable includes NEMA 20 amp plug, L6-20P, between the supply
conductors of the power cord. The power cord supplied utilizes a twist lock
connector, NEMA L6-20P. This machine must be connected to a 20 amp
branch circuit. Please refer all power source issues to a certified electrician.
Refer to “Installation Instructions for SmartWeight Pro
®
Balancer,” Form
7502-T, “Installation Instructions for the SmartWeight HN
®
” Form 6423-T and
“Installation Instructions for the SmartWeight Elite
®
” Form BN07891-05.
Image 8.
A protective ground connection, through the grounding
conductor in the power cord, is essential for safe operation. Use
only a power cord that is in good condition.
For information on converting from single phase NEMA L6-20P
plug to three phase NEMA L15-20P plug refer to Form 5350-T,
“NEMA L6-20P to NEMA L15-20P Power Plug Conversion
Instructions.”
Specific Precautions for Inner Dimension/BDC
Laser Indicator
The BDC (Bottom Dead Center) Laser Indicator is a class 3R laser -
SmartWeight Pro
®
and class 1M laser - SmartWeight HN
®
/ Elite
®
, designed
to aid in applying adhesive weights. The laser is not a field serviceable or
adjustable part.
Use caution in regard to reflective materials around the laser and never look
into the laser beam.
Specific Precautions for Outer Dimension Laser
The Outer Dimension Laser is a class 3R laser - SmartWeight Pro
®
and class
1M laser - SmartWeight HN
®
/ Elite
®
, designed to measure the profile of wheel
assemblies. The laser is not a field serviceable or adjustable part.
Use caution in regard to reflective materials around the laser and never look
into the laser beam.
Specific Precautions for HammerHead
®
TDC Laser
Indicator (Optional)
The TDC (Top Dead Center) Laser Indicator is a class 2M laser designed
to aid in applying clip-on weights. The laser is not a field serviceable or
adjustable part.
Use caution in regard to reflective materials around the laser and never look
into the laser beam.
Turning Power ON/OFF
Push Button Switch
The SmartWeight Pro
®
is equipped with a push button power switch located
on the left side of the LCD support. Use this switch for normal shut down and
restarting procedures.
Main Power Switch
To prevent loss of data, always use the push button switch on
the LCD support to power the balancer on and off. Then use the
main power switch to remove power to the entire unit.
The main power ON/OFF switch is located on the back of the balancer
cabinet. To power the balancer “ON,” press the “I” side of the ON/OFF switch.
To turn all power the balancer “OFF,” press the “O” side of the ON/OFF switch.
After the balancer performs a self-check, the main balance screen will appear
indicating the unit is ready for use.
 Loading...


