Do you have a question about the Husqvarna 650CRT and is the answer not in the manual?
Read the Owner's Manual carefully. Be thoroughly familiar with the controls and the proper use of the equipment.
Thoroughly inspect the area where the equipment is to be used and remove all foreign objects.
Do not put hands or feet near or under rotating parts. Exercise extreme caution on gravel drives, walks, or roads.
Keep machine, attachments, and accessories in safe working condition. Check shear pins, engine mounting bolts, and other bolts.
Read and observe safety rules. Follow a regular schedule in maintaining, caring for, and using your tiller.
A socket wrench set will make assembly easier. Standard wrench sizes are listed.
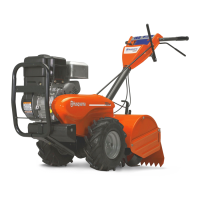
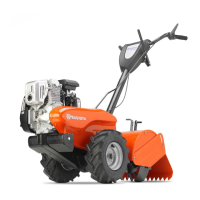
Defines 'right' or 'left' hand reference based on the operating position behind the tiller.
Lists components like Handle Locks, Carriage Bolt, Center Locknut, Flat Washer, Handle Lock Lever, and Hairpin Clip.
Be careful of exposed staples. Do not stretch or kink cables when unpacking.
Insert handle lock, attach handle assembly to gearcase using bolts and nuts.
Hook the end of the clutch cable through the hole in the control bar bracket.
Insert shift rod into shift lever indicator and secure with hairpin clip.
Ensure shift lever is in 'N'. Tilt tiller forward and separate from carton.
Reduce tire pressure to 20 PSI (1.4 kg/cm²) for optimal performance.
Handle height can be adjusted for operator comfort. Refer to Service section.
Read manual and safety rules. Familiarize yourself with controls and adjustments.
Know all controls before adding fuel/oil or starting. Familiarize with controls and adjustments.
Release drive control bar, move shift lever to 'N', and throttle to 'STOP'.
Includes engaging tines for Forward or Reverse wheel movement.
Engage drive control bar briefly, release, or rock tiller to assist shifting gears.
Release drive control, move shift lever to forward, lift handle to raise tines.
Adjust shields to protect plants from burial. Loosen nuts 'A' and 'B'.
Allow engine to cool. Disconnect spark plug wire. Drain fuel tank for transport.
Ensure engine is clean and filled with correct oil and fuel. Use clean fill funnels.
Check oil level before starting and after 5 hours. Ensure oil is at overflowing point when level.
Fill fuel tank with fresh, unleaded gasoline. Do not overfill; leave 1/2 inch space at top.
Ensure spark plug wire is connected. Set shift lever to 'N'. Place throttle control in 'FAST'.
Start with slow throttle. Consider row spacing for easier turns and better tilling.
Destroy weeds and break soil crust to retain moisture. Best depth is 1-3 inches.
Shear pins secure tines and break to prevent transmission damage if overloaded.
Covers checks for before each use, every 5, 25, 50 hours, and annually.
Maintain tiller as instructed for full warranty value. Some adjustments need periodic checks.
Check engine oil level, tine operation, and for loose fasteners.
Keep the unit well lubricated. Refer to the lubrication chart for specific points.
Use quality detergent oil. Select grade by temperature. Change oil every 25 hours or annually.
Clean foam pre-cleaner after 25 hours/season. Service paper cartridge every 100 hours/season.
Keep engine clean. Clean air screen, cylinder fins, levers, and linkage free of dirt.
Do not operate without muffler. Inspect and replace if necessary. Clean spark arrester screen.
Replace spark plugs at the beginning of each tilling season or after 50 hours of use.
Once a season, lubricate the right hand side gear case grease fitting with EP #1 Grease.
Clean unit when cool. Avoid pressurized water. Clean engine, wheels, finish, etc.
Adjust handle height for operator comfort. Loosen lever, adjust, retighten.
Maintain 20 PSI tire pressure. Ensure equal pressure. Keep tires free of gasoline/oil.
Place blocks under transmission. Remove side shields. Remove hairpin clip and clevis pin.
Remove hairpin clip and clevis pin from left wheel. Remove screws and hex nut.
Remove belt guard, slip old belt off pulleys, place new belt, check adjustment.
Ensure 5/8 inch stretch in extension spring when drive control bar is engaged.
Check tines for wear, sharpness, bending. Replace if gap exceeds 3.5 inches. Assemble new tines rearward.
Loosen cable clamp screw, adjust throttle lever to high speed stop, tighten screw.
Carburetor is preset. Contact service center for adjustments due to conditions.
Clean tiller, inspect/replace belts, lubricate, check fasteners, touch up paint.
Prevent gum deposits. Alcohol fuels attract moisture. Drain fuel tank and run engine.
Drain warm oil. Add oil through spark plug hole into cylinder. Distribute oil.
Use clean fuel. Store indoors, covered, and protected from dust and dirt.
Troubleshoot fuel, choke, air cleaner, spark plug, and carburetor issues.
Troubleshoot throttle, air cleaner, spark plug, fuel quality, and carburetor issues.
Troubleshoot overload, air cleaner, oil, spark plug, fuel, and carburetor issues.
Troubleshoot oil level, air screen, engine cleanliness, muffler, and carburetor issues.
Cause: Ground too dry and hard.
Cause: Ground too wet.
Troubleshoot drive control bar, V-belt adjustment, or V-belt position.
Troubleshoot tilling depth, throttle control, and carburetor issues.
Cause: Shear pin(s) broken.
Covers defects in material/workmanship for specified periods based on product type.
Husqvarna will repair or replace defective components without charge for parts or labor.
Excludes normal maintenance items, discoloration, non-Husqvarna engines, and third-party attachments.
Excludes defects from accident, abuse, misuse, negligence, or failure to maintain.
Product must exhibit reasonable care, maintenance, operation, storage, and upkeep.
Present proof of purchase to an authorized dealer. Deliver product at owner's expense.
| Brand | Husqvarna |
|---|---|
| Model | 650CRT |
| Category | Lawn and Garden Equipment |
| Language | English |