z
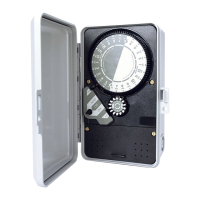
TO OPERATE MANUALLY:
Turn Auto-Off-On switch to ON. When operation is no longer needed , turn
Auto-Off-On switch back to OFF.
z
TO SET DAILY OPERATION:
There are 14 days to program on the Day Wheel. For each day that operation
is desired, the day wheel pin should be pushed down fully. For days where
operation is not desired, the day wheel pins should be pulled out gently.
z
TO SET OPERATING TIMES:
The 24 hour Time Dial has ninety-six 15 minute increments. The timing pins
should be inserted in the Time Dial to indicate the desired operating times.
Included with each controller is a package of white 15 minute pins. Longer
timing periods may be obtained by placing white pins directly next to each
other in Time Dial. Also available are shorter duration 7 minute pins (yellow)
and 4 minute pins (orange).
z
TO SET CONTROLLER TO OPERATE A MULTIPLE ZONE VALVE:
The operating times for each zone are represented by one pin or by a group of
pins in the Time Dial. Omit at least one pin between each zone of pins in Tine
Dial.
z
TO START AUTOMATIC OPERATION:
Once the correct time and day have been set and the desired operating times
have been programmed, the Auto-Off-On switch knob should be turned to
Auto.
ELECTRICAL CONNECTION INSTRUCTIONS
**PRIOR TO INSTALLATION OR SERVICE, DISCONNECT POWER TO CONTROLLER
For 1000 Series Controllers:
z
Remove controller face from enclosure by removing two chassis screws.
z
Make wire connections as indicated by Electrical Circuit and Connection
Diagram and secure connections with wire nuts provided.
z
Reinstall controller in enclosure.
For 2000 Series Controllers:
z
Remove lower cover on controller face.
z
Make wire connections to electrical connection strip as indicated by electrical
Circuit and Connection Diagram.
z
Reinstall lower cover on controller face.
CAUTIONS:
PRIOR TO INSTALLATION OR SERVICE, DISCONNECT POWER TO CONTROLLER
z
Ensure proper controller has been selected for the application .
z
Use appropriate gauge wire and ensure that all wiring meets local code.
Pa
e 2 of 9
8/2/2005htt
://www.krain.com/oldsite/h
drotechcontrollers.html