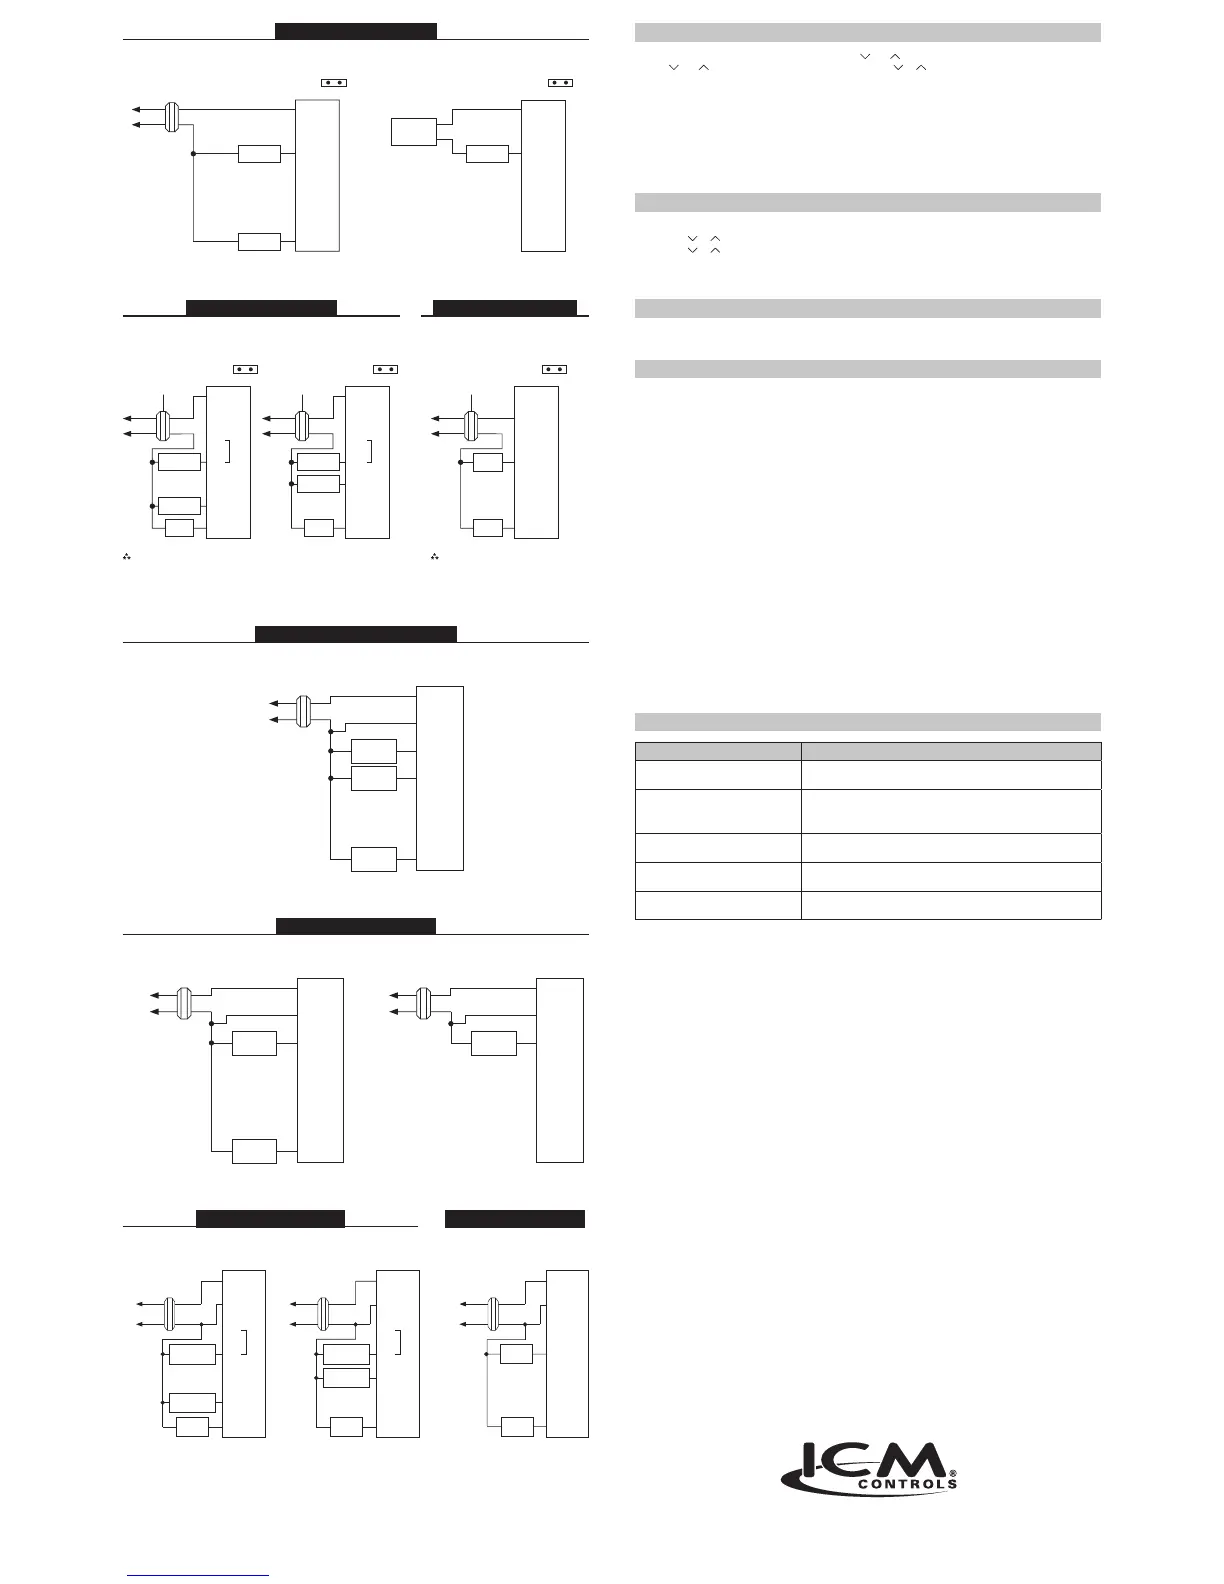
SC2000 – HeatingOnly
3-Wire,SingleTransformer
HOT
120 VAC 24 VAC
Heating
Control
Fan
Control
T
H
E
R
M
O
S
T
A
T
RH
RC
W
Y
B
O
G
Heating
Control
Thermopile
or
Transformer
2-Wire,SingleTransformerorMillivolt
RH RC
Pre-Installed Jumper
RH RC
Pre-Installed Jumper
T
H
E
R
M
O
S
T
A
T
RH
RC
W
Y
B
O
G
HOT
120 VAC 24 VAC
Transformer Transformer
HOT
120 VAC
Transformer
HOT
120 VAC
24 VAC
Compressor
Contactor
Fan
Relay
Compressor
Contactor
Fan
Relay
Reversing
Valve
Cooling
Control
Fan
Control
CoolActive
ReversingValve
HeatActive
ReversingValve
3-Wire,
SingleTransformer
Note:
Place jumper between “W” and “Y” terminals.
Note:
Millivolt system may require a
transformer and/or an isolation
relay to operate properly
SC2000 – HeatPump
SC2001 – CoolOnlySC2001 – HeatPump
Pre-Installed Jumper Pre-Installed JumperPre-Installed Jumper
RH RC
4or5-Wire,SingleTransformer
24 VAC
T
H
E
R
M
O
S
T
A
T
R
C
Y
G
120 VAC
HOT
Transformer
Fan
Control
W
B
O
Heating
Control
(Optional)
Cooling
Control
4-Wire,SingleTransformer
24 VAC
T
H
E
R
M
O
S
T
A
T
R
C
Y
G
120 VAC
HOT
Transformer
Fan
Control
W
B
O
Heating
Control
24 VAC
T
H
E
R
M
O
S
T
A
T
R
C
Y
G
120 VAC
HOT
Transformer
W
B
O
Heating
Control
G
T
H
E
R
M
O
S
T
A
T
R
C
Y
G
W
O
BB
T
H
E
R
M
O
S
T
A
T
R
C
Y
W
O
24 VAC
HOT
Transformer
24 VAC120 VAC
Transformer
24 VAC120 VAC
HOT
Transformer
Fan
Relay
Fan
Relay
Fan
Control
Cooling
Control
Reversing
Valve
Compressor
Contactor
Compressor
Contactor
HeatActive
ReversingValve
CoolActive
ReversingValve
4-Wire
SingleTransformer
Place jumper between “W” and “Y” terminals. Millivolt systems may require a
transformer and/or an isolation
relay to operate properly.
Troubleshooting
Symptom Remedy
The system isn’t turning on Check the wiring (see Installation)
Check the batteries (SC2000 only)
LCD is blank, or displaying “LO BAT” SC2000: Replace batteries, or make sure the existing ones are properly
installed (see Installing and Changing Batteries)
SC2001: Verify 24 VAC is at thermostat.
Thermostat is not properly controlling
the fan
Check that the Gas/Electric jumper setting matches your system (gas
or electric)
Thermostat is continuously turning on
and off
Increase the temperature differential
(see Conguration)
Temperature displayed is not accurate Plug the hole for wiring behind the thermostat with non-ammable
insulation to prevent airow into the thermostat
7313 William Barry Blvd., North Syracuse, NY 13212
(Toll Free) 800-365-5525 (Phone) 315-233-5266 (Fax) 315-233-5276
www.icmcontrols.com
LIAF128-1
SC2001 – HeatingandCooling
SC2000 – CoolOnly
SC2001 – HeatingOnly
Configuration
Enter conguration by simultaneously pressing both the and buttons for 1 second while in OFF mode.
Use the and buttons to change the setting. Press both the or buttons to advance to the next
conguration screen. Exit conguration by sliding the Cool/Off/Heatmode switch to Heator Coolmode.
• F/C: Select to operate in Fahrenheit or Celsius
• Differential1-5: Default set to 1 degree. When heating or cooling turn on too frequently you can increase the
temperature differential. A larger differential results in longer run times.
• Heattimedelay
– H0 = No time delay between heat calls
– H1 = 4-minute time delay between heat calls
Starting the Thermostat
Move the
Cool/Off/Heat switch to the Cool or Heat position, depending on the season.
Setting the Setpoint Temperature
1. Place Cool/Off/Heat switch to the Cool or Heat position.
2. Press the or button a single time to see the currenttemperature settting.
3. Press the or button until the desiredtemperature setpoint displays.
4. The new temperature setpoint is automatically saved in memory. After 5 seconds, the display returns to showing
the current room temperature.
A Quick Test
CAUTION!
:
Do not switch system to cool if the temperature is below 50°F (10°C). This can damage the
air conditioning system and may cause personal injury.
Donotshortjumperacrossterminalsonthegasvalveoratthesystemcontroltotestinstallation.
Action: Set the Cool/Off/Heat switch to Cool. Press the down button until the temperature
setting is 3°F below the room temperature.
Result: The A/C system and fan should turn on.
Action: Set the Cool/Off/Heat switch to Off.
Result: The A/C should turn off (There may be a fan delay).
Action: Set the Cool/Off/Heat switch to Heat. Press the up button until the temperature
setting is 3°F above the room temperature.
Result: The heating system and fan should turn on (There may be a time delay depending on your
system).
Action: Set the Cool/Off/Heat switch to Off.
Result: The heating system should turn off (There may be a fan delay).
Action: Set the FanAuto/On switch to On.
Result: The blower fan should turn on.
Action: Set the FanAuto/On switch to Auto.
Result: The blower fan should turn off.
If the above test was successful, you have a proper installation.
Ifnot:
Double check that wires are securely connected and are connected to the proper terminals. Consult the
troubleshooting section.
T
H
E
R
M
O
S
T
A
T
RH
RC
W
Y
B
O
G
T
H
E
R
M
O
S
T
A
T
RH
RC
W
Y
B
O
G
T
H
E
R
M
O
S
T
A
T
RH
RC
W
Y
B
O
G
T
H
E
R
M
O
S
T
A
T
R
C
Y
G
W
O
B
Reversing
Valve
ONE-YEAR LIMITED WARRANTY
The Seller warrants its products against defects in material or workmanship for a period of one (1) year from the date of
manufacture. The liability of the Seller is limited, at its option, to repair, replace or issue a non-case credit for the purchase
prices of the goods which are provided to be defective. The warranty and remedies set forth herein do not apply to any goods
or parts thereof which have been subjected to misuse including any use or application in violation of the Seller’s instructions,
neglect, tampering, improper storage, incorrect installation or servicing not performed by the Seller. In order to permit the
Seller to properly administer the warranty, the Buyer shall: 1) Notify the Seller promptly of any claim, submitting date code
information or any other pertinent data as requested by the Seller. 2) Permit the Seller to inspect and test the product claimed
to be defective. Items claimed to be defective and are determined by Seller to be non-defective are subject to a $30.00
per hour inspection fee. This warranty constitutes the Seller’s sole liability hereunder and is in lieu of any other warranty
expressed, implied or statutory. Unless otherwise stated in writing, Seller makes no warranty that the goods depicted or
described herein are t for any particular purpose.
 Loading...