1-1-32 Kamiminami, Hirano-ku, Osaka 547-0003, Japan
A-7022D-1EX-q Printed in Japan
© 2012 Icom Inc.
b Channel selection (Continued)
m Call channel programming
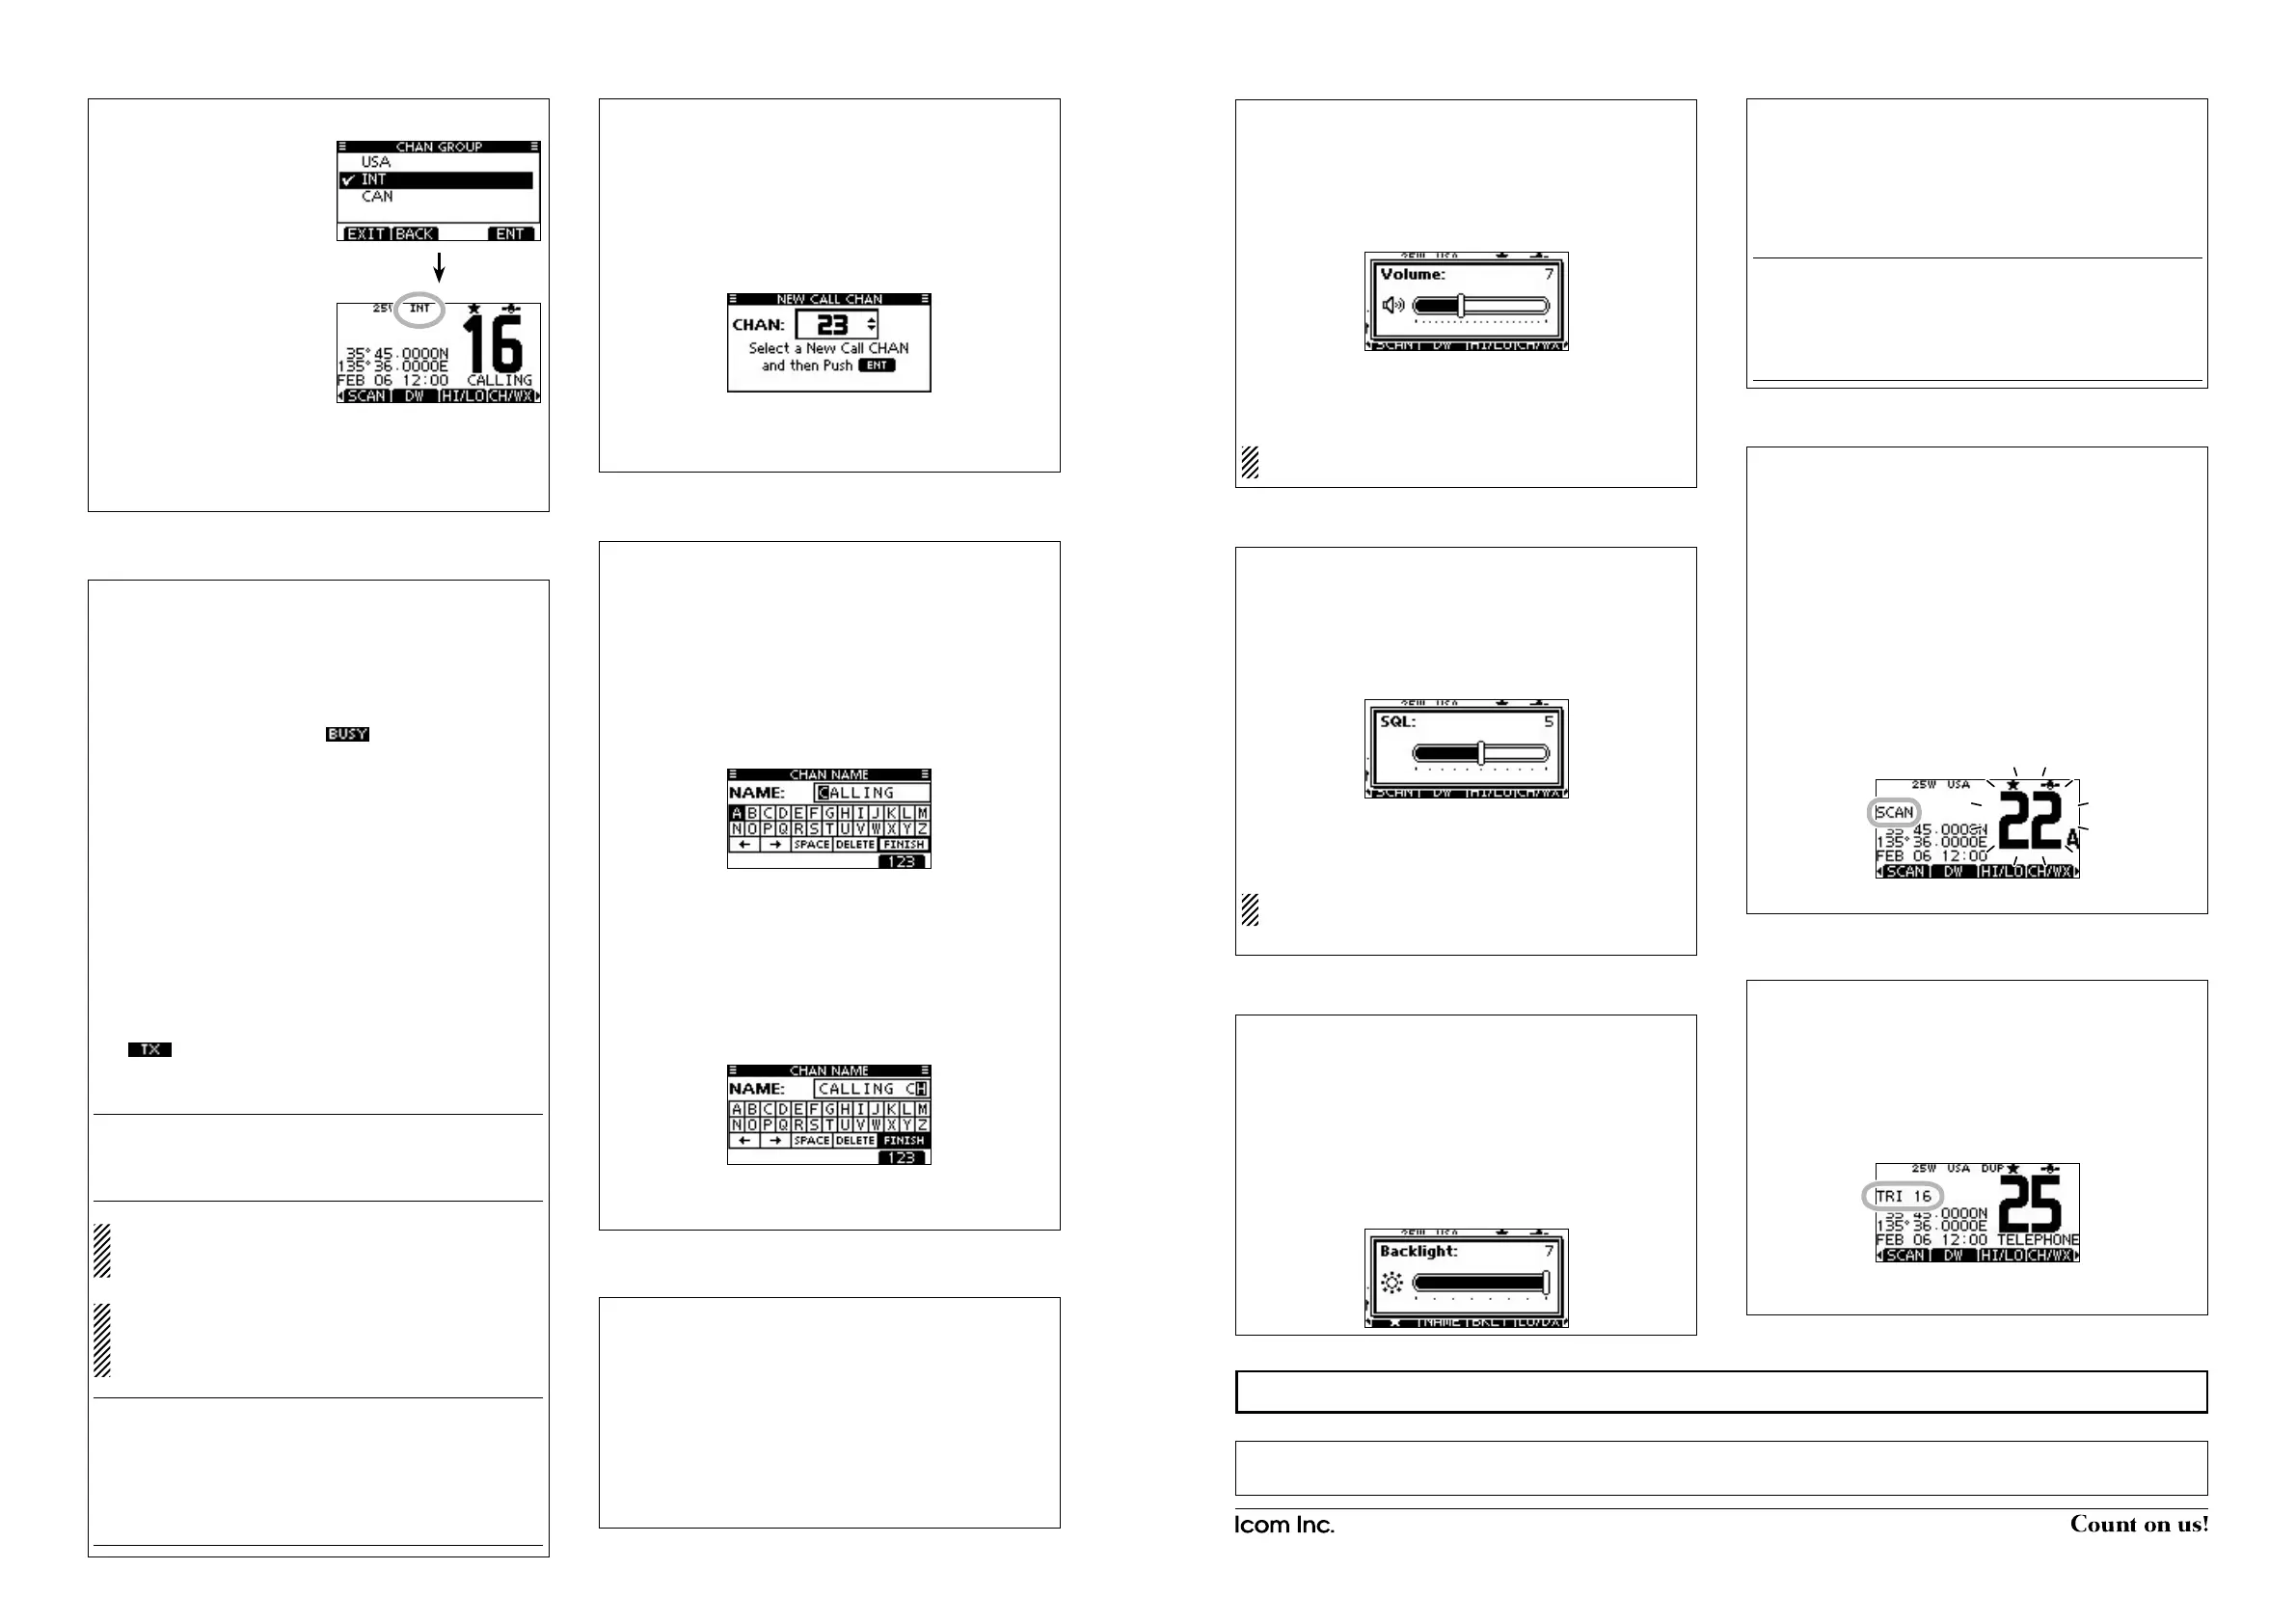
Channel group selection D
Push [MENU]. q
Rotate Dial or push [ w
∫
]/[
√
]
to select “Radio Settings,”
and then push [ENT].
Rotate Dial or push [ e
∫
]/[
√
]
to select “CHAN Group,”
and then push [ENT].
Rotate Dial or push [ r
∫
]/[
√
]
to select the desired chan-
nel group, and then push
[ENT].
•
The selectable channel
groups may differ, depending
on the transceiver version.
Push [EXIT] to exit. t
Push [ y
∫
](CH) or [
√
](CH) to
select a channel.
•“DUP”appearswhenaduplexchannelisselected.
•“A”appearswhenasimplexchannelisselected.
Select the desired channel group to be programmed. (See q
b)
Hold down [16/C] for 1 second to select the Call channel of w
the selected channel group.
•“CALL”andtheCallchannelnumberappear.
Hold down [16/C] again for 3 seconds (until a long beep e
changes to 2 short beeps) to enter the Call channel pro-
gramming mode.
Rotate Dial or push [ r
∫
](CH) or [
√
](CH) to select a channel.
Push [ENT] to program the displayed channel as the Call t
channel.
•Push[CLEAR]tocancel.
Hold down [PWR] to turn ON the power. q
Set the audio and squelch levels. (See w ⁄0, ⁄1)
First, open the squelch. Then, adjust the audio output ➥
level. After that, adjust the squelch level until the noise
just disappears.
Change the channel group. (See e b)
Push [ r ∫](CH) or [√](CH) to select a channel. (See b)
•When receiving a signal, “ ” appears and audio is
heard.
•Furtheradjustmentofthevolumelevelmaybenecessary.
Push [LO/DX] to turn the receive Attenuator function ON or t
OFF, if necessary.
•OnlyU.S.A.andAustralianversiontransceivers.
•“LOCAL” appears when the receive Attenuator function is
ON.
Push [HI/LO] to select the output power, if necessary. y
•“25W” appears when high power is selected, and“1W” ap-
pears when low power is selected.
•Choose lowpowerforshort rangecommunications,choose
high power for longer distance communications.
•Somechannelsareforonlylowpower.
Hold down [PTT] to transmit, then speak at your normal u
voice level.
•“ ” appears.
•Channel70cannotbeusedfortransmissionotherthanDSC.
Release [PTT] to receive. i
Information ✓
The Noise Cancel function reduces random noise components
in the transmit and/or receive signal. See the transceiver’s
manual for details.
Simplex channels, 3, 21, 23, 61, 64, 81, 82 and 83 CAN-
NOT be lawfully used by the general public in U.S.A. wa-
ters.
IMPORTANT: To maximize the readability of your transmit-
ted signal, pause a few seconds after pushing [PTT], hold
the microphone 5 to 10 cm (2 to 4 inches) from your mouth
and speak at a normal voice level.
NOTE for the TOT (Time-out Timer) function ✓
The TOT function inhibits continuous transmission beyond a
preset time period after the transmission starts.
10 seconds before transmission is cutoff, a beep sounds to
indicate the transmission will be shut down and “TOT” appears
in the channel name field. Transmission is not possible for 10
seconds after this shut down.
n Receiving and transmitting
, Channel name programming
Each channel can be assigned a unique alphanumeric ID of up
to 10 characters.
Capital letters, 0 to 9, some symbols (! " # $ % & ' ( ) * + , – . / [
\]^_:;<=>?)andaspacecanbeinput.
Push [ q
∫
](CH) or [
√
](CH) to select a channel.
•First,canceltheDualwatch,Tri-watchorScanfunction,ifacti-
vated.
Push [NAME] to open the channel name programming w
screen.
•Ablackboxisdisplayedontherstcharacter.
Enter the desired channel name in the following manner: e
•SelectadesiredcharacterusingDial,or[
∫
]/[
√
]/[
Ω
]/[
≈
].
•Push[ENT]tosetit.
•Tomovethecursor,selecteitherarrow,“←” or “→,” then push
[ENT].
•Select“SPACE,”thenpush[ENT]toinputaspace.
•Select“DELETE,”thenpush[ENT]todeleteacharacter.
•Push[CLEAR]tocancelandreturntothepreviousscreen.
Repeat step r e to input all characters.
Push [ t Ω], [≈], [∫] or [√] to select “FINISH,” then push [ENT]
to set the name and return to the previous screen.
. AquaQuake water draining function
The AquaQuake water draining function clears water away
from the speaker grill. Without this function, water may muffle
the sound coming from the speaker. A buzzing sound is heard
when this function is activated.
While holding down [AQUA], the AquaQuake function is ac- ➥
tivated to clear water away from the speaker grill.
•Whileholding down [AQUA],a lowbuzzing sounds to drain
water, regardless of the volume level setting.
•TheHM-195’skeysaredisabledwhiletheAquaQuakefunc-
tion is activated.
⁄0 Adjusting the volume level
Rotate [VOL/SQL](Dial), or push [VOL/SQL](Dial) one or q
more times to display the volume adjustment screen.
Rotate [VOL/SQL](Dial) to adjust the volume level. w
•TheHM-195has20volumelevelsandOFF.
•Ifnokeyoperationisperformedforabout5seconds,theHM-
195 sets the selected volume level, and returns to the normal
mode.
Push [ENT] to set the level, and exit the volume adjustment e
mode.
•Push[CLEAR]tocancel.
The desired function can be assigned to [VOL/SQL](Dial).
See the transceiver’s manual for details.
⁄1 Adjusting the squelch level
Push [VOL/SQL](Dial) one or more times to display the q
squelch adjustment screen.
Rotate [VOL/SQL](Dial) to adjust the squelch level. w
•Thesquelch is adjustable in 11 levels. OPEN is completely
open; 10 is tight squelch; 1 is loose squelch.
•Ifnokeyoperationisperformedforabout5seconds,these-
lected squelch level is set, and returns to the normal mode.
Push [ENT] to set the level, and exit the squelch adjustment e
mode.
•Push[CLEAR]tocancel.
The desired function can be assigned to [VOL/SQL](Dial).
See the transceiver’s manual for details.
Select Priority scan or Normal scan in the Menu screen. q
•Seethetransceiver’smanualfordetails.
Select the desired channel group. (See w b)
Set the e Favorite channels. (See ⁄3)
Make sure the squelch is closed to start a scan. r
Push [SCAN] to start a Priority or Normal scan. t
•“SCAN16”appearsduringa Priority scan;“SCAN” appears
during a Normal scan.
•Whena signalisdetected,thescan pausesuntil thesignal
disappears, or resumes after pausing 5 seconds, depending
on the Set mode setting. (Channel 16 is still monitored during
a Priority scan.)
•Push[Y]/[Z] to check the scanning Favorite channels, change
the scanning direction or manually resume the scan.
•Abeeptonesoundsand“16”blinkswhenasignalisreceived
on Channel 16 during a Priority scan.
To stop the scan, push [CLEAR], or repeat step y t.
⁄5 Dualwatch/Tri-watch operation
⁄3 Setting Favorite channels
⁄4 Starting a scan
Select Dualwatch or Tri-watch in the Menu screen. q
•Seethetransceiver’smanualfordetails.
Push [ w
∫
](CH) or [
√
](CH) to select the desired operating
channel.
Push [DW] to start a Dualwatch or Tri-watch scan. e
•“DUAL16”appearsduringDualwatch;“TRI16”appearsduring
Tri-watch.
•A beep tonesounds when a signal is received on Channel
16.
To cancel Dualwatch or Tri-watch, push [DW] again. r
Select the desired channel group. (See q b)
Select the desired channel to be set a w s a Favorite channel.
Push [ e ] to set the displayed channel as a Favorite chan-
nel.
•“” appears on the display.
To cancel the r Favorite channel setting, repeat step e.
•“” disappears.
Clearing (or setting) all tagged channels ✓
Hold down [] for 3 seconds (until a long beep changes to 2
short beeps) to clear all Favorite channel settings in the se-
lected channel group.
• Repeatabove proceduretoset all channels as Favorite chan-
nels.
⁄2 Adjusting the display backlight level
The function display and keys can be backlit for better visibility
under low light conditions.
The backlight is adjustable in 7 levels and OFF.
Push [BKLT] to show the backlight adjustment screen. Ro- ➥
tate Dial to adjust the brightness of the LCD and key back-
light, and then push [ENT].
•Ifnokeyoperationisperformedforabout5seconds,theHM-
195 sets the selected backlight level, and returns to the nor-
mal mode.
When the International
channel group is selected.
+See “Instructions w” (⁄6 to ¤1) or “Instructions e” (¤2 to ‹0) for other functions.
CLEAN THE HM-195 THOROUGHLY WITH FRESH WATER after exposure to saltwater, otherwise, the keys and switch may
become inoperable due to salt crystallization.
 Loading...