EasyManua.ls Logo

iDataLink maestro Rr - User Manual

iDataLink maestro Rr
229 pages
Print Icon
To Next Page IconTo Next Page
Loading...
NOTICE: Automotive Data Solutions Inc. (ADS) recommends having this installation performed by a certifi ed technician. Logos and trademarks used here in
are the properties of their respective owners.
WARNING
Pressing the printer icon or “quick printing” this document will print
all of the guides in this compilation.
Open the Bookmarks menu and find your vehicle OR scroll
down until you find the install guide for your vehicle.
Print only the pages for your vehicle using the advanced
options in the Print menu.
Install your Maestro RR according to the guide for your vehicle.
HOW TO USE THIS INSTALL GUIDE
1
2
3
SELECT VEHICLE
PRINT PAGES NEEDED

Table of Contents

Other manuals for iDataLink maestro Rr

Questions and Answers

  • K
    Karen JohnsonNov 21, 2025
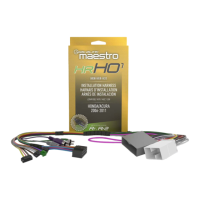
    How to fix iDataLink maestro Rr steering wheel controls when the LED blinks?
    • C
      Christina WoodardNov 21, 2025
      If the steering wheel controls on your iDataLink Automobile Accessories aren't working, but the LED on the Maestro blinks when you press the buttons, here's what to check: * First, verify that the buttons are properly configured in the flash. If any button is set to “none” for “press once”, it won't function. The “hold” column can be left as none and the “press once” function will still work with a single press or when holding the button. * Make sure the blue 4-pin steering wheel control cable is securely connected between the Maestro and the radio. * Remember, the radio uses either the 3.5mm jack OR the blue/yellow wire, not both. Connect the 3.5mm jack from the Maestro blue 4-pin cable to the radio’s 3.5mm port (labeled steering, remote, or wheel). If no such port exists, wire the...
  • C
    Cathy SmithAug 25, 2025
    Why is the audio so quiet on my iDataLink maestro Rr?
    • C
      Christina RiveraAug 26, 2025
      If the audio from your iDataLink Automobile Accessories is too quiet or too loud, here's how to adjust it: * For vehicles without an amplifier: Cut off the black & white speaker junction connectors and directly wire the speaker wires from the radio to the harness. * For vehicles with an amplifier: Make sure the black & white speaker plugs are connected and that the speaker wires are routed through the level matching circuits covered with black heat shrink.
  • K
    Kevin FryeAug 27, 2025
    What to do if gauges do not work and radio shows OBD2 Error 1 or Error 2 with iDataLink maestro Rr?
    • Q
      qtorresAug 27, 2025
      If your gauges aren't working and the radio displays OBD2 Error 1 or Error 2, ensure the OBDII connector is securely attached to the vehicle's OBD2 connector. If you've hardwired connections at the OBDII, double-check these connections. Make sure the RED/BROWN wire is on PIN 6 and the YELLOW/ BROWN wire is connected to PIN 14 of the OBDII connector. Soldering or military splicing methods are recommended. If other devices are connected to the OBD2 or CAN wires (like programmers or insurance trackers), try unplugging them to see if the gauges then work. If they do, contact tech support for options and reset the RR.
  • H
    Holly IbarraAug 27, 2025
    Why is the light on my iDataLink Maestro blinking RED TWICE and the radio IS turning ON?
    • D
      Danny JonesAug 27, 2025
      If the Maestro light is blinking red twice but the radio is turning on, ensure the 4-pin data cable is correctly connected between the radio and the RR, and that it's plugged into the black port on the Maestro RR. The red and blue ports on the RR should be empty. Also, verify that the correct radio model and serial number were entered during the flash. You can find the radio’s serial number in the radio's settings, possibly listed as Device Id, Device Number, or Serial Number.
  • W
    Walter MurphyAug 28, 2025
    What to do if the iDataLink Maestro light is blinking RED TWICE but the radio is NOT turning on?
    • J
      Jacob MurilloAug 29, 2025
      If you're installing a modular radio and it's not turning on, and the Maestro light blinks red twice, make sure the screen is securely attached and any trim pieces on the radio have been fully installed. Failure to fully install these components can prevent the radio from powering up, resulting in the 2x red error.
  • J
    James JamesSep 16, 2025
    Why is the light on my iDataLink Automobile Accessories Maestro flashing RED ONCE?
    • K
      Keith CooperSep 16, 2025
      If the light on the Maestro is flashing red once, it indicates that there is no firmware on the module. You should flash the RR module.
  • E
    Edgar HerreraSep 14, 2025
    What to do if iDataLink Automobile Accessories gauges do not work and the radio shows OBD2 Error 1 or Error 2?
    • M
      Melissa HowardSep 14, 2025
      If the gauges aren't working and the radio displays OBD2 Error 1 or Error 2, ensure the 2-pin connectors of the K200 T-harness are configured correctly, as shown in step 2. Also, try resetting the RR.
  • S
    Steven DoughertySep 15, 2025
    What to do if I cannot hear callers when making a phone call with iDataLink maestro Rr?
    • E
      Emily SmithSep 15, 2025
      If you can't hear callers but they can hear you when making a phone call, and your vehicle has a factory amplifier, ensure that the 4-pin black and white connectors in the harness are plugged in correctly as stated in step 2.
  • V
    vtuckerSep 6, 2025
    Why steering wheel controls do not work on my iDataLink maestro Rr Automobile Accessories?
    • E
      erin35Sep 6, 2025
      If the steering wheel controls for your iDataLink Automobile Accessories aren't working, but the LED on the Maestro blinks when you press the steering wheel buttons, first verify that the buttons are correctly configured in the flash. If any button is set to 'none' for 'press once,' it won't function. The 'Hold' column can be left as 'none,' and the 'press once' function will still work with a single press or when holding the button. Also, check that the blue 4-pin steering wheel control cable is securely connected between the Maestro and the radio.
  • L
    leslie99Sep 4, 2025
    What to do if iDataLink maestro Rr Automobile Accessories gauges do not work and radio shows OBD2 Error 1 or Error 2?
    • U
      uyoungSep 4, 2025
      If the gauges aren't working and the radio displays OBD2 Error 1 or Error 2 with your iDataLink Automobile Accessories, check the connections of the BROWN/RED and BROWN/YELLOW wires to the OBDII connector. Ensure these wires are connected to the correct pins (PIN 6 and PIN 14 respectively) on the OBDII connector. Avoid using T-Taps; soldering or military splicing methods are recommended for a secure connection. It's crucial to connect the BROWN/RED and BROWN/YELLOW wires, and not the red/brown and yellow/brown wires. Finally, reset the RR module.

Summary

Installation Instructions

Step 1: Prepare and Connect Main Harness

Unbox aftermarket radio, locate harness, connect to TO2 T-harness, and match wires.

Step 2: Connect Backup Camera Harness

Connects the TO2 T-harness to the backup camera harness if the vehicle is equipped.

Step 3: Connect Factory Harness to TO2 T-Harness

Connects the vehicle's factory harness to the TO2 T-harness.

Step 4: Connect TO2 T-Harness to OBDII

Plugs the TO2 T-harness's white 2-pin connector into the vehicle's OBDII connector.

Step 5: Connect Radio and Data Cables

Plugs aftermarket radio harnesses, backup camera, auxiliary RCA, and data cables.

Step 6: Connect Module and Test Installation

Connects all harnesses to the Maestro RR module and tests the installation.

Wiring Diagram

Step 1: Main Harness Wire Identification

Identifies various wires from the main harness and their destinations.

Step 2: Reverse Camera Harness Connection

Illustrates the connection of the reverse camera harness to the TO2 T-harness.

Step 3: Factory Radio Harness Connection

Shows the connection of the factory radio harness to the TO2 T-harness.

Step 4: OBDII Connector Wiring

Details the wiring and connection of the OBDII connector.

Step 5: Maestro RR Module Connection

Depicts the final connection of the Maestro RR module to the main harness.

Radio Wire Reference Chart

Troubleshooting and Support

Maestro RR Reset Procedure

Step-by-step guide to reset the Maestro RR module for troubleshooting.

Technical Assistance Information

Provides contact details for technical support via phone, email, and web.

iDataLink maestro Rr Specifications

General IconGeneral
CategoryAutomobile Accessories
TypeVehicle Interface Module
CompatibilityWorks with select vehicles and aftermarket radios
FeaturesRetains factory features
FunctionalityAllows integration of aftermarket radios with factory vehicle systems
ProgrammabilityProgrammable via Weblink desktop application
Firmware UpdatesSupports firmware updates through Weblink
Data Bus SupportCAN bus
Vehicle CoverageCompatible with a wide range of makes and models
Additional FeaturesMay include support for factory amplifiers, backup cameras, and more
InstallationProfessional installation recommended

Related product manuals