This document outlines a unit plan titled "Build a Mini Arcade with the Intel® Galileo Gen 2 board," providing instructions and resources for creating a mini arcade using the specified hardware.
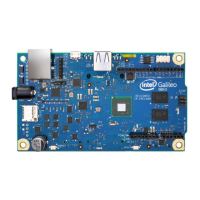
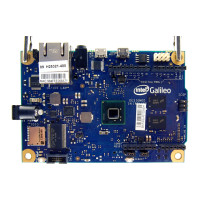
Device Description: Intel® Galileo Gen 2 Board
The Intel® Galileo Gen 2 board is a microcontroller board based on the Intel® Quark™ SoC X1000 application processor. It is designed for makers, students, and professional developers to create interactive devices and prototypes. The board functions as the central processing unit for the mini arcade projects described in this unit plan, allowing users to program and control various electronic components to create interactive games.
Important Technical Specifications:
- Processor: Intel® Quark™ SoC X1000.
- Connectivity:
- 10/100 Mbps Ethernet port for network connectivity.
- USB Host port for connecting peripherals (e.g., keyboard, mouse).
- USB Client port for connecting to a computer for programming and power.
- SDIO slot for an SD card, expanding storage capabilities.
- Input/Output (I/O):
- Digital (PWM) pins: A set of digital pins that can be configured for pulse-width modulation (PWM) output, useful for controlling motor speed or LED brightness.
- Analog In pins: A set of analog input pins for reading analog sensor data.
- ICSP header: In-Circuit Serial Programming header for programming microcontrollers.
- UART (Universal Asynchronous Receiver/Transmitter) for serial communication.
- JTAG (Joint Test Action Group) for debugging.
- Power: The board requires external power, typically supplied via a power cable. It also draws power from the USB client connection when connected to a computer.
- Voltage: The board provides 3V and 5V power outputs for connected components.
- Design: "DESIGNED IN IRELAND" is printed on the board, indicating its origin.
Usage Features:
The Intel® Galileo Gen 2 board is highly versatile and can be used for a wide range of projects, including the mini arcade games detailed in this unit plan:
- Programming Environment: The board is primarily programmed using the Arduino IDE (Integrated Development Environment). This environment allows users to write "sketches" (programs) in a C++-like language, compile them, and upload them to the Galileo board.
- Sensor Integration: The board can interface with various sensors, which are devices that respond to stimuli like heat, light, or pressure and generate a measurable signal. In the context of the mini arcade, push buttons act as input sensors.
- Output Control: The board can control output devices such as LEDs, displays (like the 8x8 LED Matrix used in this project), and other actuators.
- Project-Based Learning: This unit plan leverages the Galileo board for hands-on, project-based learning, allowing students to build and program interactive games like "Stacker," "Sprites," and "Rock Paper Scissors."
- Code Structure and Best Practices: The unit plan introduces fundamental coding concepts such as curly brackets for defining code blocks, comments for documentation, and case sensitivity in programming.
- Circuit Building: Users learn to connect various electronic components (LED matrix, push buttons, resistors, jumper wires) to the Galileo board and a breadboard to create functional circuits.
Maintenance Features:
Proper handling and connection procedures are crucial for the longevity and functionality of the Intel® Galileo Gen 2 board:
- Connection Protocol:
- Always ensure the Galileo board is plugged in (powered) BEFORE connecting the USB cable to the computer.
- Always unplug the USB cable BEFORE disconnecting the power from the Galileo board.
- Failure to follow these steps can permanently damage the board.
- Software Installation: The unit plan provides instructions for installing necessary software, including the Arduino IDE and specific project sketches (IESC.zip), ensuring the board can be programmed correctly.
- Firmware Upgrades: In case of issues, upgrading the firmware is a recommended troubleshooting step, accessible through the Arduino IDE's "Help" menu.
- Driver Installation: If the Galileo port is not visible in the device manager, installing the Galileo Driver is necessary.
- Troubleshooting Guide: A comprehensive troubleshooting guide is provided to address common issues such as sketches not working, Galileo port not being visible, Gadget Serial v2.4 not appearing, upload complaints about missing /dev/tty** or hangs, and complaints about missing libraries. This guide offers specific resolutions like checking IDE settings, replugging USB/power, rebooting, installing drivers, and restarting the Arduino IDE.
- Component Identification: The unit plan includes a guide for reading resistors using color bands, which is essential for correctly identifying and using resistors in circuits.
- Bill of Materials: A detailed bill of materials with links to purchase components helps in acquiring the correct parts for the projects, ensuring compatibility and proper functioning.
In summary, the Intel® Galileo Gen 2 board is a robust platform for educational and hobbyist electronics projects, with clear guidelines for setup, programming, and troubleshooting to facilitate a smooth learning experience in building interactive mini arcade games.