9. Installation / Activation / Wireless
You do NOT need a home wi-fi system to use these units. Multiple wireless units create their own indepen-
dent wireless detector network (wireless interconnect between multiple detectors). In addition, these units
can wirelessly communicate with an appropriate control panel.
WARNING: THIS DETECTOR SHOULD BE INSTALLED BY A CERTIFIED TECHNICIAN.
WARNING: FAILURE TO PROPERLY INSTALL AND ACTIVATE THIS DETECTOR WILL PREVENT
PROPER OPERATION AND RESPONSE TO HAZARDS.
If you are installing detectors and will use the wireless interconnect function, proceed to sec-
tion 9.1 “Set Up a Wireless Detector Network (Wireless Interconnect)” If you are not using the
wireless detector-to-detector interconnect function, then proceed with the following two steps,
and then skip ahead to the “ENROLLING A DETECTOR WITH A PANEL” section.
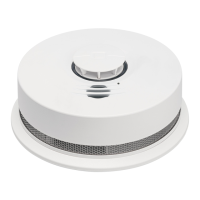
1. After selecting the proper location for the detector, attach the mounting bracket (trim plate) to the wall
or ceiling. To ensure aesthetic alignment of the detector with the hallway, or wall, the “A” line on the
mounting bracket (trim plate) must be parallel with the hallway when ceiling mounted or horizontal when
wall mounted.
2. Install the detector fully on the mounting bracket (trim plate) by rotating the detector in a clockwise
direction.
NOTE: Installing the detector on the mounting bracket (trim plate) will automatically activate the battery.
The power up sequence is indicated by the LED ring slowly glowing GREEN on/off one time.
NOTE: Detectors will emit a series of slow RED LED glowing on/off as the detector searches for a wireless
network. If you are intending to use the detectors without the wireless interconnect function, ignore these
notifications, and the wireless interconnect function will eventually turn off (~15 minutes) OR to immediately
finish this process, push the Test/Hush button until two beeps are heard (approximately 4 seconds). The
LED will change to glowing GREEN on/off every second. Repeat the button push/hold for another 4
seconds, until two beeps are heard, and then release the button. This will close the network.
• When the network has been closed, each detector’s GREEN LED will change from glowing on/off every
second to flashing once every 60 seconds to indicate normal operation.
NOTE: The battery activation is a one-time feature. After activation, the battery cannot be turned off, and
can only be discharged at the end of unit life. If the detector is removed from the mounting plate, the battery
will remain active. See Permanently Disable Detector / Discharge Battery section to de-energize the detec-
tor.