EasyManua.ls Logo

Jeep UNIVERSAL CJ-2A - Page 42

Jeep UNIVERSAL CJ-2A
281 pages
Print Icon
To Next Page IconTo Next Page
To Previous Page IconTo Previous Page
Loading...
'Jeep'
UNIVERSAL
and
'Jeep'
DISPATCHER
D
have
been
refaced
and
then
only
when
necessary.
The
finished
valve
seat
should
contact
the
approxi-
mate
center
of
the
valve
face.
Check
by
applying
an
extremely
thin
coat
of
pencil
lead
or
bearing-
fitting
blue
to
the
seat.
Then
install
and
rotate
the
valve
with
light
pressure.
Blue
(or
pencil
marks)
will
transfer
to
the
face
of
the
valve.
If
the
blue
is
near
the
top
edge
of
the
valve
face,
lower
the
valve
seat
by
using
the
valve
seat
relief
counter-
bore.
If
the
blue
is
transferred
to
the
bottom
edge
of
the
valve
face, raise
the
seat
by
using
the
valve
seat
narrowing
cutter.
When
the
valve
seat
can
no
longer
be
corrected,
it
is
advisable
to
investigate
installing
seat
inserts.
NOTE:·
The
insert
should
be
sufficiently .cooled
to
permit
installation
with
light
taps;
excessive
driving
of
the
insert
may
cock
it
in
the
counterbore
or
crack
the
insert.
0-57.
Exhaust
Valve
Seat
Insert
Replacement
Hardened
valve
seat
inserts
for
exhaust
valves
were
installed
in
production
beginning
with
engine
S/N
3J-161344
(For
CJ-2A,
beginning
with
replacement
engine
S/N
RJ-297362).
They
will
seldom
require
replacement.
To
avoid
damaging
the
block,
remove
an
insert
with
a
tool
designed
for
this
purpose.
When
installing
a
new
insert,
make
certain
the
counterbore
is
clean
and
smooth.
Use
a
driver
that
will
keep
the
insert
in
true
alignment
with
the
bore.
Cool
the
insert
and
the
installing
tool
with
dry
ice
for
30
minutes.
Make
certain
the
valve
seat
is fac-
ing
out.
Drive
in
the
insert
with
the
tool
until
it
bottoms
in
the
counterbore.
After
installation,
grind
the
valve
seat
at
an
angle
of
45°
and
then
check
with
a
dial
indicator
as
shown
in
Fig.
4 7.
D-58. Valve
Guide
Replacement
Damaged,
loose,
or
worn
valve
guides
must
be
re-
placed.
FIG.
49-REPLACING
VALVE
GUIDES
Should
it
be
necessary
to
replace
the
guides,
this
in-
stallation
can
b~t
be
made
by
using
Valve
Guide
Driver
tool
W.:'238
as
shown
in
Fig.
49.
The
old
guides
are
removed
by
driving
them
through
the
block
into
the
valve
compartment.
If
this
driver
is
not: availa,ble a
suitable
puller
ca,n
be
made
from
a
piece
of
2" [50,8 mm.)
pipe,
6"
[152,4
mm.]long
and
%"
[9,525 mm.)
bolt
10" [254 mm.)
to
12" [304,8
mm.]long
with
a
threaded
end,
a
small
hexagon
nut
which
will
pass
through
the
hole
in
the
cylinder
block
and
a 2" [50,8 mm.)
washer
with
a
%"
[9,525 mm.] hole
in
it.
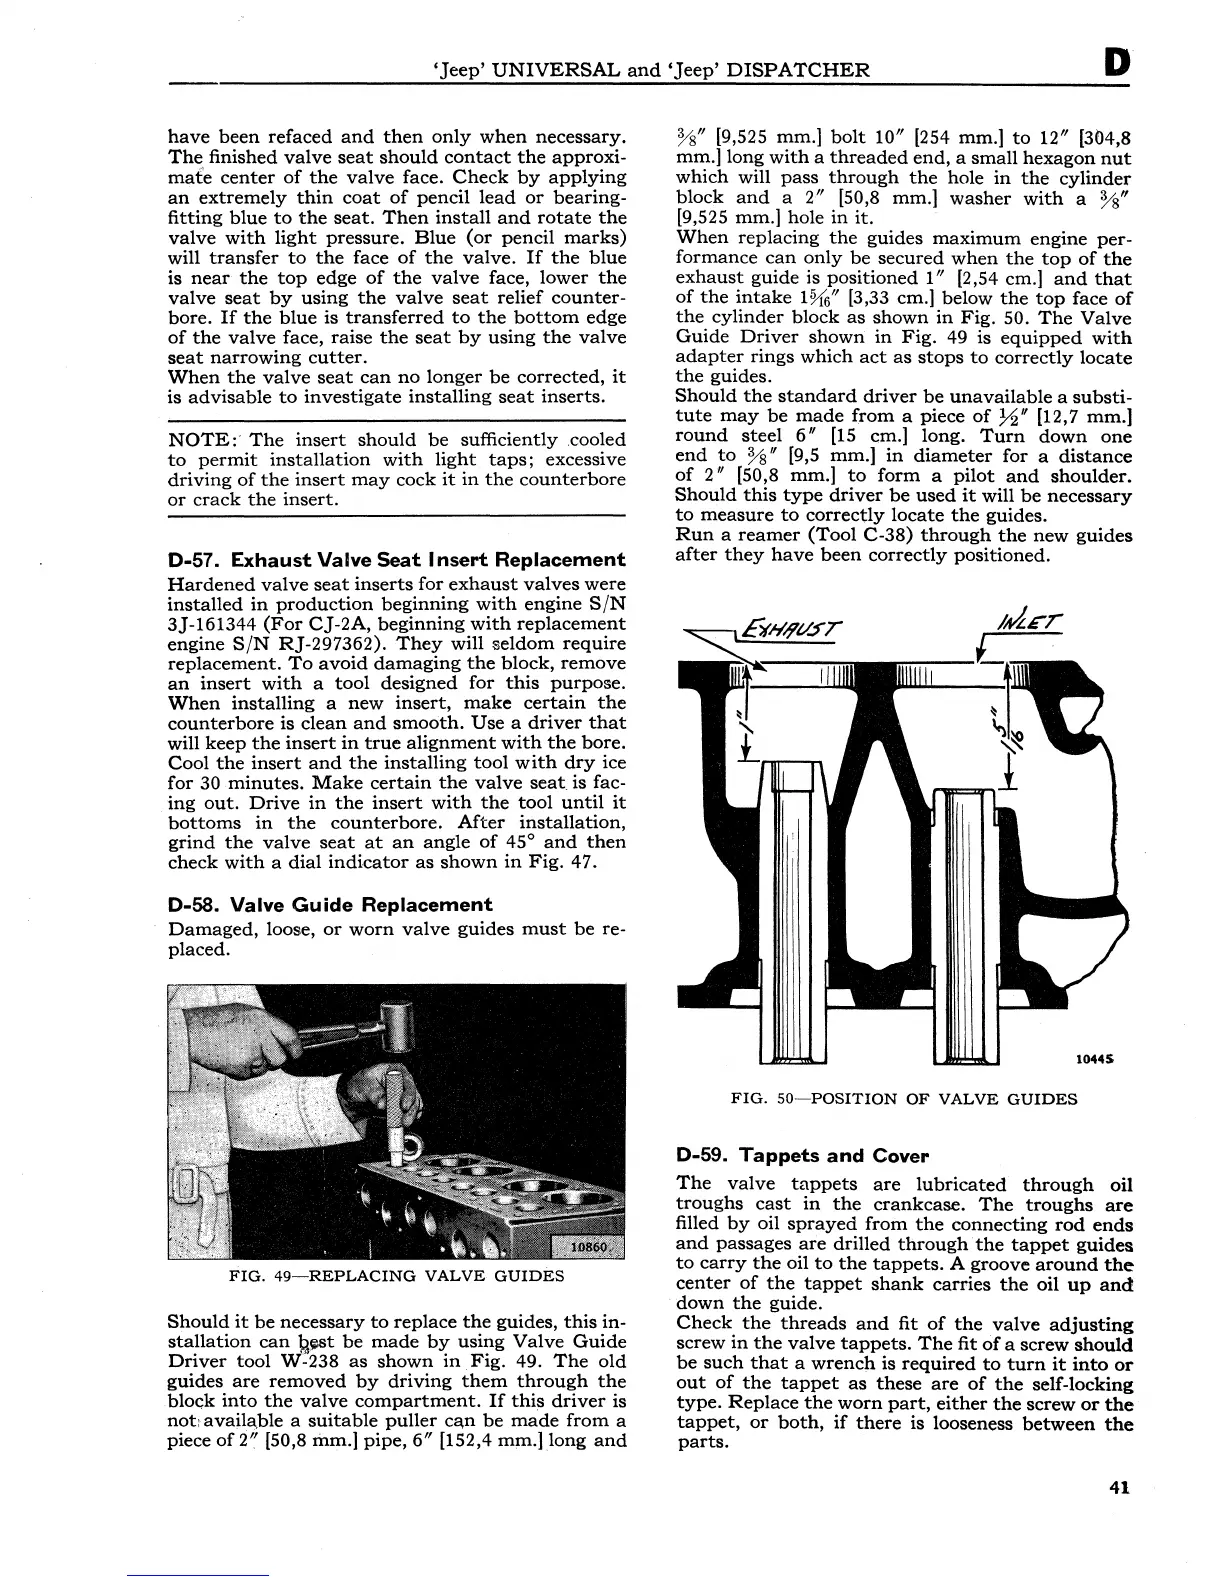
When
replacing
the
guides
maximum
engine
per-
formance
can
only
be
secured
when
the
top
of
the
exhaust
guide is
positioned
1" [2,54 em.]
and
that
of
the
intake
1%;" [3,33 em.] below
the
top
face
of
the
cylinder
block
as
shown
in
Fig.
50.
The
Valve
Guide
Driver
shown
in
Fig.
49 is
equipped
with
adapter
rings
which
act
as
stops
to
correctly
locate
the
guides.
Should
the
standard
driver
be
unavailable
a
substi-
tute
may
be
made
from
a piece
of
%
11
[12,7 mm.]
round
steel
6
11
[15
em.] long.
Turn
down
one
end
to
%
11
[9,5 mm.]
in
diameter
for a
distance
of
2
11
[50,8 mm.]
to
form
a
pilot
and
shoulder.
Should
this
type
driver
be
used
it
will
be
necessary
to
measure
to
correctly
locate
the
guides.
Run
a
reamer
(Tool
C-38)
through
the
new
guides
after
they
have
been
correctly
positioned.
10445
FIG.
50-POSITION
OF
VALVE
GUIDES
D-59.
Tappets
and
Cover
The
valve
tappets
are
lubricated
through
oil
troughs
cast
in
the
crankcase.
The
troughs
are
filled
by
oil
sprayed
from
the
connecting
rod
ends
and
passages
are
drilled
through
the
tappet
guides
to
carry
the
oil
to
the
tappets.
A groove
around
the
center
of
the
tappet
shank
carries
the
oil
up
and
down
the
guide.
Check
the
threads
and
fit
of
the
valve
adjusting
screw
in
the
valve
tappets.
The
fit
of
a screw
should
be
such
that
a
wrench
is
required
to
turn
it
into
or
out
of
the
tappet
as
these
are
of
the
self-locking
type.
Replace
the
worn
part,
either
the
screw
or
the
tappet,
or
both,
if
there
is looseness
between
the
parts.
41