4'"'"
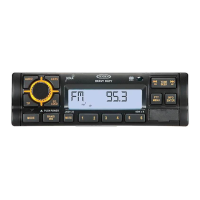
JHD1130
HEAVY~
---------------------------------------------------------------------------------------------------------------------------
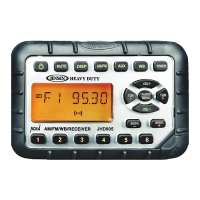
System
Menu
1.
Press and hold
the PTY/MENU button (2) for more than 2 seconds to enter the system
menu. The first menu item,
"KEYBEEP", will appear on the display.
2.
Press the TUNE/SEEK
I<<
I
>>I
(18, 19) button repeatedly to navigate the system menu.
3.
Press the
INFO/ENTER
button (16)
to
select the desired item.
4.
Press the
INFO/ENTER
button again to adjust the selected menu item.
The following items can
be
adjusted:
KEYBEEP
(Cik
(click)
I
Bep (beep)
I Off):
Turn the audible beep
On/Off
(heard when
functions/buttons are selected).
LCDLITE
(1-1
0):
Adjust
LCD
brightness.
TUNING (USA I EURO): Set
frequency spacing for various regions.
P-- CLOCK
(1-1
0 I Off)
CLK
FMT (12Hour
I
24Hour): Select 12 or 24 hour display mode.
CLK
(HH : MM):
Set
clock.
Press the
INFO/ENTER
button (16)
to
view the clock set screen.
Press the
INFO/ENTER
button to move to the next digit.
Press the TUNE/SEEK
I<<
I
>>I
(18, 19) buttons to adjust the selected digit.
PREONLY (On I Off):
Turn preset-only tuning on/off.
BAT ALRM
(Off I On):
When
ON,
radio
will
alert when vehicle battery voltage is below
10.8 VDC.
BAT
OFF (Off I On): When
ON,
radio
will
automatically turn off when vehicle battery
voltage is below 10.8 VDC.
RESET ALL <ENTER>: Press the INFO/ENTER
button (16) to return the
EEPROM
to
factory default set up values.
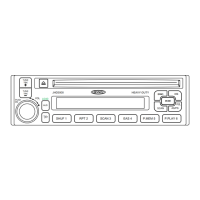
Equalizer
Press the EQ/LOUD butt.on (11) to choose one
of
the following pre-defined bass and treble
curves:
USER > FLAT >
ROCK>
CLAS(SICAL)
>
POP.
Loudness
Press and hold the EQ/LOUD button (11)
to
toggle loudness on/off. When listening to music at
low volumes, this feature
will boost the bass and treble ranges to compensate for the
characteristics
of
human hearing.
Auxiliary
Input
To
access an auxiliary device:
1.
Connect the portable audio player to the AUX
IN
on the front panel (17).
2.
Press the
MODE
button (4) to select
"Auxiliary"
mode.
3.
Press
MODE again
to
cancel
"Auxiliary"
mode and go to the next mode.
Liquid
Crystal
Display
(LCD)
The current frequency and activated functions are shown on the
LCD
panel
(21
).
NOTE:
LCD
panels
may
take
longer
to
respond
when
subjected
to
cold
temperatures
for
an
extended
period
of
time. In
addition,
the
visibility
of
the
characters
on
the
LCD
may
decrease
slightly.
The
LCD
display
will
return
to
normal
when
the
temperature
increases
to
a
normal
range.
6
Setting
the
Clock
To
set the clock
to
display the current time, turn the vehicle ignition on and turn the radio on.
Enter the system menu and adjust the clock by selecting the
"CLK"
menu item.
Press the
INFO/ENTER
button (16) to view the clock set screen.
Press the TUNE/SEEK
I<<
I
>>I
(18, 19) buttons to adjust the selected digit.
Press the
INFO/ENTER
button to move to the next digit.
Press the TUNE/SEEK
I<<
I
>>I
(18, 19) buttons to adjust the selected digit.
When
no
adjustment is made for 15 seconds, the time will
become set and normal operation
will
resume.
Display
Modes
Press the T/F button (12)
to
switch between LCD
clock display and source display.
 Loading...