9
Column Lock Handle
Referring to Figure 5:
Thread the column lock handle (D) into the table
bracket (E).
Figure 5
Table Installation
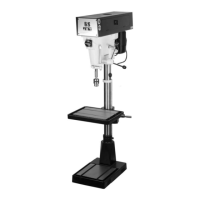
Referring to Figure 6:
1. Place the table (A) on the bracket (B).
2. Tighten the table lock handle (C).
Figure 6
Head Assembly
Referring to Figure 7:
1. With the aid of a second person, carefully lift the
head onto the column top and slide it down into
position
The head assembly is heavy! Use care when
lifting onto the column!
2. Rotate head assembly until sides of the pulley
cover are parallel with the sides of the base.
3. Tighten two setscrews (A) with a 5mm hex
wrench (provided) until they are snug.
Figure 7
4. Install three downfeed handles (B) into the
downfeed hub (C).
Chuck and Arbor Installation
Referring to Figure 8:
1. Twist the chuck (B) to retract the chuck jaws if
they are exposed.
2. Install the chuck (B) to the arbor (A) tightly.
3. Insert the chuck and arbor assembly into the
spindle (C). Pull the downfeed handle down to
press the arbor in place.
Note: Put a piece of scrap wood (D) on the table to
protect the chuck nose when pulling the downfeed
handle (E) down to press into place.
Figure 8