JOHNSON CONTROLS
48
FORM 450.50-N1
ISSUE DATE: 08/19/2019
SECTION 6 - LON PROTONODE
5. Connect the ProtoNode to the LON FTT10 net-
work using the non-shielded twisted pair network
cable. There is no polarity on the LON FTT10
network, so you can connect either wire to either
terminal.
NETWORK
CONNECTION
FIGURE 58 - PROTONODE LON NETWORK
CONNECTION
6. To discover the ProtoNode automatically, com-
plete the following steps:
1. Power up the chiller panel and the Proto-
Node.
2. Insert a small screwdriver into the Service
Pin hole.
3. Tilt the screwdriver towards the LonWorks
connector to depress the Service Pin switch.
The Service Pin switch faces towards the
LON port connector as shown in Figure 59.
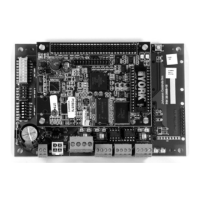
LD29261
SERVICE
PIN
FIGURE 59 - PROTONODE SERVICE PIN (COVER
REMOVED)
7. Use the unique 12 character LON Neuron ID in
lieu of the service pin to bind the ProtoNode to the
network. The ID address is printed on a label on
the back of the ProtoNode.
FIGURE 60 - PROTONODE NEURON ID
 Loading...