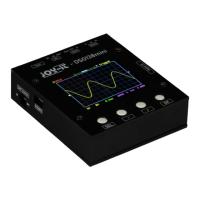
VERTICAL POSITION ALIGNMENT
Move the cursor to the vertical position indicator via the [SEL] key. Now
press and hold the [OK] key for three seconds and follow the instructions on
the screen.
SHOW/HIDE MEASUREMENT VALUES
To show or hide the measured values, move the cursor to the time base
using the [SEL] key. Now press and hold the [OK] key for three seconds.
SAVE WAVEFORM
Press the [SEL] key and the [+] key simultaneously. The currently displayed
waveform is stored in the EEPROM. Previously stored data will be
overwritten.
LOAD WAVEFORM
A previously stored waveform can be loaded from the EEPROM by
simultaneously pressing the [SEL] key and the [-] key.
CENTER HORIZONTAL POSITION
To center the horizontal position, move the cursor to the horizontal position
indicator via the [SEL] key. Now hold down the [OK] key for three seconds.
CENTER TRIGGER LEVEL
Select the trigger level via the [SEL] key and then hold down the [OK] key
for three seconds. The trigger level is now automatically set to the average
value of the signal amplitude.
SEND WAVEFORM
Press and hold the [SEL] key for three seconds to send the waveform data
in text form via serial port J5. The data is transmitted in the format 8N1 and
with a baud rate of 115200.
TOGGLE TEST SIGNAL AMPLITUDE
Move the cursor to the rising/falling edge setting via the [SEL] key. Now
press and hold the [OK] key for three seconds to set the test signal amplitude
to 3.3 V or 0.14 V. The amplitude is displayed via the symbol. The
amplitude is displayed here via the symbol in the upper screen area.
CALIBRATE ANALOG GAIN
Move the cursor to the trigger source setting (Int/Ext) via the [SEL] key. Now
press and hold the [OK] key for three seconds to start the calibration. Now
follow the instructions on the screen.
9. ADDITIONAL FUNCTIONS