Do you have a question about the JVC PC-X110 and is the answer not in the manual?
Performing isolation check on exposed metal parts to ensure safety from electrical shock.
Important safety standards and responsibilities for repairers and users.
Warnings and precautions related to the Class 1 Laser Product.
Instructions regarding the mains plug, fuse replacement, and wiring for UK users.
Guidelines for connecting wires in the mains lead according to color codes.
Details on controlling screw torque for the power transformer and securing the AC socket to the PCB.
Ensuring proper creeping distance and spatial separation on the PCB, and managing solder protrusions.
Confirming fuse capacity and ensuring flammable parts are lifted to prevent hazards.
Proper fixing and securing of wires on the PCB to prevent contact with live or moving parts.
Describes the multi-function CD player with remote control and its programming capabilities.
Highlights sound circuits, digital tuner, synchro-record, and double-cassette mechanism.
Details timer/clock operations, wake-up volume, and sleep timer functions.
Technical specifications for the CD player section, radio frequencies, and antennas.
Details on tape deck system, speaker units, power supply, dimensions, and weight.
Labels and descriptions of components on the top panel of the unit.
Labels and descriptions of components on the front panel, including buttons and display.
Explains the functions of power, sleep, preset, tuner, and volume controls.
Details the Multi-Bass Horn button and the SEA Electronic EQ function for sound adjustment.
Describes the tape mode switch, dubbing speed, and cassette operation buttons for Deck A.
Lists the cassette operation buttons for Deck B, including Play, Rewind, Fast Forward, Stop/Eject, and Pause.
Identifies speaker terminals, headphone jack, DC IN, AC IN, and telescopic antenna connections.
Explains the functions of various buttons on the remote control unit for different modes.
Details operations performed when holding down the SHIFT button in conjunction with other buttons.
Instructions on how to connect and disconnect the speakers from the main unit.
Step-by-step guide on how to detach the speakers from the main unit using the lock lever.
Instructions for connecting speaker cords and other connections, emphasizing safety.
Steps for playing a CD, including opening the disc holder, loading, and starting playback.
How to use the SEA (Frequency) button and VOLUME buttons to adjust EQ bands.
Method to stop CD playback by pressing the /CLEAR button.
Instructions on pausing, changing discs, and managing disc read errors.
Procedures for navigating tracks and accessing specific positions on the disc using buttons or remote.
Steps to program up to 20 tunes in a desired order and start programmed playback.
Methods to clear programmed tunes and check the details of a programmed sequence.
How to set repeat playback for a single tune or all tunes using the REPEAT button.
Instructions for random order playback and playing the first 15 seconds of each tune.
Steps for playing cassette tapes, including setting the tape switch and operating playback controls.
Procedure for setting up relay playback from Deck B to Deck A.
Steps for tuning radio, selecting FM modes (Auto/Mono), and using the tuner.
Methods for finding stations using seek, manual tuning, and automatic preset scanning.
Instructions for manually presetting stations using the remote control and preset buttons.
How to use preset scan to cycle through stations and access saved presets.
Guidance on using FM/MW/LW antennas and initial steps for recording.
Procedure for starting synchronized recording from a CD to tape, including auto spacing.
How to perform synchronized recording without the automatic 4-second gap between tracks.
Steps for normal and high-speed dubbing from Deck B to Deck A with synchro-start.
Instructions for recording radio broadcasts and erasing cassette tape content.
Identifies the buttons on the remote control used for clock and timer functions.
Step-by-step guide to set the current time on the unit using the remote control.
Detailed process for setting the timer's start and stop times using the remote control.
How to set the desired playback volume and configure fade-in for timer operations.
Procedure to check if the timer settings have been correctly applied.
How to perform timer playback and recording for tapes, broadcasts, and CDs.
Explanation of volume setting and the fade-in operation when the unit is switched on.
How to set and use the sleep timer to automatically turn off the unit and cancel the operation.
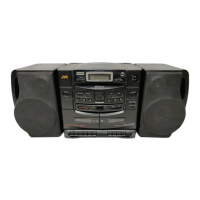
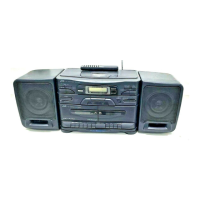
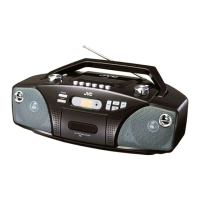
This document details the operation and maintenance of the JVC PC-X110 B/E/G/GI/EN CD Portable System, a versatile audio device designed for a range of listening and recording activities.
The PC-X110 is a multi-function CD portable system featuring a CD player, a digital synthesizer tuner, and a double-cassette mechanism.
The CD player supports programmed play of up to 20 tunes, repeat play, random play, and intro play functions. It is also capable of playing 8-cm (3-3/16") "CD singles." The CD player's operation is managed through dedicated buttons for search/skip, play/pause, and stop/clear functions, with a display window showing track numbers, playback time, and various indicators for intro scan, random play, repeat play, music calendar, and program mode.
The digital synthesizer tuner offers 2-band reception (FM and AM/MW/LW) with a capacity for 30 preset stations (15 FM and 15 AM/MW/LW). Tuning can be performed via seek, manual, auto preset, or preset scan. The tuner display shows the band, radio frequency, and indicators for mono or stereo reception, as well as preset station numbers.
The double-cassette mechanism comprises Deck A for recording and playback, and Deck B for playback only. It supports metal and CrO2 tapes for enhanced tone quality. Key features include synchro-start dubbing (normal/high speed), relay playback from Deck B to Deck A, and synchro-record start for CD recording. Cassette operations are controlled by buttons for record, play, rewind, fast forward, stop/eject, and pause. A tape mode switch allows selection between CrO2/METAL (playback only) and NORMAL tape types. The dubbing speed switch offers HIGH and NORMAL options.
The system also incorporates a Multi-Bass Horn circuit for improved low-frequency sound reproduction, activated by a dedicated button. An SEA Electronic EQ (Frequency) button allows adjustment of electronic equalizer frequency bands (100 Hz/1 kHz/10 kHz) using the volume buttons.
A 24-key remote control unit (RM-RX110) provides comprehensive control over CD and tuner operations, including power on/off, volume control, SEA electronic equalizer, and Multi-Bass Horn on/off switching. The remote also features track/tune number buttons, timer functions, and various playback mode controls (intro, random, repeat).
The PC-X110 is designed for user convenience with several integrated features:
Timer/Clock Functionality: The device includes a timer/clock function that allows for timer on/off with preset volume, a wake-up volume setting with 25 different levels, and a sleep timer adjustable up to 120 minutes. The clock can be set using the remote control, with options for adjusting hours and minutes, and displaying AM/PM. Timer operations include setting start and stop times for playback or recording, and selecting the desired volume level for timer-activated events. The volume can fade in from zero to the preset level.
Sleep Operations: For users who wish to fall asleep to music, the sleep timer can be set for 30, 60, 90, or 120 minutes. The device will automatically switch off after the specified time. The remaining sleep time can be checked by pressing the SLEEP button, which also allows for resetting the sleep duration.
Speaker System: The unit comes with detachable speakers. They can be attached to the main unit by pressing them down into the speaker slots or detached by lifting them up while pressing a lock lever at the rear bottom. Speaker cords are provided, and it is recommended to place the speakers symmetrically in relation to the main unit for optimal sound. When connecting the speaker cords, the one marked with a line should be connected to the "-" terminal first, and any slack in the cords can be bundled into a designated space in the rear panel.
The manual emphasizes several safety precautions and maintenance guidelines to ensure the longevity and safe operation of the PC-X110:
This comprehensive manual ensures users can effectively operate and maintain their JVC PC-X110 B/E/G/GI/EN CD Portable System, understanding both its capabilities and the necessary safety measures.
| CD Player | Yes |
|---|---|
| Cassette Player | Yes |
| Channels | 2 (Stereo) |
| Dynamic Range | 85 dB |
| Type | CD Player |
| Frequency Response | 20Hz to 20kHz |