13
Basic Settings
Speaker distance
Register the unit you use, then the speaker distance from your
listening point.
• If you have set the unit before, start from step
3
.
• Speaker distance is not valid for the DVD MULTI playback mode.
1
Press SETTING repeatedly until
“UNIT” (with the current setting)*
appears on the display.
* “METER” is the initial setting. If you have already changed the
setting, “FEET” will be shown.
2
Press CONTROL UP 5/DOWN ∞ to
select the unit.
• Each time you press the button, the setting
alternates between “METER” and “FEET.”
METER : Speaker distance is shown in meter.
FEET : Speaker distance is shown in feet.
3
Press SETTING repeatedly until
“FRNT DIS (Front distance),” “CNTR
DIS (Center distance),” or “REAR DIS
(Rear distance)” (with the current setting)*
appears on the display.
• The display shows the current setting in the unit selected in
step
2
.
* “3.0m” is the initial setting for meter and “10FT” is for feet. If
you have already changed the setting, another value will be
shown.
4
Press CONTROL UP 5/DOWN ∞
to select the appropriate speaker
distance.
• If you have selected “METER” in step
2
, the
value is changed from “0.3m” to “9.0m” by 0.3 m step.
• If you have selected “FEET” in step
2
,
the value is changed
from “1FT” to “30FT” by 1 foot step.
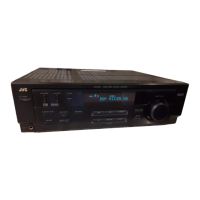
Example: In this case,
set “FRNT DIS” to “3.0m” or “10FT,”
set “CNTR DIS” to “2.7m” or “9FT” and,
set “REAR DIS” to “2.4m” or “8FT.”
Note:
If you have selected “NONE” for the center and rear speakers
setting, you cannot set the speaker distance for the center and rear
speakers.
Speaker size
Register the sizes of all the connected speakers.
• When you change your speakers, register the information about the
speakers again.
1
Press SETTING repeatedly until
“FRNT SP (Front speaker),” “CNTR
SP (Center speaker),” or “REAR SP
(Rear speaker)” (with the current setting)
appears on the display.
2
Press CONTROL UP 5/DOWN ∞ to
select the appropriate item about the
speaker selected in the above step.
• Each time you press the button, the display
changes as follows:
LARGE : Select this when the speaker size is relatively large.
(See “Notes” below.)
SMALL : Select this when the speaker size is relatively small.
(See “Notes” below.)
NONE : Select this when you have not connected a speaker.
(Not selectable for the front speakers)
3
Repeat step
1
and
2
to select the appropriate
items for other speakers.
Notes:
• Keep the following comment in mind as reference when adjusting.
– If the size of the cone speaker unit built in your speaker is greater
than 12 cm (4
3
/
4
inches), select “LARGE,” and if it is smaller than
12 cm (4
3
/
4
inches), select “SMALL.”
• If you have selected “NO” for the subwoofer setting, you can only
select “LARGE” for the front speaker setting.
• If you have selected “SMALL” for the front speaker setting, you
cannot select “LARGE” for the center and rear speaker settings.
3.0 m
(10 feet)
Left front
speaker
Right front
speaker
Right rear
speaker
Left rear
speaker
Center speaker
2.7 m
(9 feet)
2.4 m
(8 feet)
2.1 m
(7 feet)
EN08-17.RX-6020V[J]_f 01.12.7, 4:17 PM13