WWW.KAARTA.COM 12
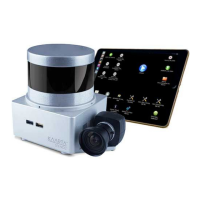
EXTERNAL CONTROLLER COMPONENTS
CONTROLLER P OWER/OPERATING BUTTONS
Start Scanning Push the
button to begin scanning. The LED ring around
the button turns from blue to green or teal when Stencil Pro
scanning has started (takes approximately 4-5 seconds).
To stop scanning, push the Scan button. The LED ring around
the button turns from green/teal to yellow while saving, then
returns to a blue ready state. Wait for the blue indicator
before powering off or beginning a new scan.
Switch
Turn the switch up to power on the controller. To utilize shore
power, connect the controller’s AC adapter. It is recommended
to remove the batteries when using shore power, as the
batteries will continue to drain if they remain in the V-mounts.
If shore power is not connected, the system utilizes battery
power. The V-mount batteries are not charged via Stencil
Pro’s shore power connection and should be charged with
the supplied AC battery charger.
Turn the switch down to turn off the controller.
CONTROLLER CONNECTORS AND PORTS
The USB-C connector can be used for high-speed USB 3.0 drives for
fast data transfers.
There are two USB-A ports on the controller. The USB-A ports can
be used with the wireless mouse/keyboard dongle for easier
The HDMI port can be used with the included Wi-Fi dongle to
connect wirelessly to the iPad.
The controller’s Power Connector supplies power to the Scanner.
The controller’s Data Connector supplies data to the Scanner.
Connector
The Shore Power Connector supplies electrical power to the device
through the controller’s AC Adapter (input voltage: 100-240 VAC or
12V with an inverter).